Build, launch, and operate DigiKash {{V}} with confidence.
A Laravel wallet, merchant gateway, P2P marketplace, virtual-card platform, and payment-operations suite. This guide walks you from a blank server to a live, production-grade installation — and covers every module you will use day to day.
What's New in DigiKash {{V}}
Version {{V}} headlines a Vendor Marketplace with automatic commission splits, automated KYC through Smile ID / ShuftiPro / Sumsub, and a Crypto Hub for multi-chain USDT deposits and withdrawals — on top of the International Remittance engine, P2P order chat, Golden theme, RTL multi-language, multi-provider virtual cards, feature flags, mobile recharge, subscriptions, wallet staking, agent operations, and OTA updater from the 2.0 line. All on Laravel with PHP 8.3+.
Vendor Marketplace New in {{V}}
Multi-vendor storefront with vendor applications, categories, an admin vendor manager, suspension workflow, orders, and wallet-settled checkout.
Commission Split New in {{V}}
Every marketplace order settles atomically between the vendor wallet and your platform commission account — percentage + fixed fee, order limits, auto-release, and payout hold.
Automated KYC New in {{V}}
Smile ID, ShuftiPro, and Sumsub drivers with per-country routing, credential vault, connection testing, a decision engine, and verification webhooks.
Crypto Hub New in {{V}}
USDT / USDC deposits and withdrawals via Bitnob with deposit addresses on Ethereum, Polygon, Base, Solana, Tron, and BSC — plus signature-verified webhooks.
International Remittance Improved
Cross-border transfers hardened with pluggable compliance screening, payout routing, a status-event timeline, reconciliation jobs, and an admin operations screen.
P2P Order Chat New
In-escrow buyer/seller messaging with live polling, unread tracking, and a dedicated rate-limit bucket — plus a demo-trading seeder to preview the marketplace.
Golden Theme & Brand Colors New
A second site-wide theme — luxury obsidian + gold — selectable alongside Classic, with admin-controlled accent colors from Site Settings.
RTL Multi-language Improved
Full right-to-left support and a redesigned Language Manager — add locales, edit strings inline, and reposition the switcher.
P2P Marketplace New
Peer-to-peer trading rooms with offer ads, escrow orders, payment-method directory, disputes, promotions, and trader profiles.
Multi-provider Virtual Cards Improved
Stripe Issuing, StroWallet, and Bitnob in a single abstraction. Per-provider capabilities for issuance, top-up, withdraw, freeze, and limits.
Feature Controls New
Toggle every revenue module per panel (user / merchant / agent), set KYC and phone-verification gates, and control country allow-lists.
Agent Operations New
Dedicated agent panel, commission rule engine, and operations workflow for cash-in / cash-out agents.
Wallet Earn New
Stake wallet balances in configurable plans and pay scheduled rewards through background jobs.
Subscriptions New
Tier-based plans with pricing cycles, feature limits, renewals, cancellations, and subscription transactions.
Mobile Recharge New
Recharge mobile numbers from wallet balance through pluggable providers — Sandbox, Reloadly, or any HTTP API.
Project Updater Improved
Signed OTA releases, SHA-256 verification, recovery backups, and automatic migrations — all from the admin panel.
Redesigned Control Panel Improved
Searchable, categorized shortcuts to every admin tool — built on top of the live feature catalog.
PHP 8.3+ & Laravel 11 Upgraded
Streamlined bootstrap, attribute-based middleware, and modern PHP performance across the stack.
Security Hardening Improved
Account-status checks, IP block lists, login activity logs, throttled phone verification, and 2FA across panels.
Server Requirements
Prepare the server before opening the installer. The wizard checks your PHP version, required extensions, and writable paths — and refuses to continue until everything turns green.
Minimum Software
PHP 8.3 or higher
PHP 8.4 is recommended where available. Keep the CLI and web-server PHP versions identical.
MySQL, MariaDB, or SQLite
MySQL / MariaDB installs import DB/digikash.sql. SQLite installs run migrations + seeders instead.
Apache or Nginx
Document root must point to public/. Apache must allow .htaccess rewrite rules.
HTTPS
A valid SSL certificate is mandatory before going live — payment callbacks, PWA features, and push will not work otherwise.
Required PHP Extensions
| Extension | Purpose |
|---|---|
bcmath | High-precision money arithmetic across wallet, fees, and exchange. |
ctype, tokenizer, mbstring | Core Laravel string handling. |
dom, libxml, xml | QR codes, PDF receipts, and XML payloads. |
fileinfo | File upload validation (KYC docs, logos, page assets). |
json | Settings, feature catalog, API payloads. |
openssl | Sessions, tokens, signed updater verification. |
pdo, pdo_mysql | Database connection. |
zip | Project Updater package extraction and recovery backups. |
curl + allow_url_fopen | Recommended for outbound gateway, license, and updater requests. |
Writable Directories
.env— the installer writes app and DB settings here.storage/— logs, uploads, sessions, cache, backups, generated PDFs.bootstrap/cache/— optimized framework cache files.
A queue worker is required for email, notifications, payment-jobs, virtual-card syncing, and updater steps.
Useful Commands
php artisan queue:work --tries=3 --timeout=90php artisan storage:linkphp artisan optimize:clearInstallation Wizard
DigiKash installs through a friendly 6-step web wizard at /install — no manual .env editing and no importing SQL by hand. If you can fill in a web form, you can install DigiKash. Most people finish in under 10 minutes.
After extracting digikash.zip from your Envato downloads you'll find two items (plus the licence certificate Envato attaches automatically):
core-v{{V}}.zip— the Laravel application. This is the file you upload to your server.documentation/index.html— an offline copy of this guide, for reference without an internet connection.
The full, always-current documentation lives online at digidoc.coevs.com — bookmark it for the latest screenshots and release notes. The offline copy in the download mirrors it at release time.
Part 1 — Prepare your server
Do these one-time steps before opening the wizard — they get your files, domain, and database ready. If you're on shared hosting, everything here can be done from cPanel.
Download & unzip on your computer
Download digikash.zip from your Envato Downloads page and extract it. You only need core-v{{V}}.zip for the install — the documentation/ folder is just the offline copy of these docs (latest version always at digidoc.coevs.com).
Upload the app to your hosting
Upload only core-v{{V}}.zip into your public_html/ (or the folder for your domain). Use cPanel File Manager, FTP, or SSH — whichever you're comfortable with.
Extract it on the server
Right-click the uploaded zip → Extract (cPanel), or run unzip core-v{{V}}.zip over SSH. You'll get folders like app/, public/, storage/, and vendor/.
Point your domain at public/
Set your domain's document root to the public/ folder. This is the single most important step for security — it keeps .env, source code, and backups out of public reach.
Make a few folders writable
Ensure .env, storage/, and bootstrap/cache/ are writable by PHP. On Linux, permission 775 with correct ownership is usually enough.
Create an empty database
Create a MySQL/MariaDB database and a user, then grant that user all privileges on it. Leave the database empty — the wizard fills it in for you. Note the name, user, and password for Step 4 of the wizard.
Copy your Envato purchase code
From Envato Downloads → License certificate & purchase code (text), copy the purchase code. You'll paste it in Step 3 of the wizard.
Part 2 — Walk through the installer
Open https://yourdomain.com/install in your browser — until DigiKash is installed, every page on your domain redirects here. A progress bar tracks where you are, and each step must pass its checks before the next one unlocks, so you can't skip anything by accident. Here's what each screen looks like:
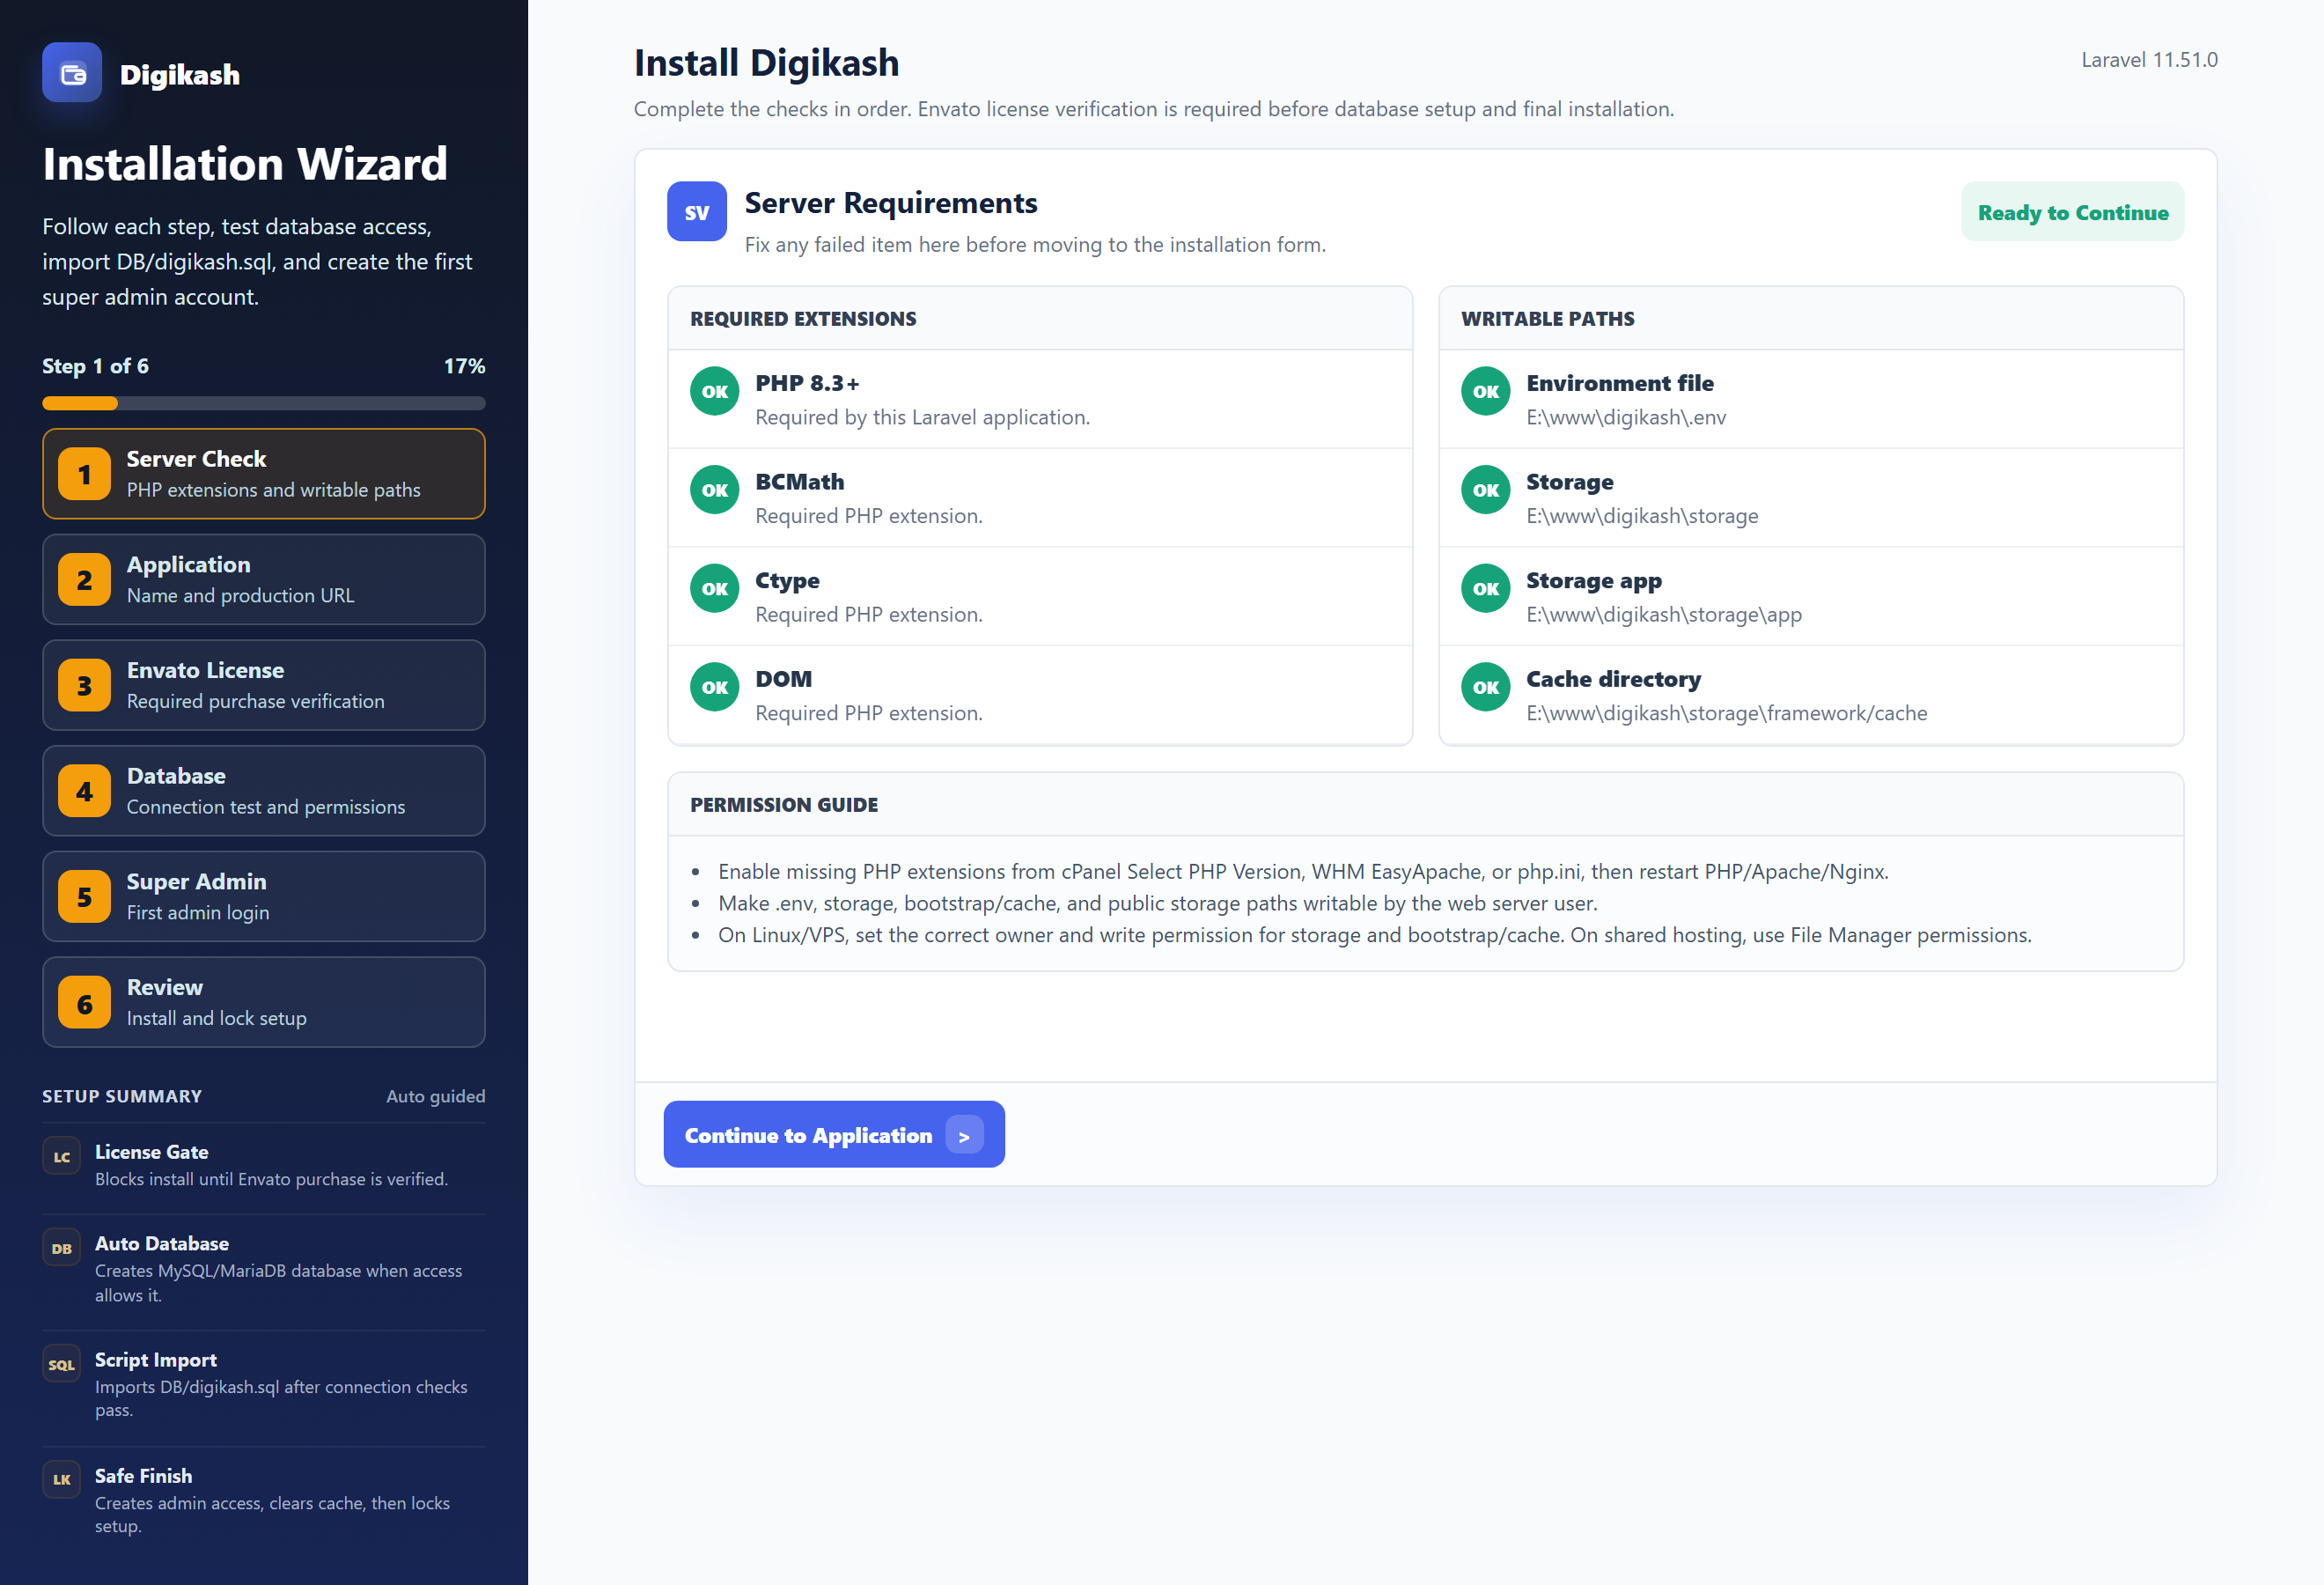
Step 1 — Server Check. The wizard inspects your server and shows a green OK for every required PHP extension and writable path. Fix any red item, then press Continue to Application.
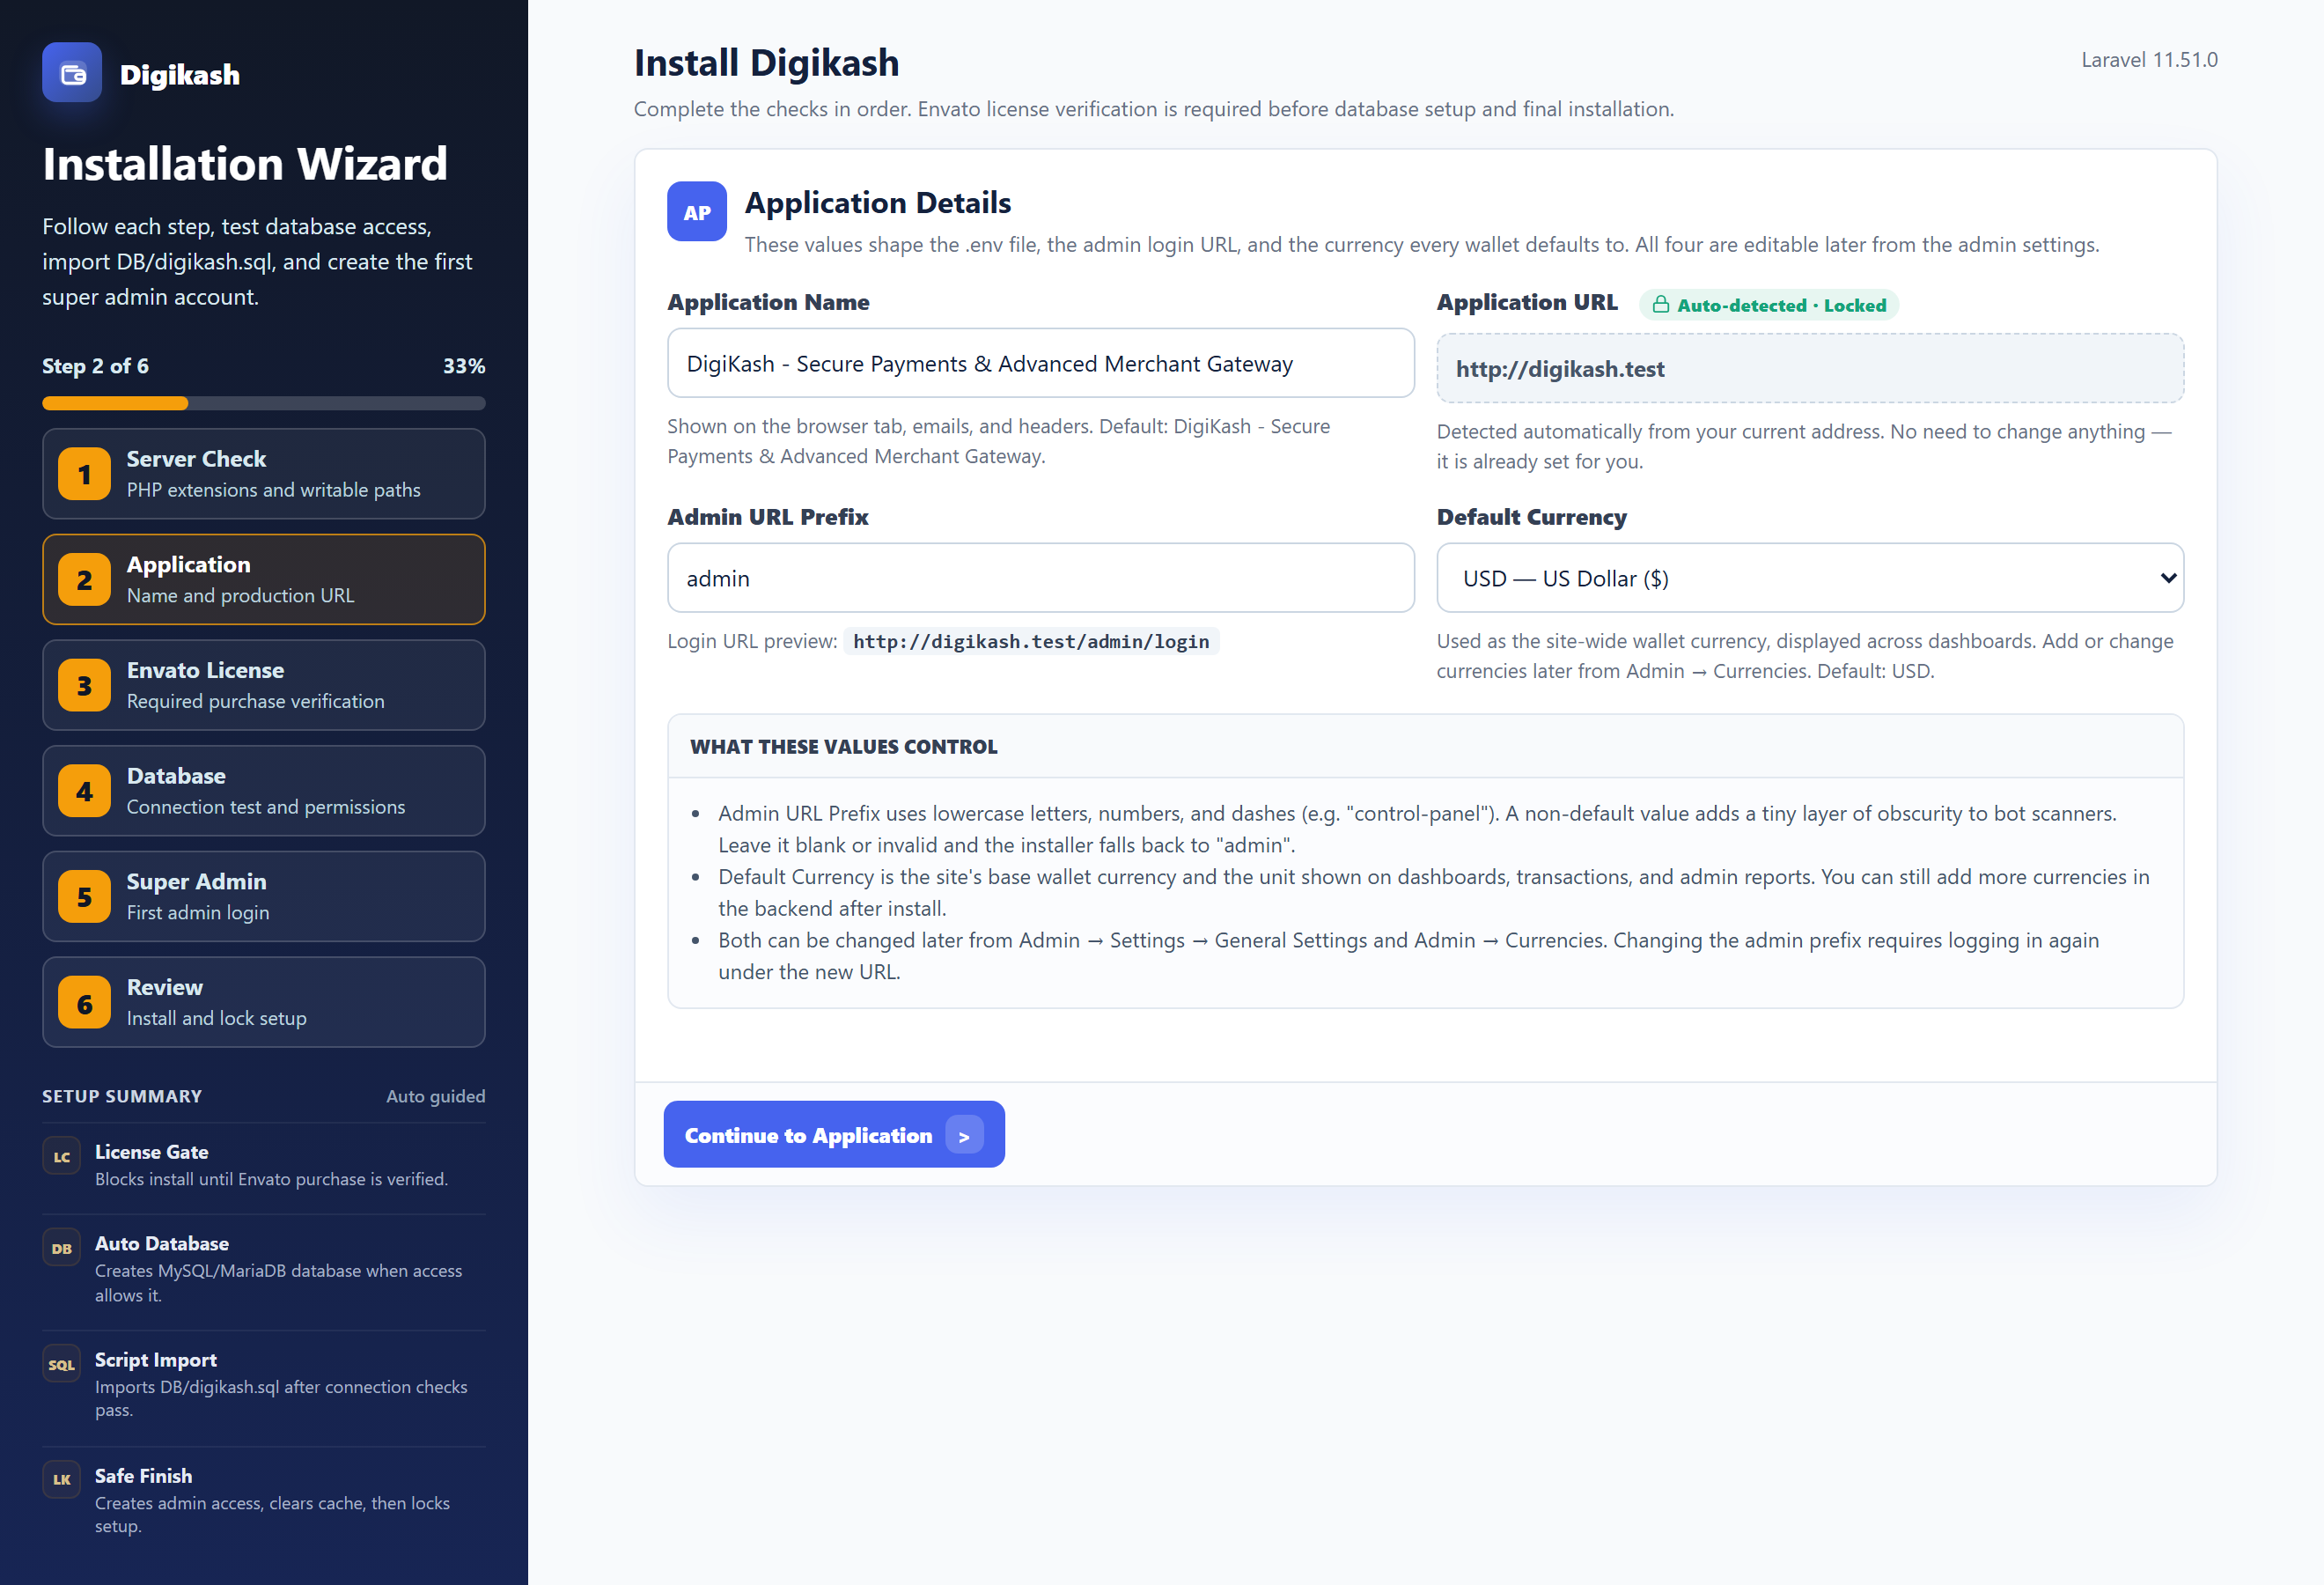
Step 2 — Application. Set your site name, confirm the auto-detected URL, choose an admin URL prefix, and pick the default currency. All four are editable later from admin settings.
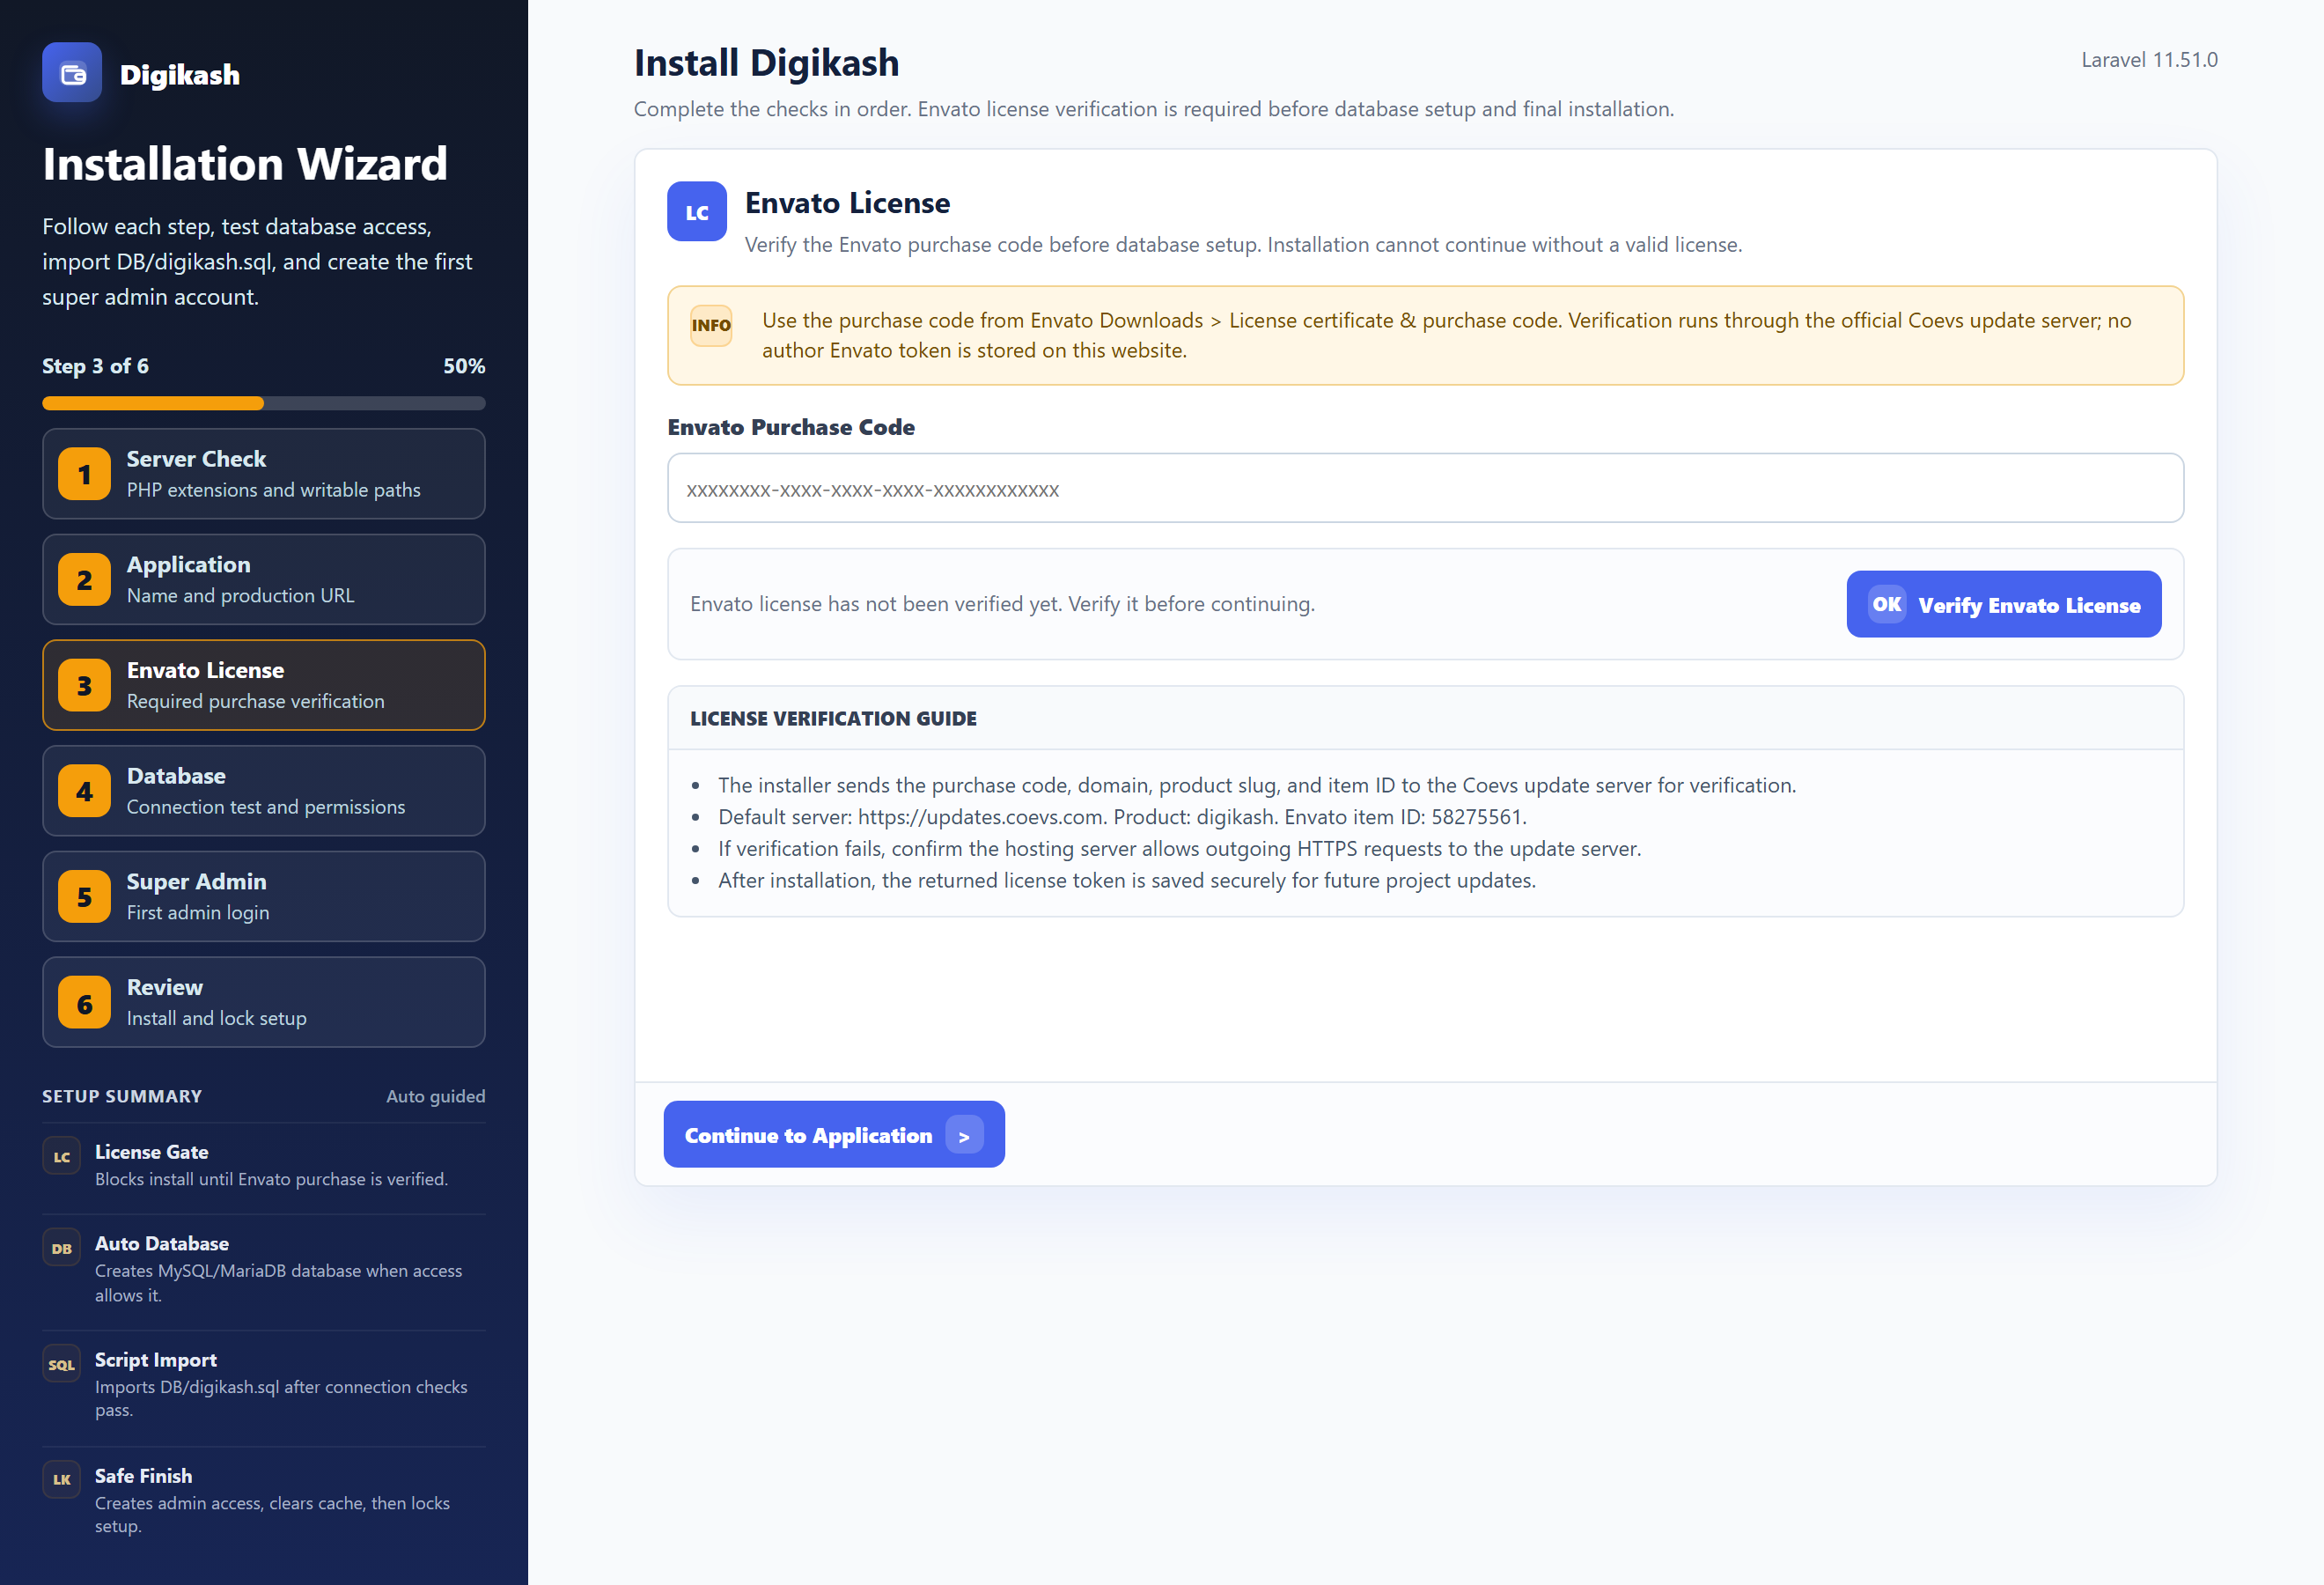
Step 3 — Envato License. Paste your purchase code and click Verify Envato License. This confirms your copy is genuine and links it for future updates. The check runs against the official Coevs update server — no token is stored on your site.
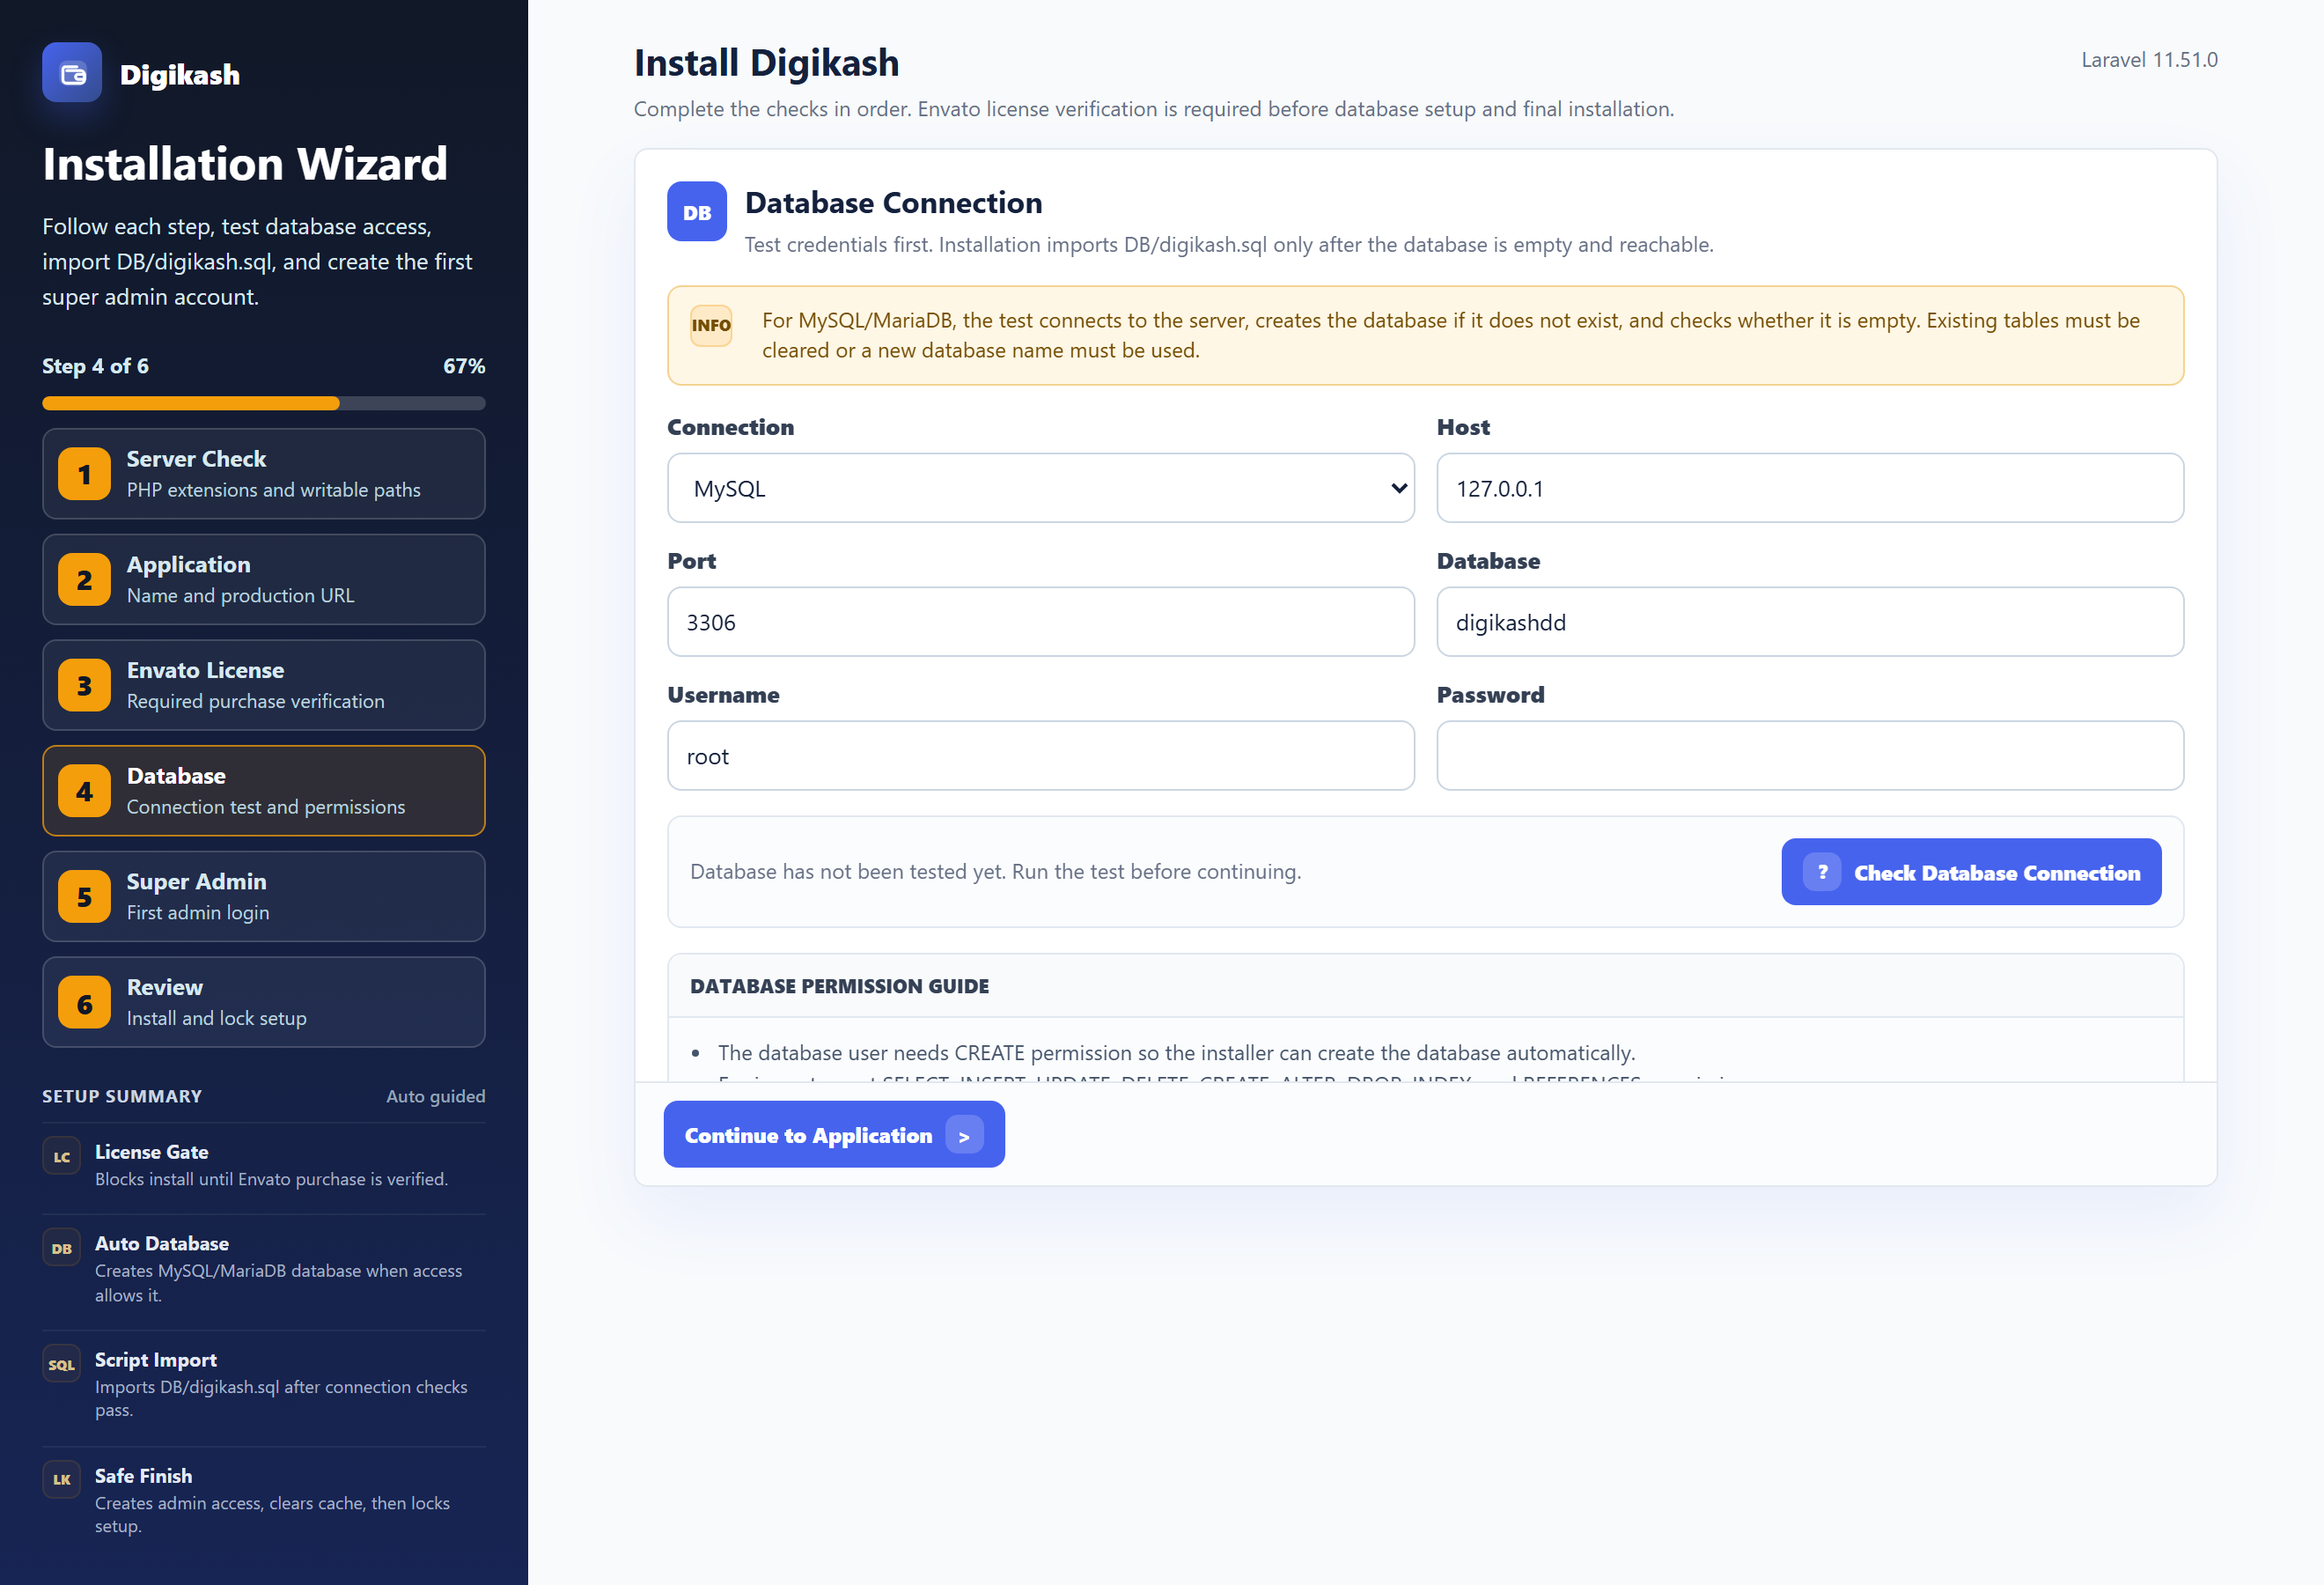
Step 4 — Database. Enter the database name, user, and password you created in Part 1, then click Check Database Connection and wait for the green success message before continuing. Leave the database empty — the installer imports DB/digikash.sql for you.
Step 5 — Super Admin. Enter your name, email, and password. This becomes your admin login — there is no default password, so keep it safe.
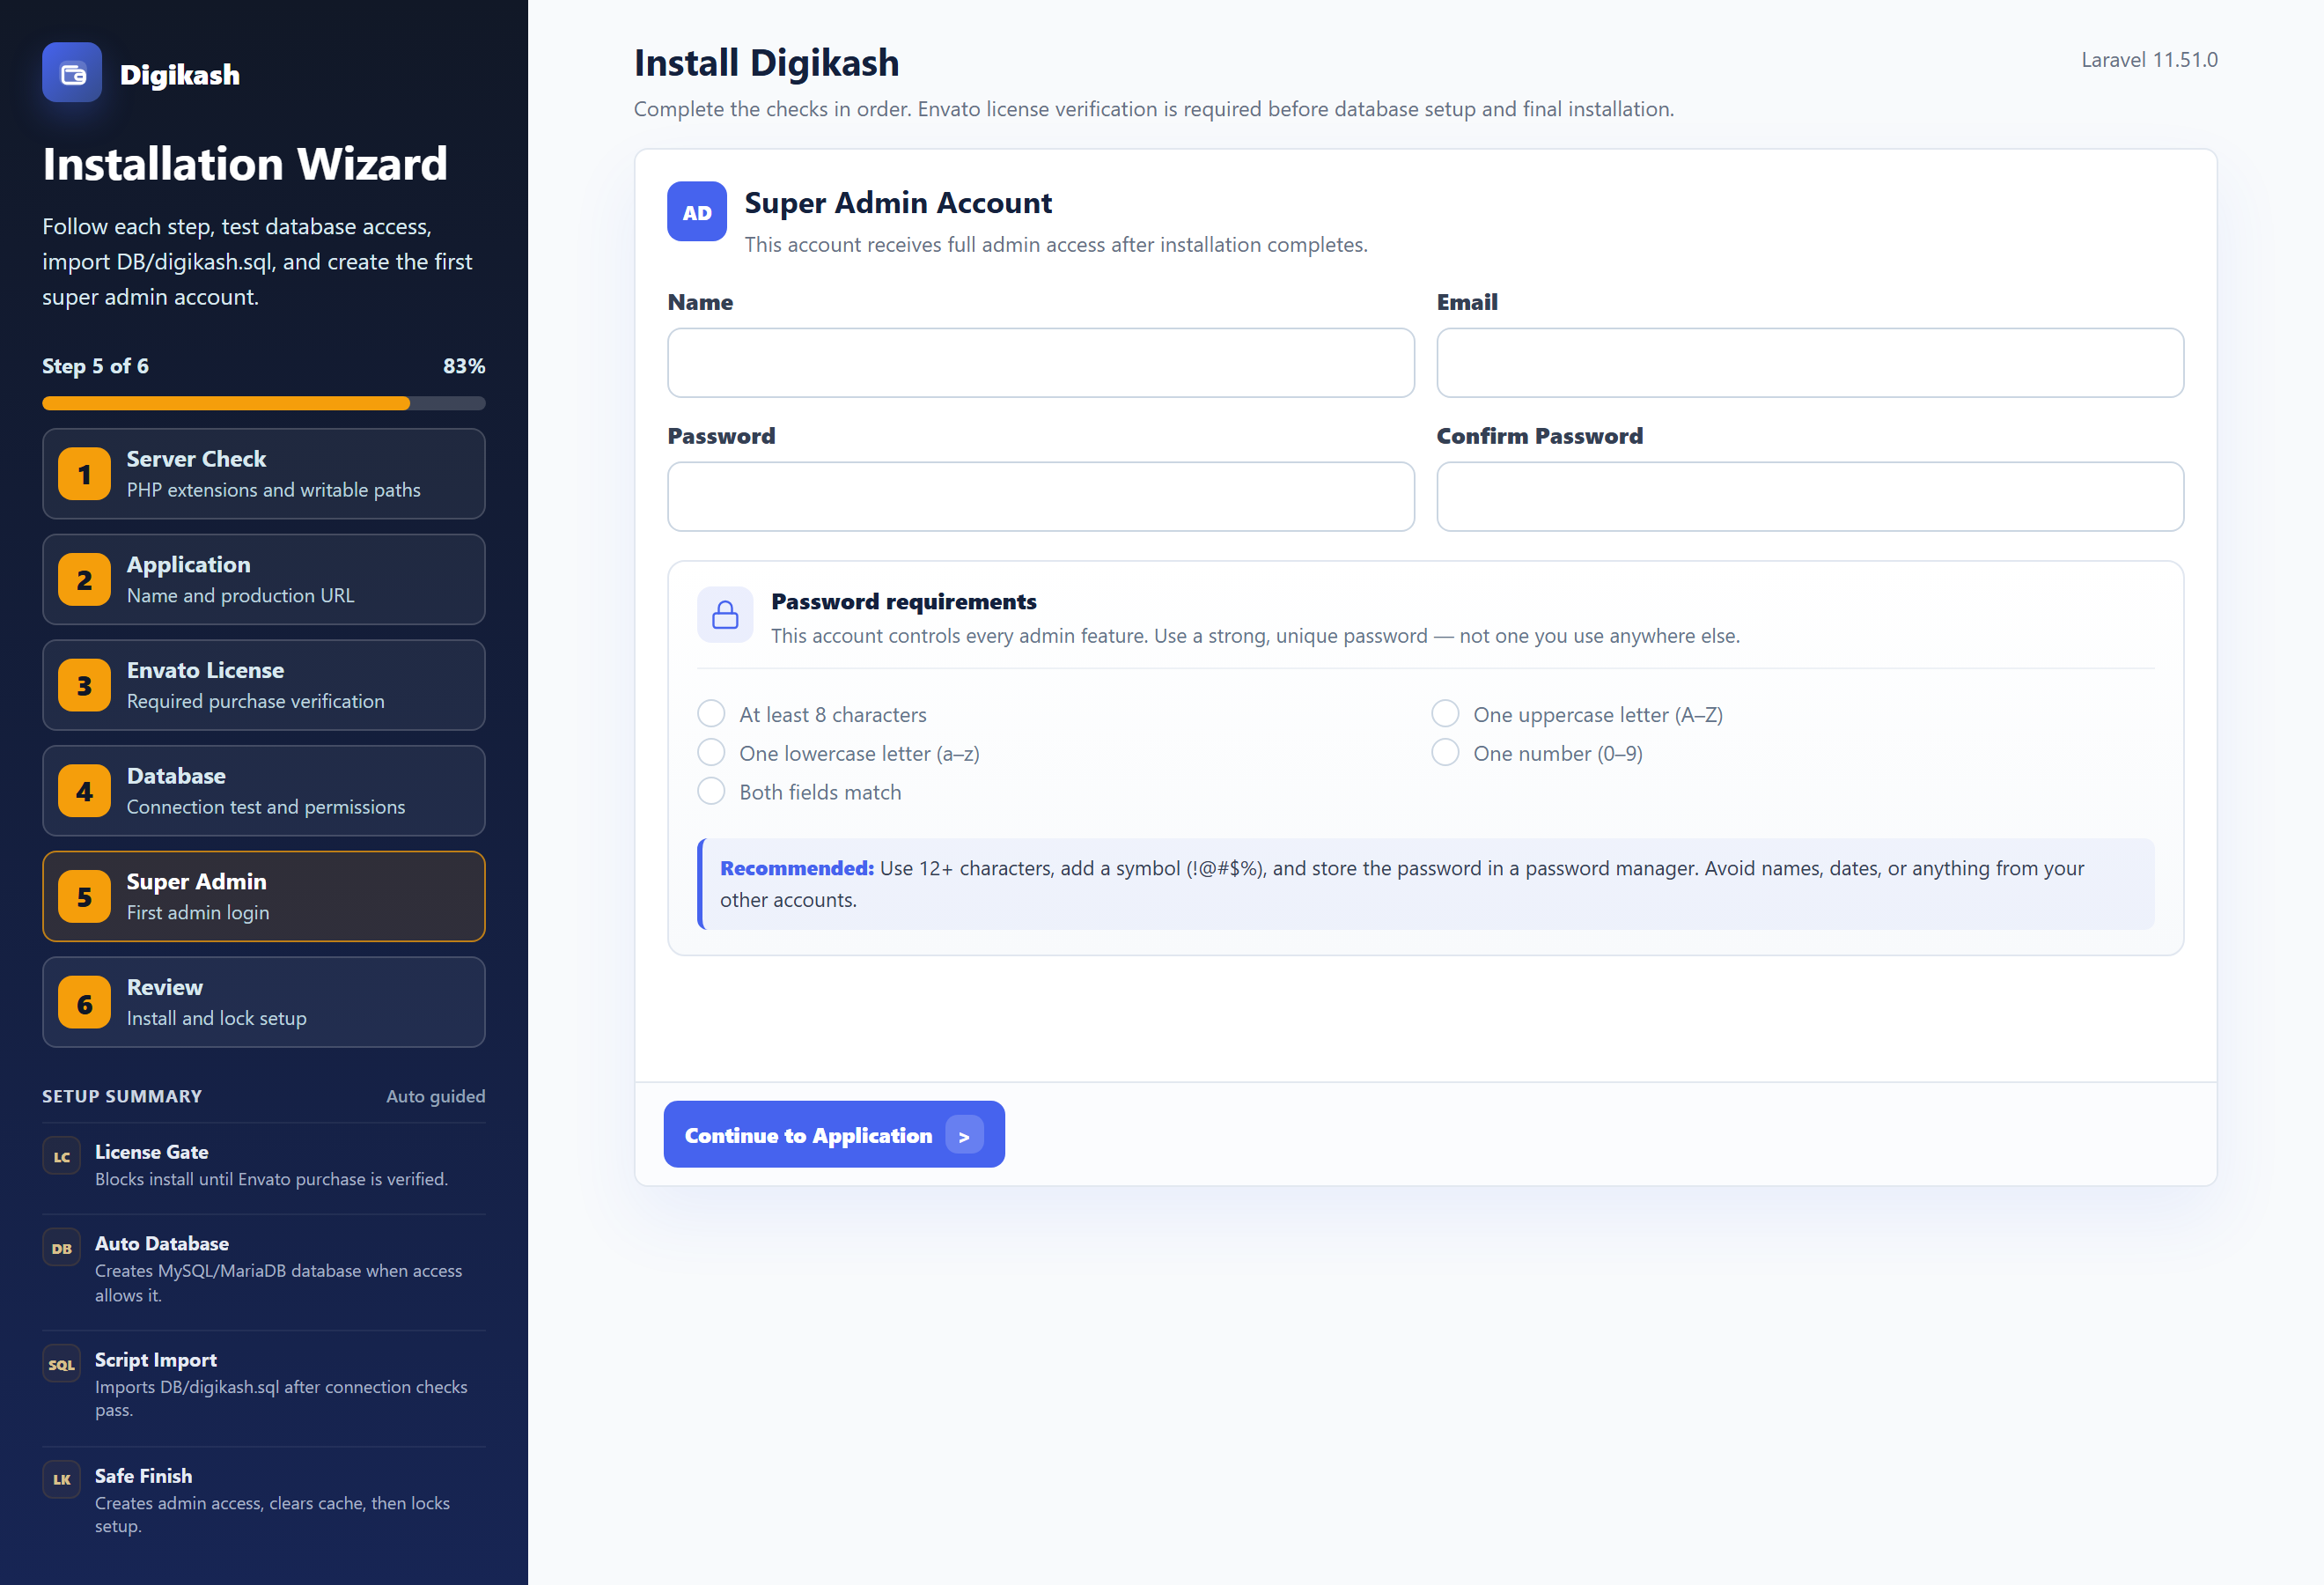
Step 6 — Review. A final summary of everything above, with each setup task listed in order. Confirm it, then press Start Installation — DigiKash writes .env, imports the database, creates your admin, clears caches, and sends you to /admin/login.
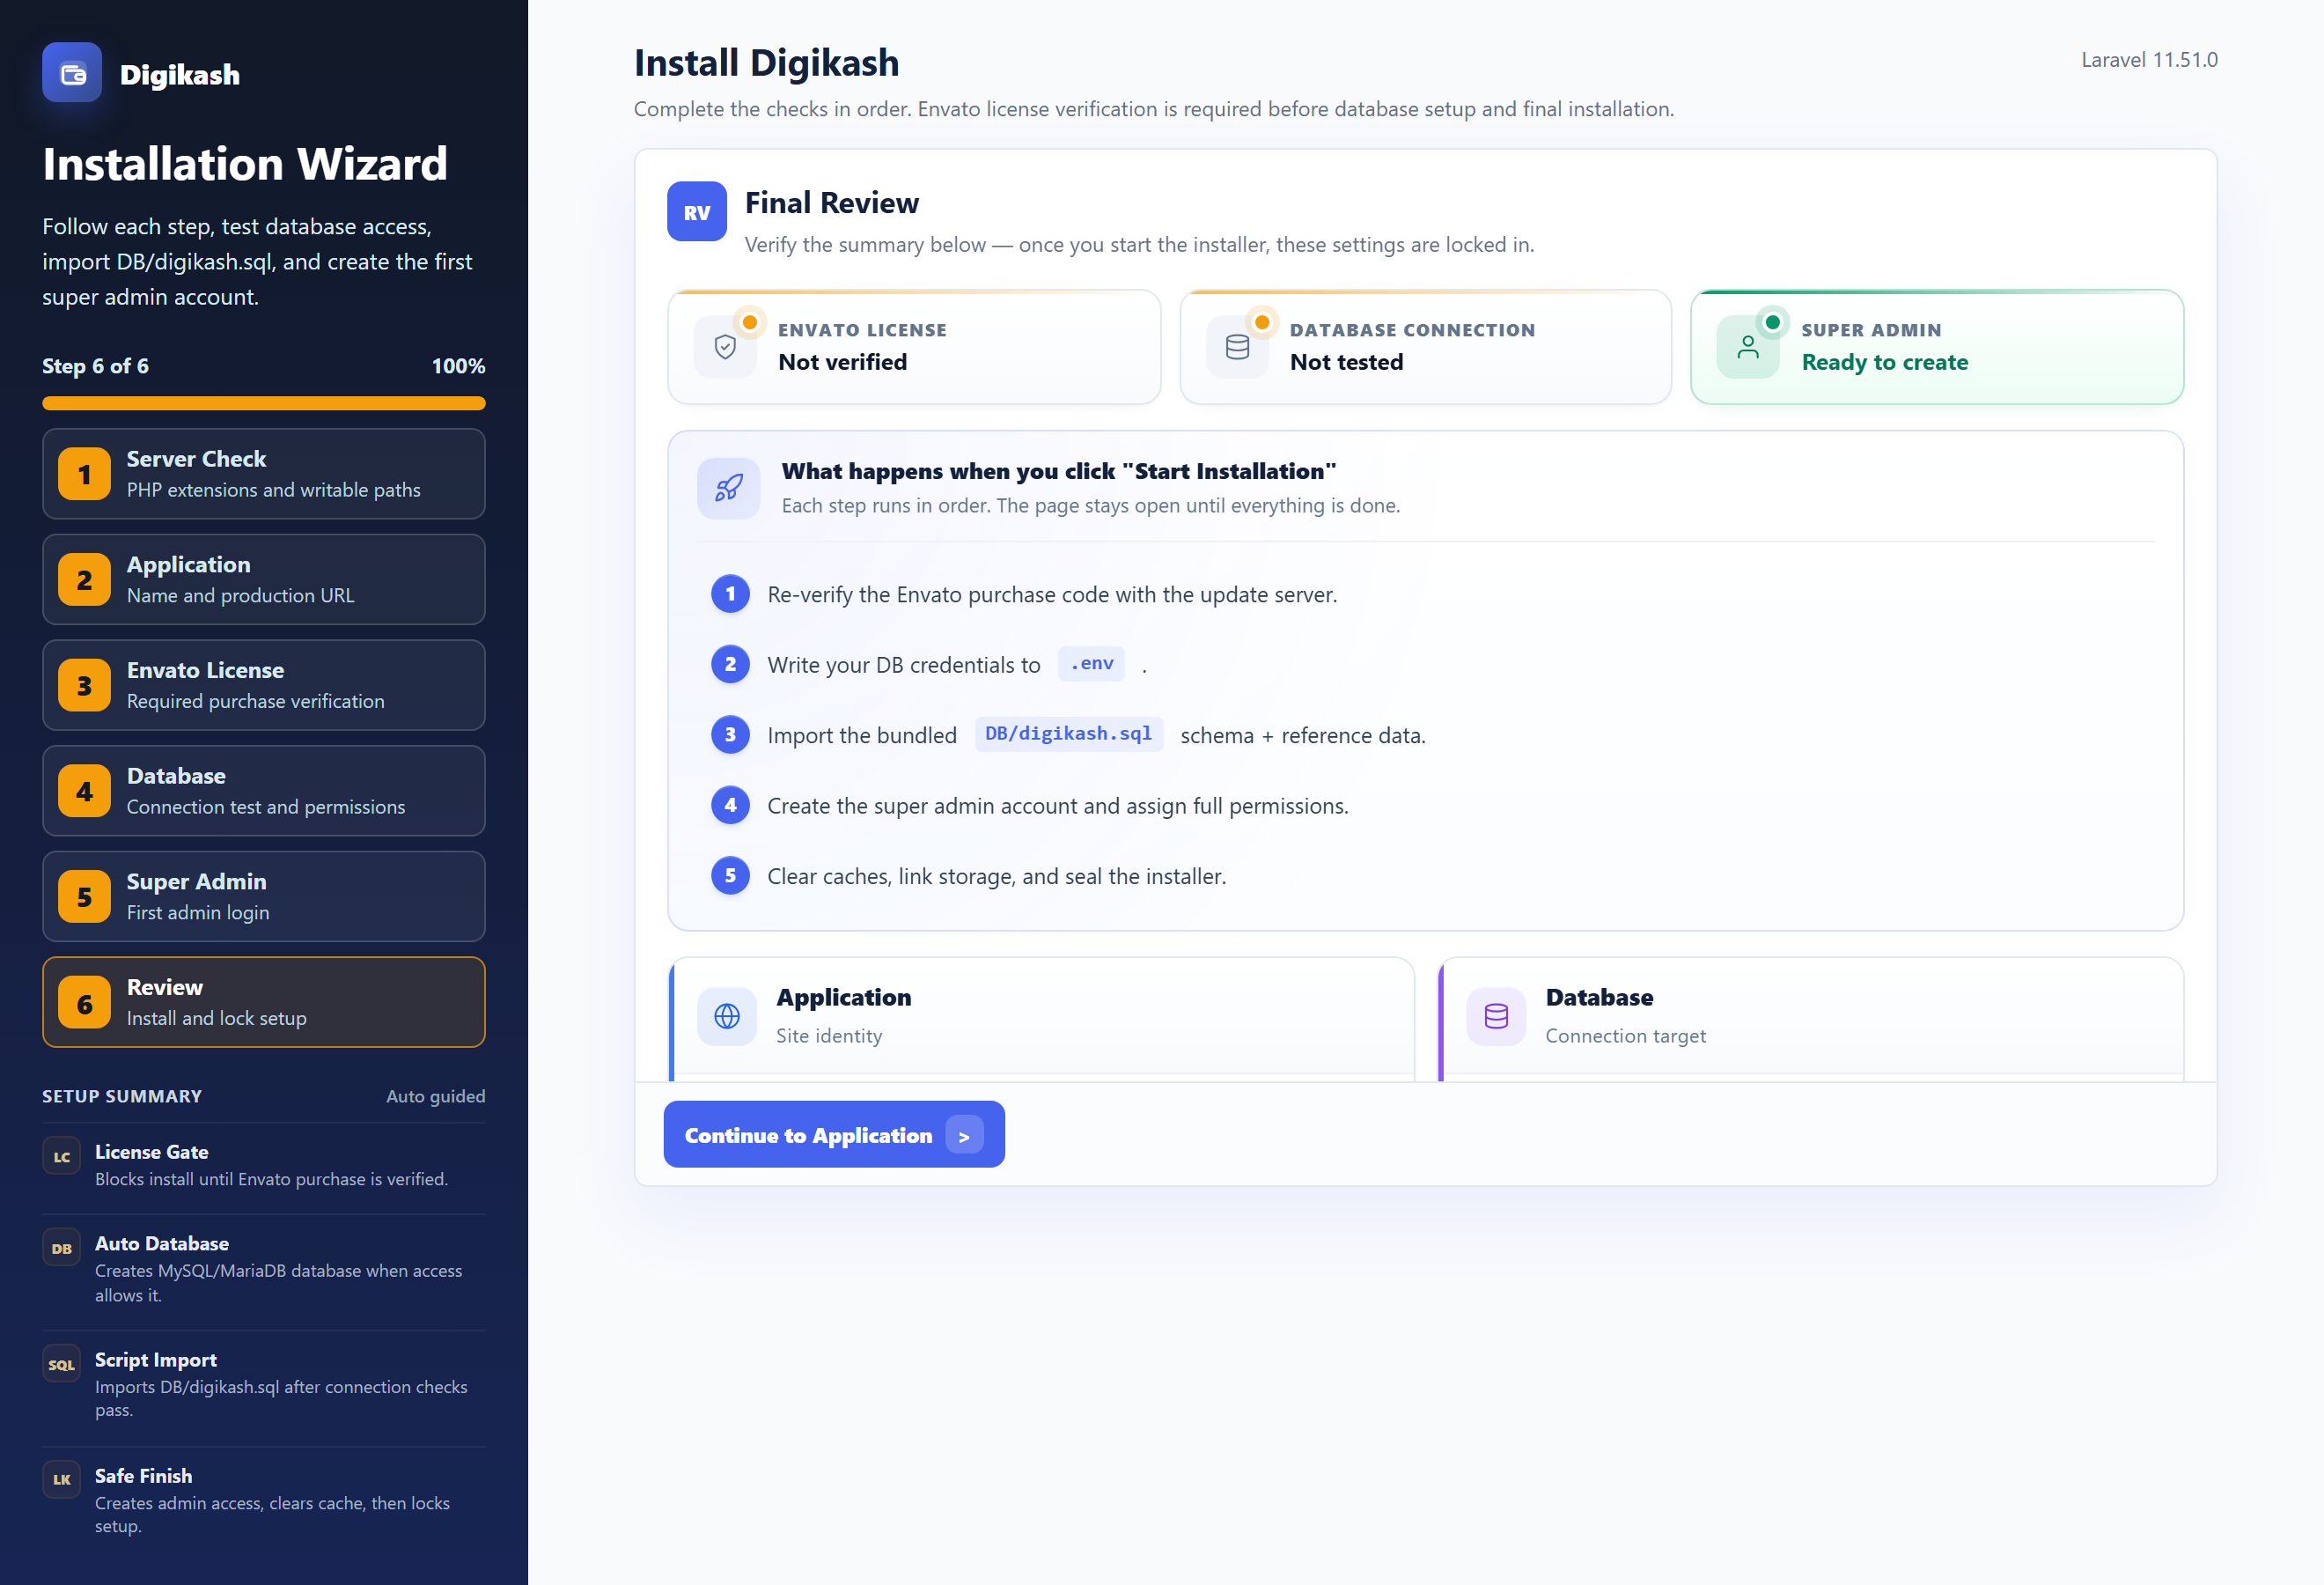
The wizard drops you at /admin/login. Sign in with the Super Admin you just created, then work through the Post-install Checklist to switch on automation, mail, payments, and security before going live.
Confirm the purchase code is correct and is for DigiKash (not another item), and that your server can make outbound HTTPS requests. The code is checked against the Coevs update server — only your own license record is saved on your site.
Use File Manager to upload & extract the zip, MySQL Databases to create the database and user, and Domains to point the document root at public/. If your host blocks document-root changes, ask their support before moving files.
Post-install Checklist
DigiKash is installed. Sign in at yourdomain.com/admin/login with the super-admin account you created in the wizard — then work through the steps below. Each one tells you exactly where to go in the admin panel and what to do there.
Step 1 — Turn on background automation Do this first
This is the one step people skip. Until you add a single cron line to your server, nothing runs on a schedule — P2P orders won't expire, Wallet Earn won't pay out, subscription renewals won't charge, and queued emails & payment jobs never send. DigiKash gives you the exact line to copy; you don't have to write it.
What to do: open that page, press Copy on the cron entry (it's pre-filled with your real PHP binary and project path), then paste it into your server's crontab — run crontab -e over SSH, or use cPanel → Cron Jobs. That single line is all the scheduling DigiKash needs. The same page also has a one-click cron-expression builder and the exact queue-worker commands for your host.
/admin/background-tasks/scheduler · copy the cron line from here
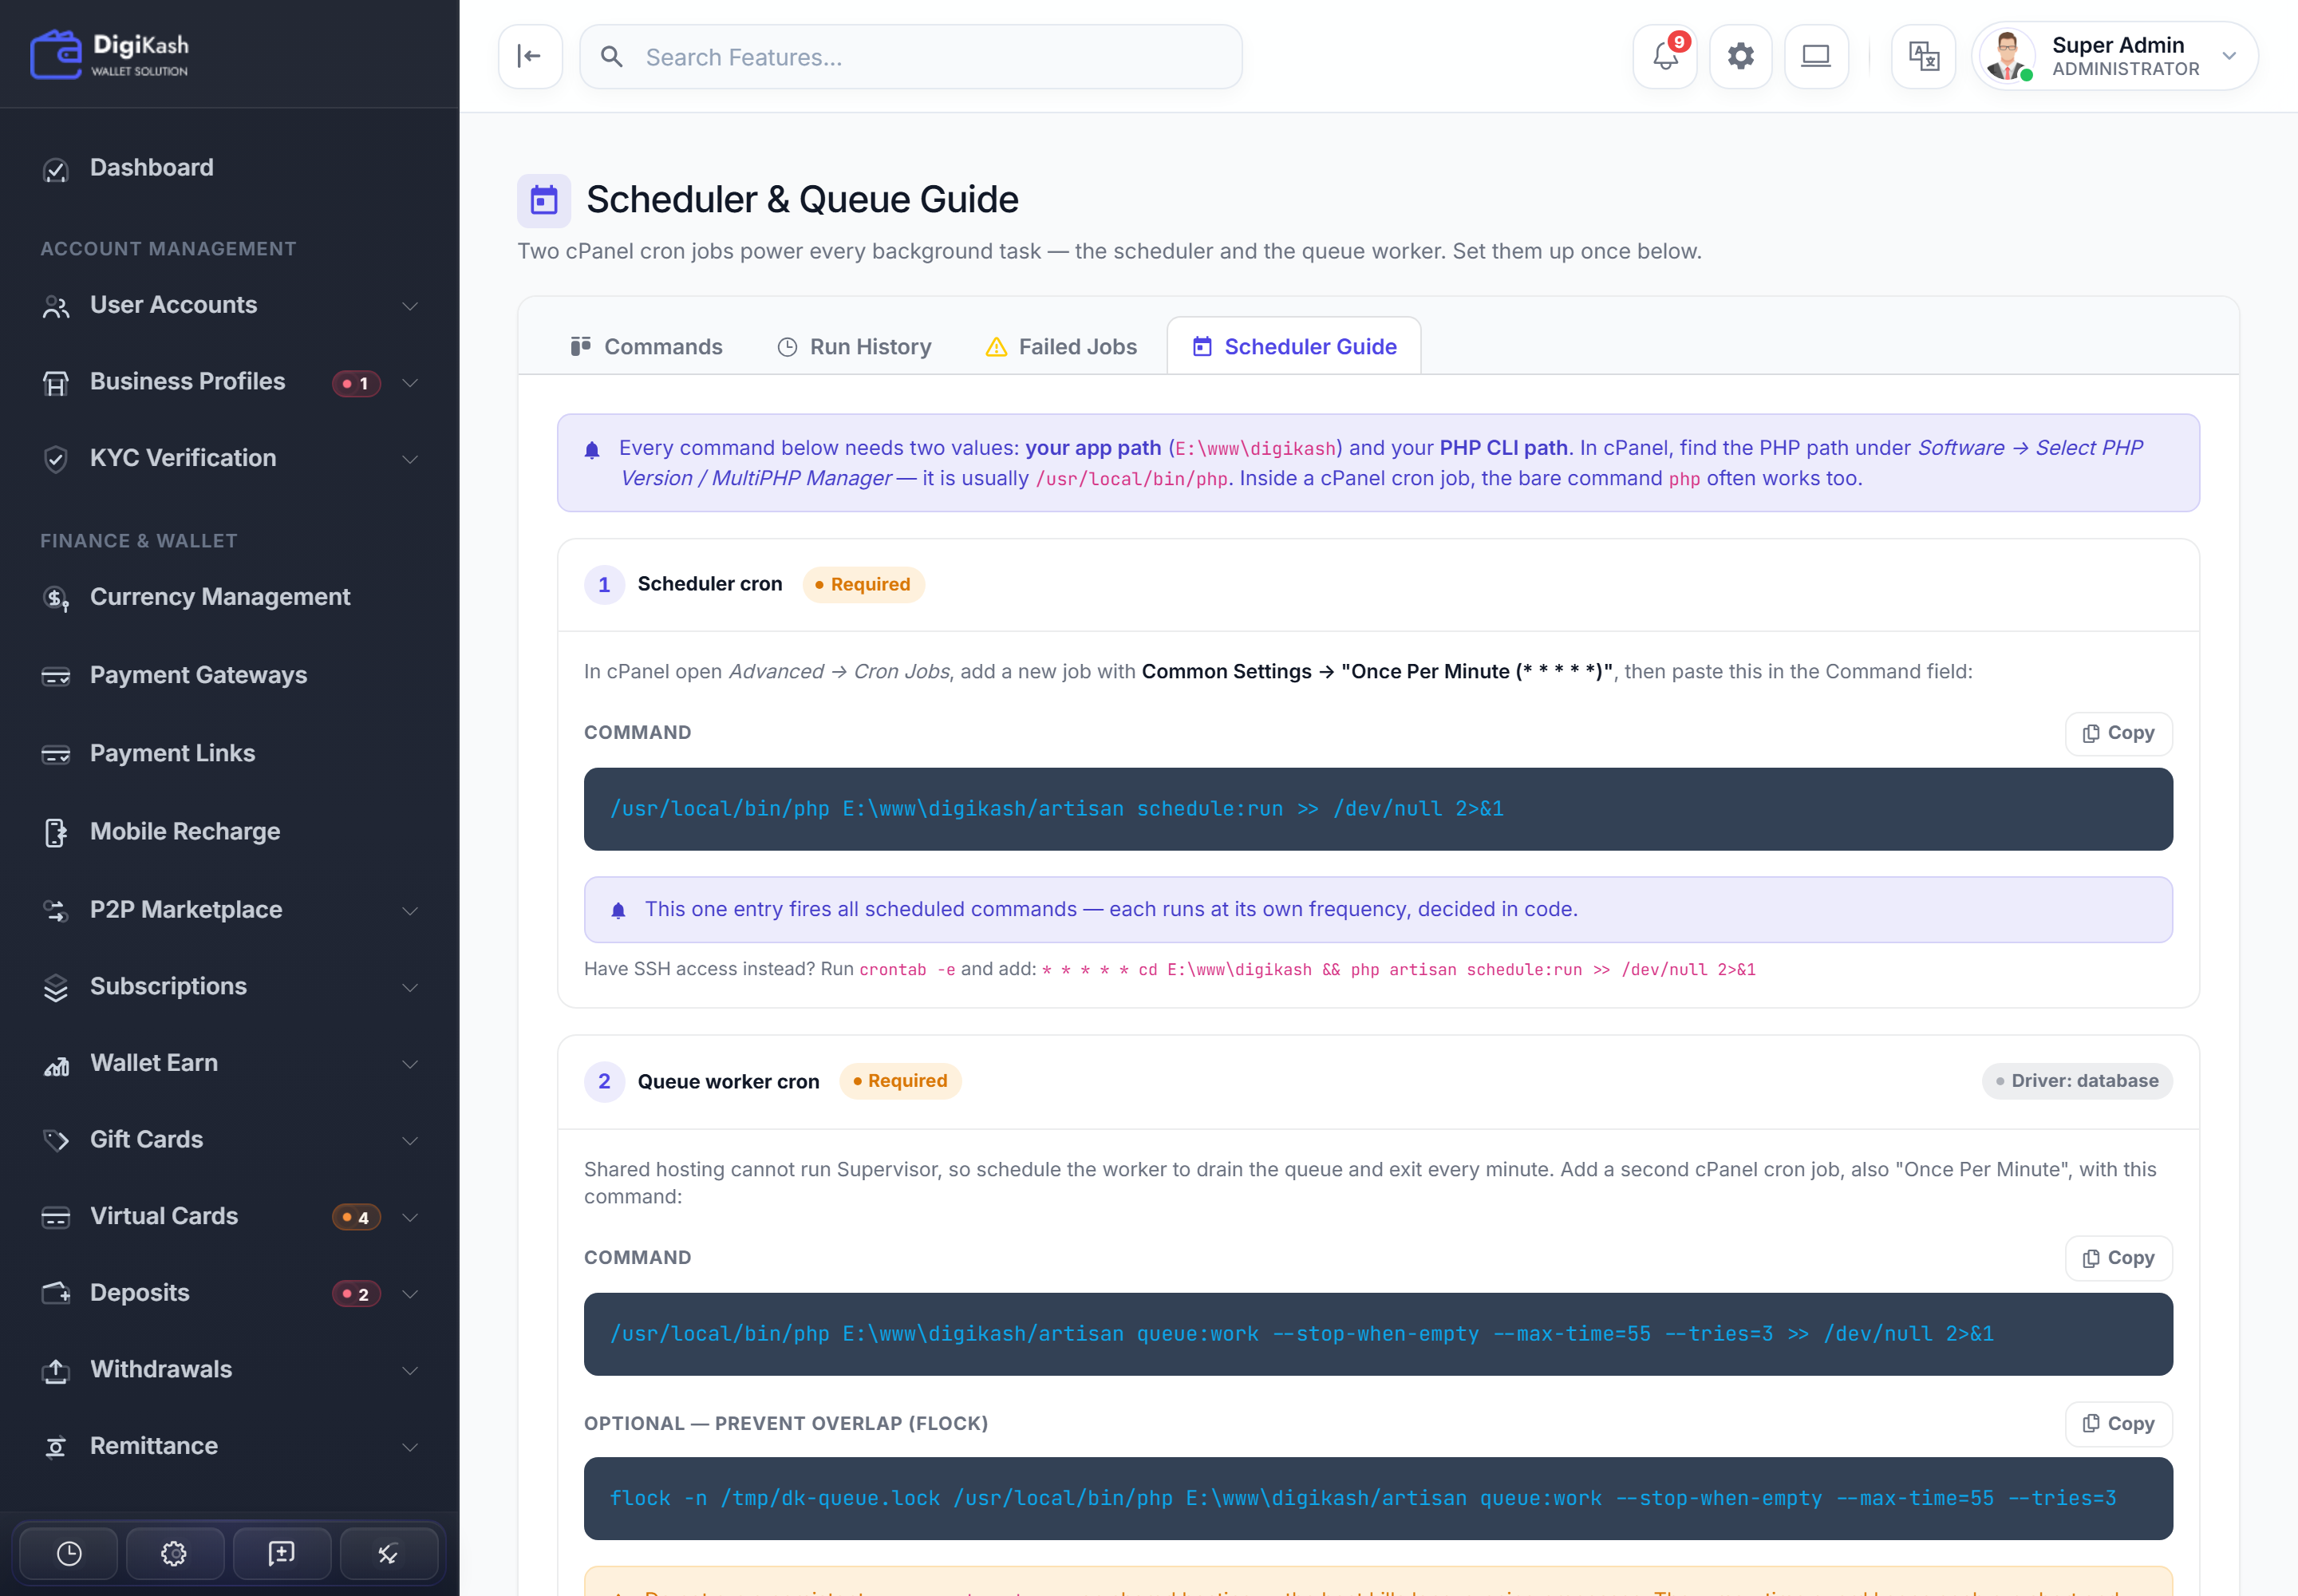
Expiring P2P orders & promotions, Wallet Earn payouts, subscription renewals, license re-checks, and temp-file cleanup — all automatic. Full cron, queue-worker, and Supervisor details are in Production Setup.
Step 2 — Finish your go-live checklist
Work through these in the admin panel. Each card shows where the setting lives and what to set.
Set up email (SMTP)
Settings → Site Settings → MailEnter your SMTP host, port, and login, then send a test email so password resets and notifications actually deliver.
Connect payment gateways
Finance & Wallet → Payment GatewaysAdd the live API keys for the providers you'll use, then run one real deposit on HTTPS to confirm the full flow works.
Turn on Two-Factor Auth
Admin profile → Two-Factor AuthenticationEnable 2FA for every admin and high-privilege staff account before the site is public.
Lock down secrets
.env on your server
Keep APP_DEBUG=false in production, and make sure .env and storage/ are never reachable from the web.
Pick your modules
Settings → Feature ControlsSwitch off any modules (P2P, cards, recharge, staking…) you don't plan to offer, so users only see what you actually run.
Set your branding
Settings → Site SettingsUpload your logo and favicon, set brand colors, and fill in the SEO defaults (title, description, social image).
Clean up the server
Your hosting file managerOnce everything works, delete the uploaded core-v{{V}}.zip to free up space — the app is already extracted and running.
Updating DigiKash Safely
Update with a single click from Settings → Project Updater in your admin panel. The updater downloads the official release, verifies it, backs up what it replaces, and installs — no command line needed. Follow the order below and an update takes just a few minutes.
Example: what the updater screen looks like
How to update — step by step
Confirm your license is active
New installs are already linked. Existing sites enter their Envato purchase code once — the updater shows License: Active when it's bound to your domain.
Check for updates
Click Check for updates. The updater fetches the latest release and shows the new version number and changelog before anything is installed.
Back up — always, every time
Click Generate recovery backup (database + storage), and also download a copy of your full site files and database to your computer. Never start an update without a backup you control.
Install the update
Click Install Update. The updater runs its pre-flight checks, enables maintenance mode, applies the release phase by phase with a live progress log, runs migrations, and brings your site back online automatically.
The one-click updater is built for an unmodified codebase. It replaces core application files with the new release — so if you (or your developer) have edited core files directly, two things can happen: your custom changes will be overwritten, and if the codebase has drifted far from the original, the update itself can fail or leave the site broken. This is exactly why a backup before every update is non-negotiable.
Updating a customized site — the safe workflow
If you have made code customizations, follow this order instead of updating blindly. It keeps both the update and your custom work safe:
List your changes
Write down every file you modified and what it does (better: keep them in Git so a diff shows them instantly).
Back up everything
Recovery backup in the updater plus a full local copy of files and database on your own computer.
Revert to stock code
Temporarily remove / revert your custom edits so the codebase matches the original release.
Run the update
Install the new version through the Project Updater on the clean codebase — it will apply smoothly.
Re-apply your changes
Carefully add your customizations back on top of the new version, adjusting for anything the release changed.
Test before going live
Check your key flows (login, deposit, payments) — ideally on a staging copy first — then lift maintenance mode.
Where possible, customize through the built-in tools instead of editing core files — Style Manager (custom CSS), Feature Controls, theme colors, languages, and notification templates all survive every update untouched. The less core code you edit, the easier every future update becomes.
Your settings, uploaded files, and database content are never wiped by an update, and a recovery backup is saved on the server before anything changes. The warnings above are about custom code edits — your data itself is protected either way.
Changelog
[Added] - Vendor Marketplace — multi-vendor storefront with vendor applications, categories, an admin vendor manager, suspension workflow, order management, and wallet-settled checkout
[Added] - Marketplace commission split — every order settles atomically between the vendor wallet and a configurable platform commission account (percentage + fixed fee, min/max order amount, auto-release, payout hold window)
[Added] - Automated KYC providers — Smile ID, ShuftiPro, and Sumsub drivers with per-country provider routing, an admin credential vault, connection testing, a decision engine, and a verification webhook
[Added] - Crypto Hub — USDT / USDC stablecoin deposits and withdrawals through Bitnob with multi-chain deposit-address generation (Ethereum, Polygon, Base, Solana, Tron, BSC) and signature-verified webhooks
[Added] - Circle testnet faucet shortcut on demo builds so stablecoin deposits can be tested without real funds
[Added] - bitnob:test-address console command — self-service sandbox probe for the Bitnob stablecoin address API
[Added] - Tawk.to live chat widget with plugin-managed property / widget IDs and strict credential validation
[Added] - Remittance operations commands — remittance:readiness, remittance:check-payout-provider, remittance:dispatch-pending, remittance:reconcile, remittance:alert-stuck, and remittance:uat
[Improved] - Remittance hardening — pluggable compliance screening (local + remote providers), payout router, status-event timeline, encrypted financial storage with retention rules, operational indexes, and a full admin transfer-operations screen
[Improved] - Vendor Marketplace enabled by default and surfaced across the control panel, settings hub, quick actions, and mobile navigation
[Improved] - Virtual card admin module redesigned — provider management, fee settings, cardholder views, and a cleaner credential modal
[Improved] - Unified admin table styling and a shared page-header component across KYC, gift cards, users, subscription plans, P2P promotions, and wallet earn
[Improved] - Payment gateway credential labels and edit modal for clearer provider setup
[Improved] - Crypto deposit UI — chain selector pills, address card, and copy / QR flow
[Improved] - reCAPTCHA plugin management with a recaptcha:disable console escape hatch for lockouts
[Fixed] - Installer and license re-check no longer reject a "Lifetime" support window
[Fixed] - Admin seeder no longer wipes the super admin created by the installer
[Fixed] - Bitnob stablecoin deposits now credit from the payload Bitnob actually sends, including reference-less deposit.success webhooks routed by deposit address
[Fixed] - Bitnob card / customer endpoints repointed at the routes the API still serves
[Fixed] - Exchange Money validation and conversion-rate script issues
[Fixed] - Blog admin foreign key, wallet decimal formatting, SMTP test email, and subscription notification templates
[Fixed] - Numerous UI and validation fixes across admin, marketplace, deposit / withdraw, and virtual cards
[Added] - Merchant API refund endpoint (POST /api/v1/refund-payment) — full or partial refunds with idempotency, over-refund protection, and a signed payment.refunded webhook
[Improved] - verify-payment now reports refunded_amount, refundable_amount, and fully_refunded for each payment
[Added] - International Remittance module — cross-border money transfer with beneficiaries, country/currency corridors, live quotes, payout routing, compliance screening, and a versioned REST API
[Added] - P2P Order Chat — in-escrow buyer/seller messaging with live polling, unread tracking, and a dedicated rate-limit bucket
[Added] - P2P Demo Trading seeder — sample offers, orders, and trader profiles to preview the marketplace immediately after install
[Added] - Golden theme — a second site-wide visual theme (luxury obsidian + gold) selectable alongside Classic, each with its own layouts and asset bundle
[Added] - Theme Color customizer — override accent / brand colors with validated hex values from Site Settings
[Added] - MercadoPago payment gateway added to the gateway factory
[Added] - Payment-method seeder and automatic method-code generator for consistent deposit / withdraw provisioning
[Added] - Multiple manual deposit methods per currency
[Added] - Storage Link tool — create or repair the public/storage symlink from the admin Settings page, no SSH required
[Improved] - Multi-language UI with full RTL support and a redesigned Language Manager (add locales, inline translate, reposition the switcher)
[Improved] - Saved Withdraw Accounts with stricter validation and reusable payout details
[Improved] - Subscription plan feature types — richer per-feature limits / flags and cascade-safe plan deletion
[Improved] - StroWallet provider response handling hardened (dispatch and response-shape normalization)
[Improved] - Installer — smarter database-host parsing, extra feature checks, and a refreshed installer UI
[Improved] - Wallet service refactor for staking / earn balance operations
[Improved] - Admin payment-gateway and virtual-card management UIs
[Fixed] - Updater license card now follows the current host instead of the newest row
[Fixed] - Manual deposit transaction currency handling
[Fixed] - Notification feed now tolerant of malformed data
[Fixed] - Deposit-method compatibility and conversion-rate layout issues
[Fixed] - Numerous bug fixes and UI polish across admin, P2P, subscriptions, and withdrawals
[Added] - P2P Marketplace with offer ads, escrow orders, disputes, promotions, payment-method directory, and trader profiles
[Added] - Subscription System with tier plans, pricing cycles, proration math, renewals, cancellations, and transactions
[Added] - Wallet Earn (Staking) with configurable plans, lock periods, APY, and scheduled rewards
[Added] - Mobile Recharge module with Sandbox, Reloadly, and generic HTTP API drivers
[Added] - Agent Program with dedicated panel, commission rule engine, QR cash-out, and operations workflow
[Added] - Feature Controls to toggle every revenue module per panel with KYC and phone-verification gates
[Added] - Project Updater with signed OTA releases, SHA-256 verification, recovery backups, and automatic migrations
[Added] - Redesigned Control Panel with searchable, categorized, permission-aware shortcuts
[Added] - PWA support with installable manifest, service worker, and configurable theme color and icons
[Added] - Wallet PIN as a secondary numeric PIN for transfers, withdrawals, and other high-risk actions
[Added] - Phone Verification via Twilio with rate-limited send and verify endpoints
[Added] - KYC Templates per audience (user / merchant / agent) with resubmission flow on rejection
[Added] - Login Activity tracking (IP, country, browser, device, platform) with one-click logout of all other sessions
[Added] - IP Block list to ban abusive addresses at the middleware layer
[Added] - Admin Lock Screen for quick session lock without full sign-out
[Added] - Background Jobs dashboard with task registry, scheduler view, retry, and retry-all for failed jobs
[Added] - User-to-merchant and user-to-agent account conversion from the admin user manager
[Added] - Bulk email send to all users directly from the admin panel
[Added] - "Login as user" support sessions with full audit logging
[Added] - Scheduled Withdrawals to cap payout submissions to defined day-of-week windows
[Added] - Saved Withdraw Accounts so users can reuse bank / crypto / mobile-money payout details
[Added] - Notification Templates with three configurable channels (Email, SMS, Push) and per-template on/off toggle
[Added] - In-app notification inbox via Laravel database notifications
[Added] - Style Manager to inject custom CSS without touching source code
[Added] - Currency role-based visibility (user / merchant / agent) for per-audience wallet enablement
[Added] - Expanded to 25+ payment gateways including Stripe, PayPal, Mollie, Cryptomus, Razorpay, Paystack, Flutterwave, Paymob, Coinbase Commerce, NowPayments, Binance Pay, Bitnob, StroWallet, and more
[Added] - Merchant API with Sanctum personal-access tokens and HMAC-signed webhook delivery
[Added] - Live Merchant API documentation page at /api-docs with Prism syntax highlighting
[Improved] - Multi-provider Virtual Cards now span Stripe Issuing, StroWallet, and Bitnob with per-provider capability flags (issue, top-up, withdraw, freeze, limits, controls)
[Improved] - WooCommerce gateway plugin bundled at public/general/woocommerce-gateway-v2.8.0/ for eCommerce checkout
[Improved] - Account management with KYC status flows and suspended / unverified / KYC-pending filtered views
[Improved] - Notification system with per-channel toggles and channel-specific templates
[Improved] - Security hardening across panels — account-status middleware, IP block, throttled phone verification, 2FA on User / Merchant / Agent / Admin
[Improved] - Multi-language UI with admin-managed translation strings via joedixon/laravel-translation
[Improved] - PDF receipts via barryvdh/laravel-dompdf for transactions, payment links, and subscription invoices
[Improved] - Voucher system with single-use / multi-use codes, per-currency limits, and merchant checkout redemption
[Improved] - Payment Links with fixed or buyer-defined amount, expiry, max uses, and guest checkout
[Upgraded] - Laravel framework to v11 with streamlined bootstrap and attribute-based middleware
[Upgraded] - PHP requirement to 8.3+ (PHP 8.4 supported)
[Upgraded] - Laravel Sanctum to v4 for Merchant API token authentication
[Upgraded] - Spatie Laravel Permission to v6 for staff roles and granular admin permissions
[Upgraded] - pragmarx/google2fa to v8 for TOTP-based two-factor authentication
[Upgraded] - Stripe PHP SDK to v17 with the latest Issuing API for virtual cards
[Upgraded] - Intervention Image to v3 for upload, resize, and format conversion
[Fixed] - Carry-over deposit, withdrawal, and gateway integration issues reported during v1.x
[Fixed] - Query optimization, N+1 reductions, and general performance improvements across admin and dashboard
[Removed] - Bundled development-only dependencies (Vite / Tailwind / Alpine) from the shipped runtime; the production UI uses pre-built assets in public/
Previous Releases (v1.x)
[Added] - Merchant disable feature
[Added] - Additional currencies for the StroWallet payment gateway
[Added] - Multi-fee option (Percentage + Fixed) for the StroWallet virtual card
[Improved] - Payment gateway list now displays all supported currencies
[Fixed] - Deposit issue with StroWallet
[Added] - Initial Control Panel for improved backend management
[Added] - Advanced search system in the admin panel
[Added] - WooCommerce plugin integration
[Upgraded] - Merchant API to enterprise-grade structure
[Fixed] - Payment gateway integration issues
[Fixed] - Various bugs and overall site performance optimization
[Added] - User and merchant account delete functionality
[Added] - Option to redirect visitors to login page instead of default landing
[Added] - User-to-merchant account conversion
[Added] - Separate withdrawal and deposit fee settings for users and merchants
[Fixed] - Currency management API
[Fixed] - Activity log display issues
[Added] - Custom landing page uploader
[Added] - Exchange API config in the admin currency section
[Added] - Site preloader management
[Improved] - Currency exchange error UI redesigned
[Improved] - Auto-disable deposit / withdraw methods when the underlying gateway is disabled
[Added] - New payment methods
[Added] - Initial multi-provider virtual card support
[Added] - Virtual card placeholder application flow
[Added] - Card top-up and withdrawal endpoints
[Improved] - Replaced static values with dynamic config options
[Added] - Merchant payment via QR code
[Added] - Payment using merchant payment link
[Added] - Voucher payment at checkout
[Added] - Advanced virtual card system (multi-provider support)
[Fixed] - Google reCAPTCHA integration issues
[Fixed] - General bug fixes and performance improvements
Tech Stack
DigiKash is built on a modern Laravel stack with clearly separated concerns for backend, frontend, payments, and integrations.
| Layer | Technology | Notes |
|---|---|---|
| Runtime | PHP 8.3+ | PHP 8.4 supported. CLI and web-server versions must match. |
| Framework | Laravel 11 | Streamlined bootstrap, attribute middleware. |
| Authentication | Laravel Sanctum 4 | Personal-access tokens for the Merchant API. |
| Roles & Permissions | Spatie Laravel Permission 6 | Powers staff roles and granular admin permissions. |
| 2FA | pragmarx/google2fa 8 | TOTP-based two-factor authentication. |
| UI Framework | Bootstrap 5 + jQuery 3.7 | Pre-built assets served from public/frontend and public/backend. |
| Typography | Inter + JetBrains Mono | Self-hosted Google Fonts for UI & code. |
| Icons | Font Awesome + IcoMoon | Mixed icon set across admin and dashboard. |
| Charts | Chart.js + ApexCharts | Used in admin dashboard and analytics widgets. |
| Rich text | Summernote Lite | Inline WYSIWYG for blog posts and page content. |
| Code editor | CodeMirror | Used in Style Manager and custom landing-page editor. |
| Date picker | Daterangepicker + Moment.js | Date-range filters across reports and transaction tables. |
| Image processing | Intervention Image 3 | Uploads, resizing, format conversion. |
| QR codes | bacon/bacon-qr-code | Wallet QR, merchant pay QR, 2FA setup. |
| PDF receipts | barryvdh/laravel-dompdf | Transaction receipts and payment-link confirmations. |
| HTML purifier | mews/purifier | Sanitises rich-text content before save. |
| Payments | Stripe, Mollie, Cryptomus, Bitnob, StroWallet | Multi-provider abstraction for cards, deposits, and webhooks. |
| Notifications | Mail (SMTP), Twilio SMS, Push, In-app inbox | Three configurable channels (Email/SMS/Push) per template, plus a built-in database inbox. |
| Translation | joedixon/laravel-translation | Multi-language UI managed from the admin panel. |
| Device detection | jenssegers/agent | Browser / device parsing for login activity logs. |
| Syntax highlighting | Prism.js | Used inside the Merchant API documentation. |
| Database | MySQL, MariaDB, or SQLite | Bundled DB/digikash.sql for MySQL installs. |
Folder Structure
DigiKash keeps Laravel's default structure and adds product-specific folders for payments, the installer, the project updater, and the bundled database import.
Core Folders
app/— application logic, services, jobs, events, support classes.Http/Controllers/Backend/— admin-panel controllers (60+ modules).Http/Controllers/Frontend/— user, merchant, agent surfaces.Http/Controllers/Api/— merchant checkout API.Http/Controllers/Webhook/— incoming provider callbacks.Http/Middleware/— installer guard, feature flags, IP block, 2FA, account status.Http/Requests/— Form Request validators for every action.Models/— Eloquent models for accounts, wallets, transactions, P2P, cards, licenses.Services/— provider abstractions for payments, virtual cards, recharge, phone verification.Payment/— gateway-specific payment integrations (classmap autoloaded).Support/— installer manager, helpers, infrastructure utilities.
routes/—web.php,admin.php,api.php,auth.php,install.php,channels.php,console.php.resources/views/— Blade templates:backend/,frontend/,installer/,emails/,pwa/,components/.config/— Laravel + product config:installer.php,project_updater.php,feature_catalog.php,admin_menus.php,control_panel.php,virtual_card.php,mobile_services.php.DB/— bundleddigikash.sqlused by MySQL / MariaDB installs.database/— migrations, factories, seeders (used by tests and SQLite).public/— web entry point. Your domain points here. Pre-built CSS / JS assets live underpublic/general,public/backend, andpublic/frontend.storage/— logs, cache, sessions, uploads, update packages, recovery backups.documentation/— this docs package.vendor/— Composer dependencies shipped with the release.
Important Files
| Path | Purpose |
|---|---|
.env | Environment values. Written by the installer. Never publish this file. |
composer.json | PHP dependencies and Laravel package scripts. |
package.json | Node dependency manifest (optional — the shipped UI uses pre-built assets under public/). |
artisan | Laravel command-line entry point. |
bootstrap/app.php | Middleware, routing, and exception registration (Laravel 11 style). |
storage/app/installed | Installer lock file. Removing it re-opens the installer. |
Configuration Files
Most product behavior is configured from the admin UI, but these files drive what the UI can do.
| File | What it controls |
|---|---|
config/installer.php | Required extensions, writable paths, license requirement, core / demo seeders. |
config/project_updater.php | Update server URL, product slug, Envato item ID, signed-package public key, protected paths. |
config/feature_catalog.php | Master list of every toggleable feature (deposit, withdraw, P2P, cards, ranks, vouchers, subscriptions...). |
config/admin_menus.php | Sidebar layout for the admin panel. |
config/control_panel.php | Categorized shortcuts used by the Control Panel screen. |
config/virtual_card.php | Card provider registry (Stripe, StroWallet, Bitnob) and per-provider capabilities. |
config/wallet.php | Brand prefix for newly generated wallet IDs (the DK in DK-USD-9F2A-E710). See Wallet ID Format. |
config/mobile_services.php | Phone-verification and mobile-recharge provider registry. |
config/permission.php | Spatie Permission setup for staff roles. |
Environment Variables
Most values are written by the installer and edited from the admin UI. These are the ones you may need to touch by hand.
| Variable | Description |
|---|---|
APP_NAME | Public-facing platform name. |
APP_ENV | Use production in live deployments. |
APP_DEBUG | Must stay false in production. |
APP_URL | Canonical HTTPS URL of the site. |
WALLET_ID_PREFIX | Brand prefix for new wallet IDs (2–6 uppercase letters, default DK). See Wallet ID Format. |
DB_* | Database connection details written by the installer. |
SESSION_DRIVER | Default is file. Use database or redis at scale. |
QUEUE_CONNECTION | Use database by default. Switch to redis for high throughput. |
MAIL_* | SMTP credentials for transactional email. |
PROJECT_UPDATER_SERVER_URL | Override the default release server when self-hosting. |
PROJECT_UPDATER_PRODUCT_SLUG | Product slug — defaults to digikash. |
PROJECT_UPDATER_ENVATO_ITEM_ID | Envato item ID — defaults to 58275561. |
MOBILE_RECHARGE_PROVIDER | sandbox, reloadly, or http. |
PHONE_VERIFICATION_PROVIDER | log (dev) or twilio (production). |
Wallet ID Format
Every wallet is issued a unique, shareable ID that users hand out to receive money. It opens with a short brand prefix you can change to match your platform name.
Anatomy of a wallet ID
A generated ID looks like DK-USD-9F2A-E710 and is built from three parts:
Brand prefix
DK — the configurable part. 2–6 uppercase letters. Defaults to DK (DigiKash).
Currency code
USD — the wallet's currency, added automatically. Not configurable.
Unique code
9F2A-E710 — random, collision-checked, unique per wallet.
Where to change the prefix
The prefix is driven by a single environment variable, WALLET_ID_PREFIX, read through config/wallet.php. Set it in your .env file:
# .env — brand prefix for newly generated wallet IDs
# 2–6 uppercase letters. Leave as DK to keep the default.
WALLET_ID_PREFIX=PAY
Apply the change — no terminal needed
After saving .env, tell the app to reload its settings by clearing the cache from the admin panel. Click the Clear Cache shortcut at the bottom of the sidebar:
A “Cache Cleared Successfully” message confirms it worked, and the new prefix is live right away. New wallets are now issued as PAY-USD-XXXX-XXXX.
Have terminal access? Running php artisan config:cache does exactly the same thing — but the Clear Cache button above is all you need.
Existing wallet IDs are permanent identifiers that people have already shared and saved. They are never rewritten when you change the prefix. Lookups and masking recognise the ID structure rather than a fixed prefix, so every previously issued ID keeps working exactly as before — no migration, no broken transfers.
Pick the prefix once at launch and keep it stable — it is a branding decision, not a routine setting. It is deliberately separate from your Site Title, since renaming the site should not alter wallet IDs. Invalid values (anything other than 2–6 uppercase letters) fall back to DK automatically.
Admin Login
The admin panel is the control center for accounts, transactions, content, settings, and maintenance. Access is gated by a separate auth guard.
Login URL
https://yourdomain.com/admin/login
Credentials
The first super-admin is created during installation. There is no shared default password.
Use a unique strong admin password, enable Two-Factor Authentication, limit staff permissions, and consider changing the admin URL prefix from Settings → Site Settings → Security.
User, Merchant, & Agent Login
Each audience has a dedicated entry point. Login accepts the registered email or username with the account password.
Login URLs
| Audience | URL | Notes |
|---|---|---|
| User | /user/login | Default end-user panel. |
| Merchant | /merchant/login | Business dashboard for receiving payments. |
| Agent | /agent/login | Cash-in / cash-out operations panel. Hidden when the Agent feature is disabled. |
Shared Login Features
- Email or username + password.
- Password visibility toggle.
- Remember Me for trusted devices.
- Forgot Password — sends a reset link to the registered email.
- Sign Up link to the matching registration form.
- Protected pages redirect guests to the correct login page based on the requested area.
- Account-status checks block suspended accounts at the auth layer.
- Two-Factor Authentication is enforced when enabled on the account.
Two-Factor Authentication
Add a second layer to every login with a time-based one-time code (TOTP). Strongly recommended for admins and any account that moves real money.
The Security Center gathers 2FA, password, active sessions, and the Wallet PIN onto one screen, with a readiness meter so each account can see at a glance what's still unprotected.
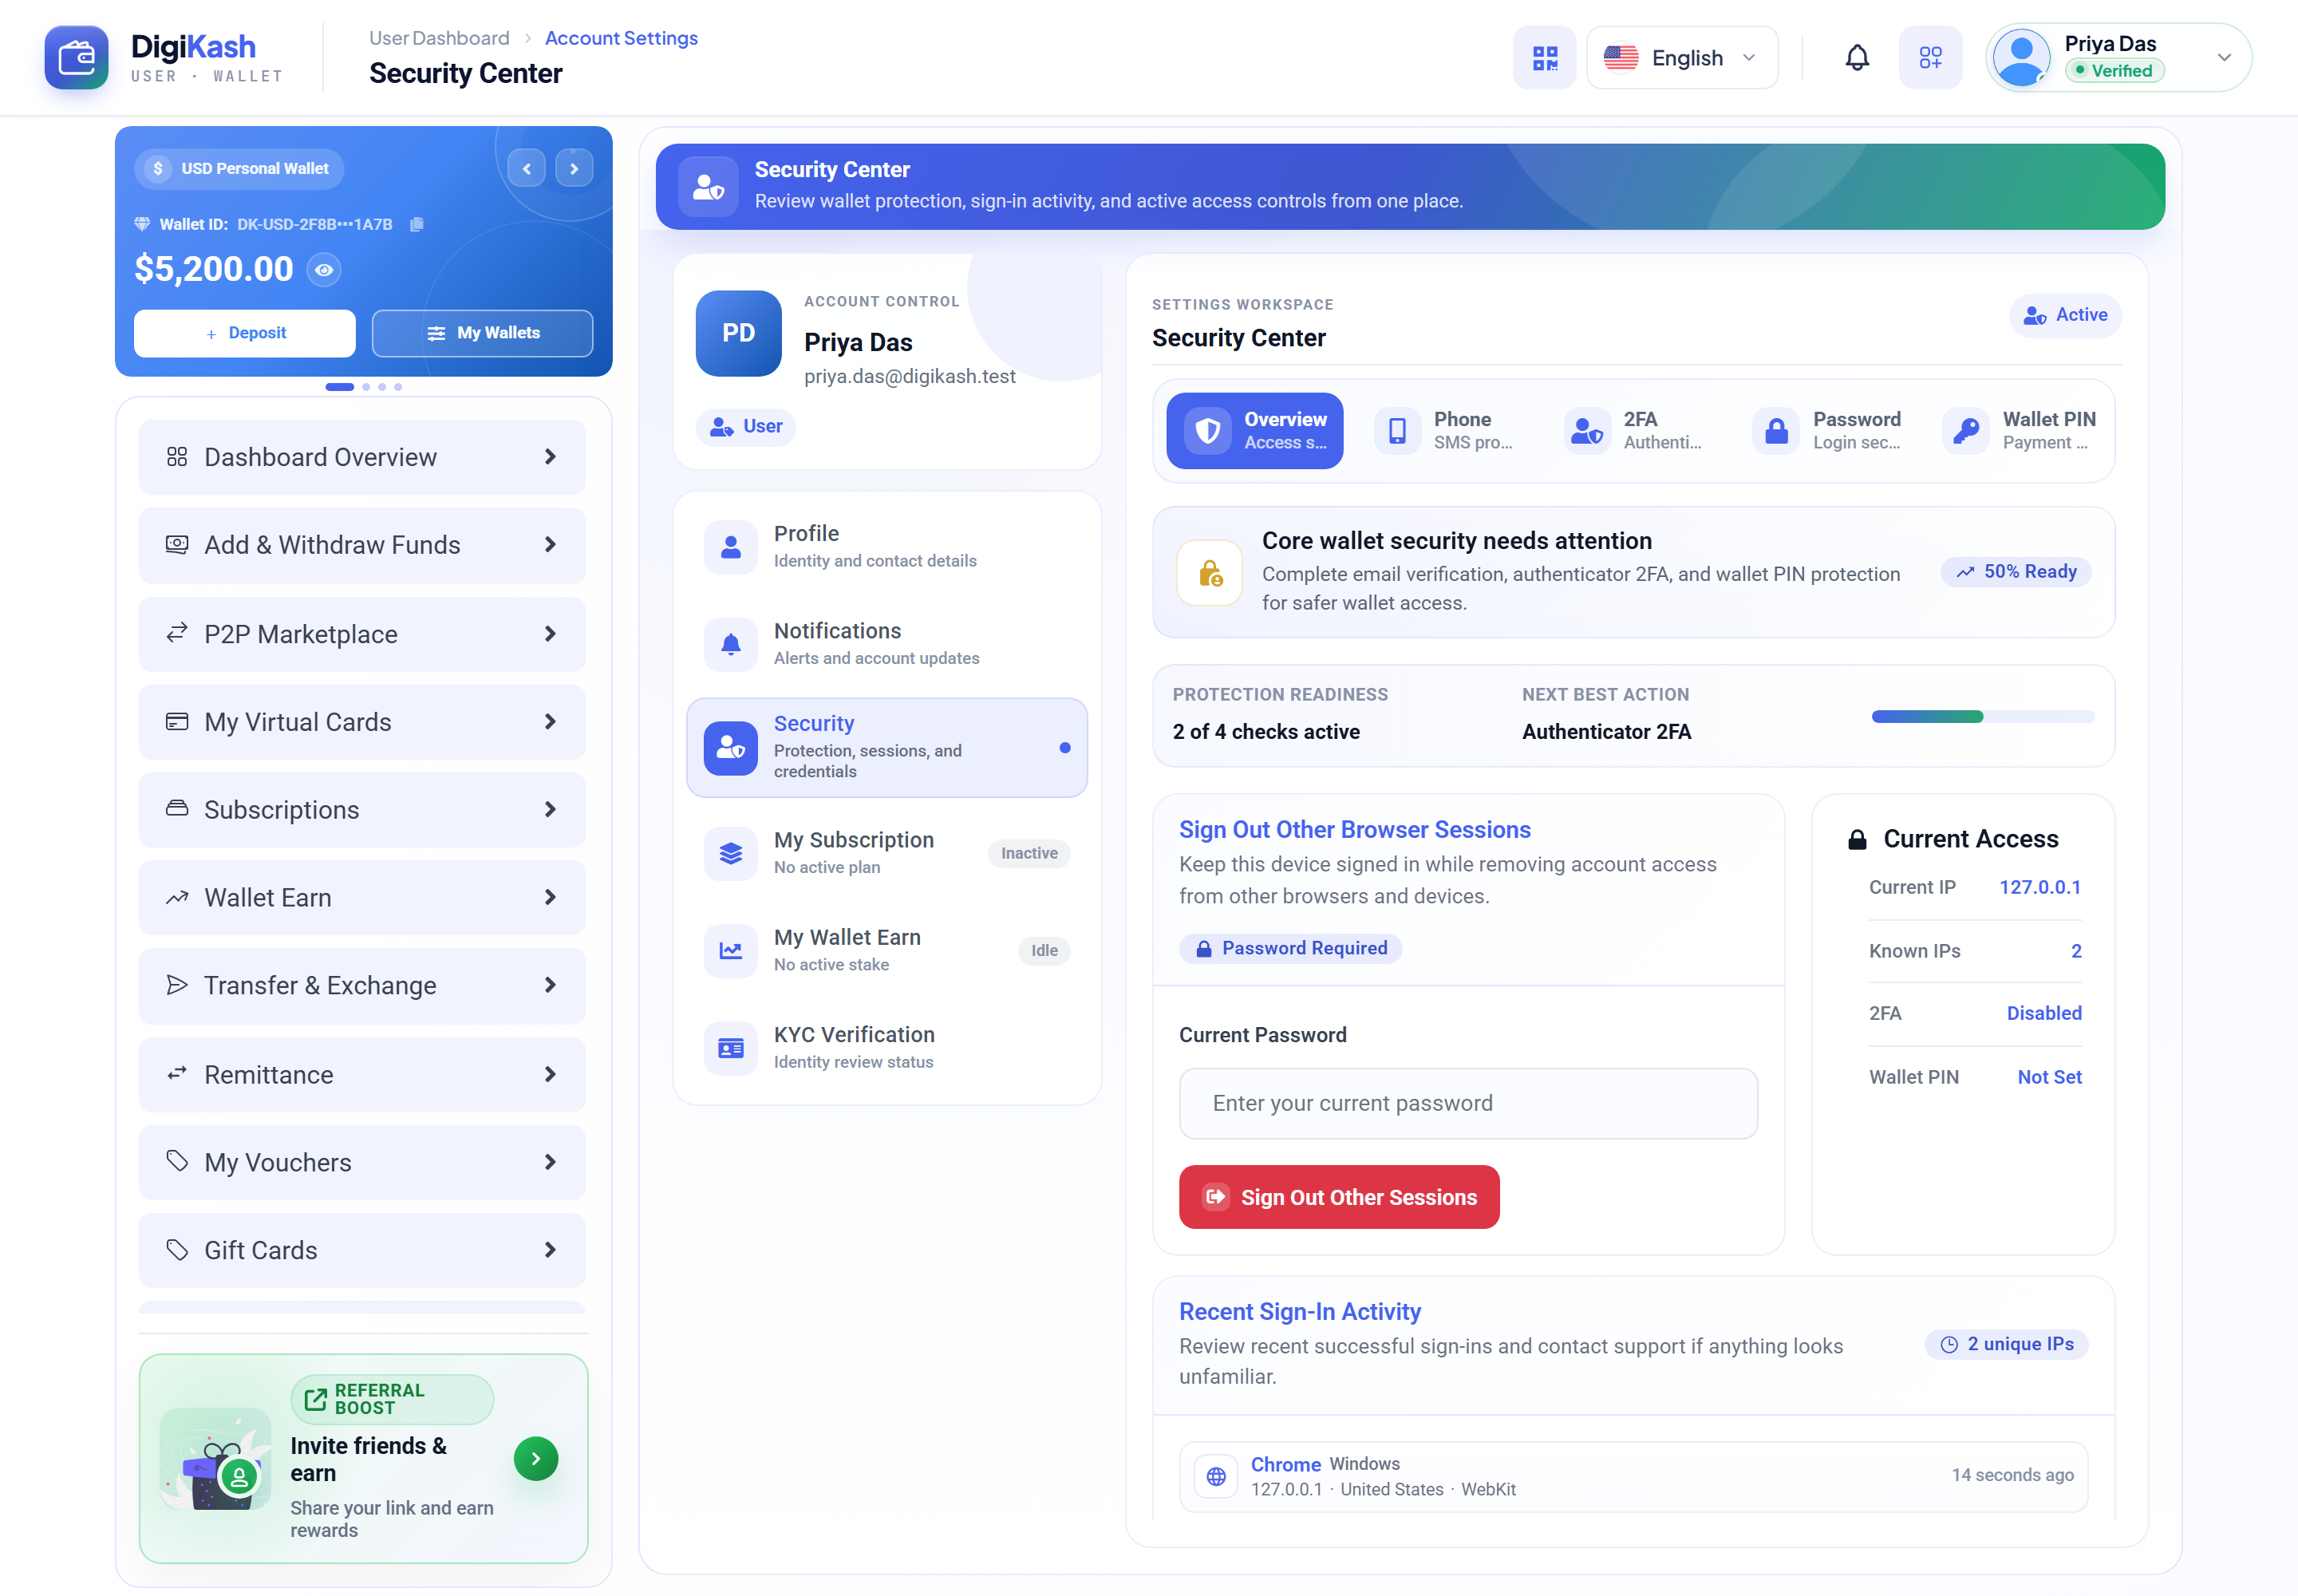
Turn it on in three steps
Open the 2FA tab
Go to Settings → Security → 2FA. The Security Center shows your current protection readiness right away.
Scan the QR code
Scan it with any authenticator app — Google Authenticator, Authy, or 1Password all work.
Confirm the code
Enter the 6-digit code from the app once to activate. Every later login then asks for a fresh code.
Disabling 2FA requires the account password, so store your authenticator backup (or recovery codes) safely. From the same screen you can also sign out other browser sessions if a device is lost.
Wallet PIN
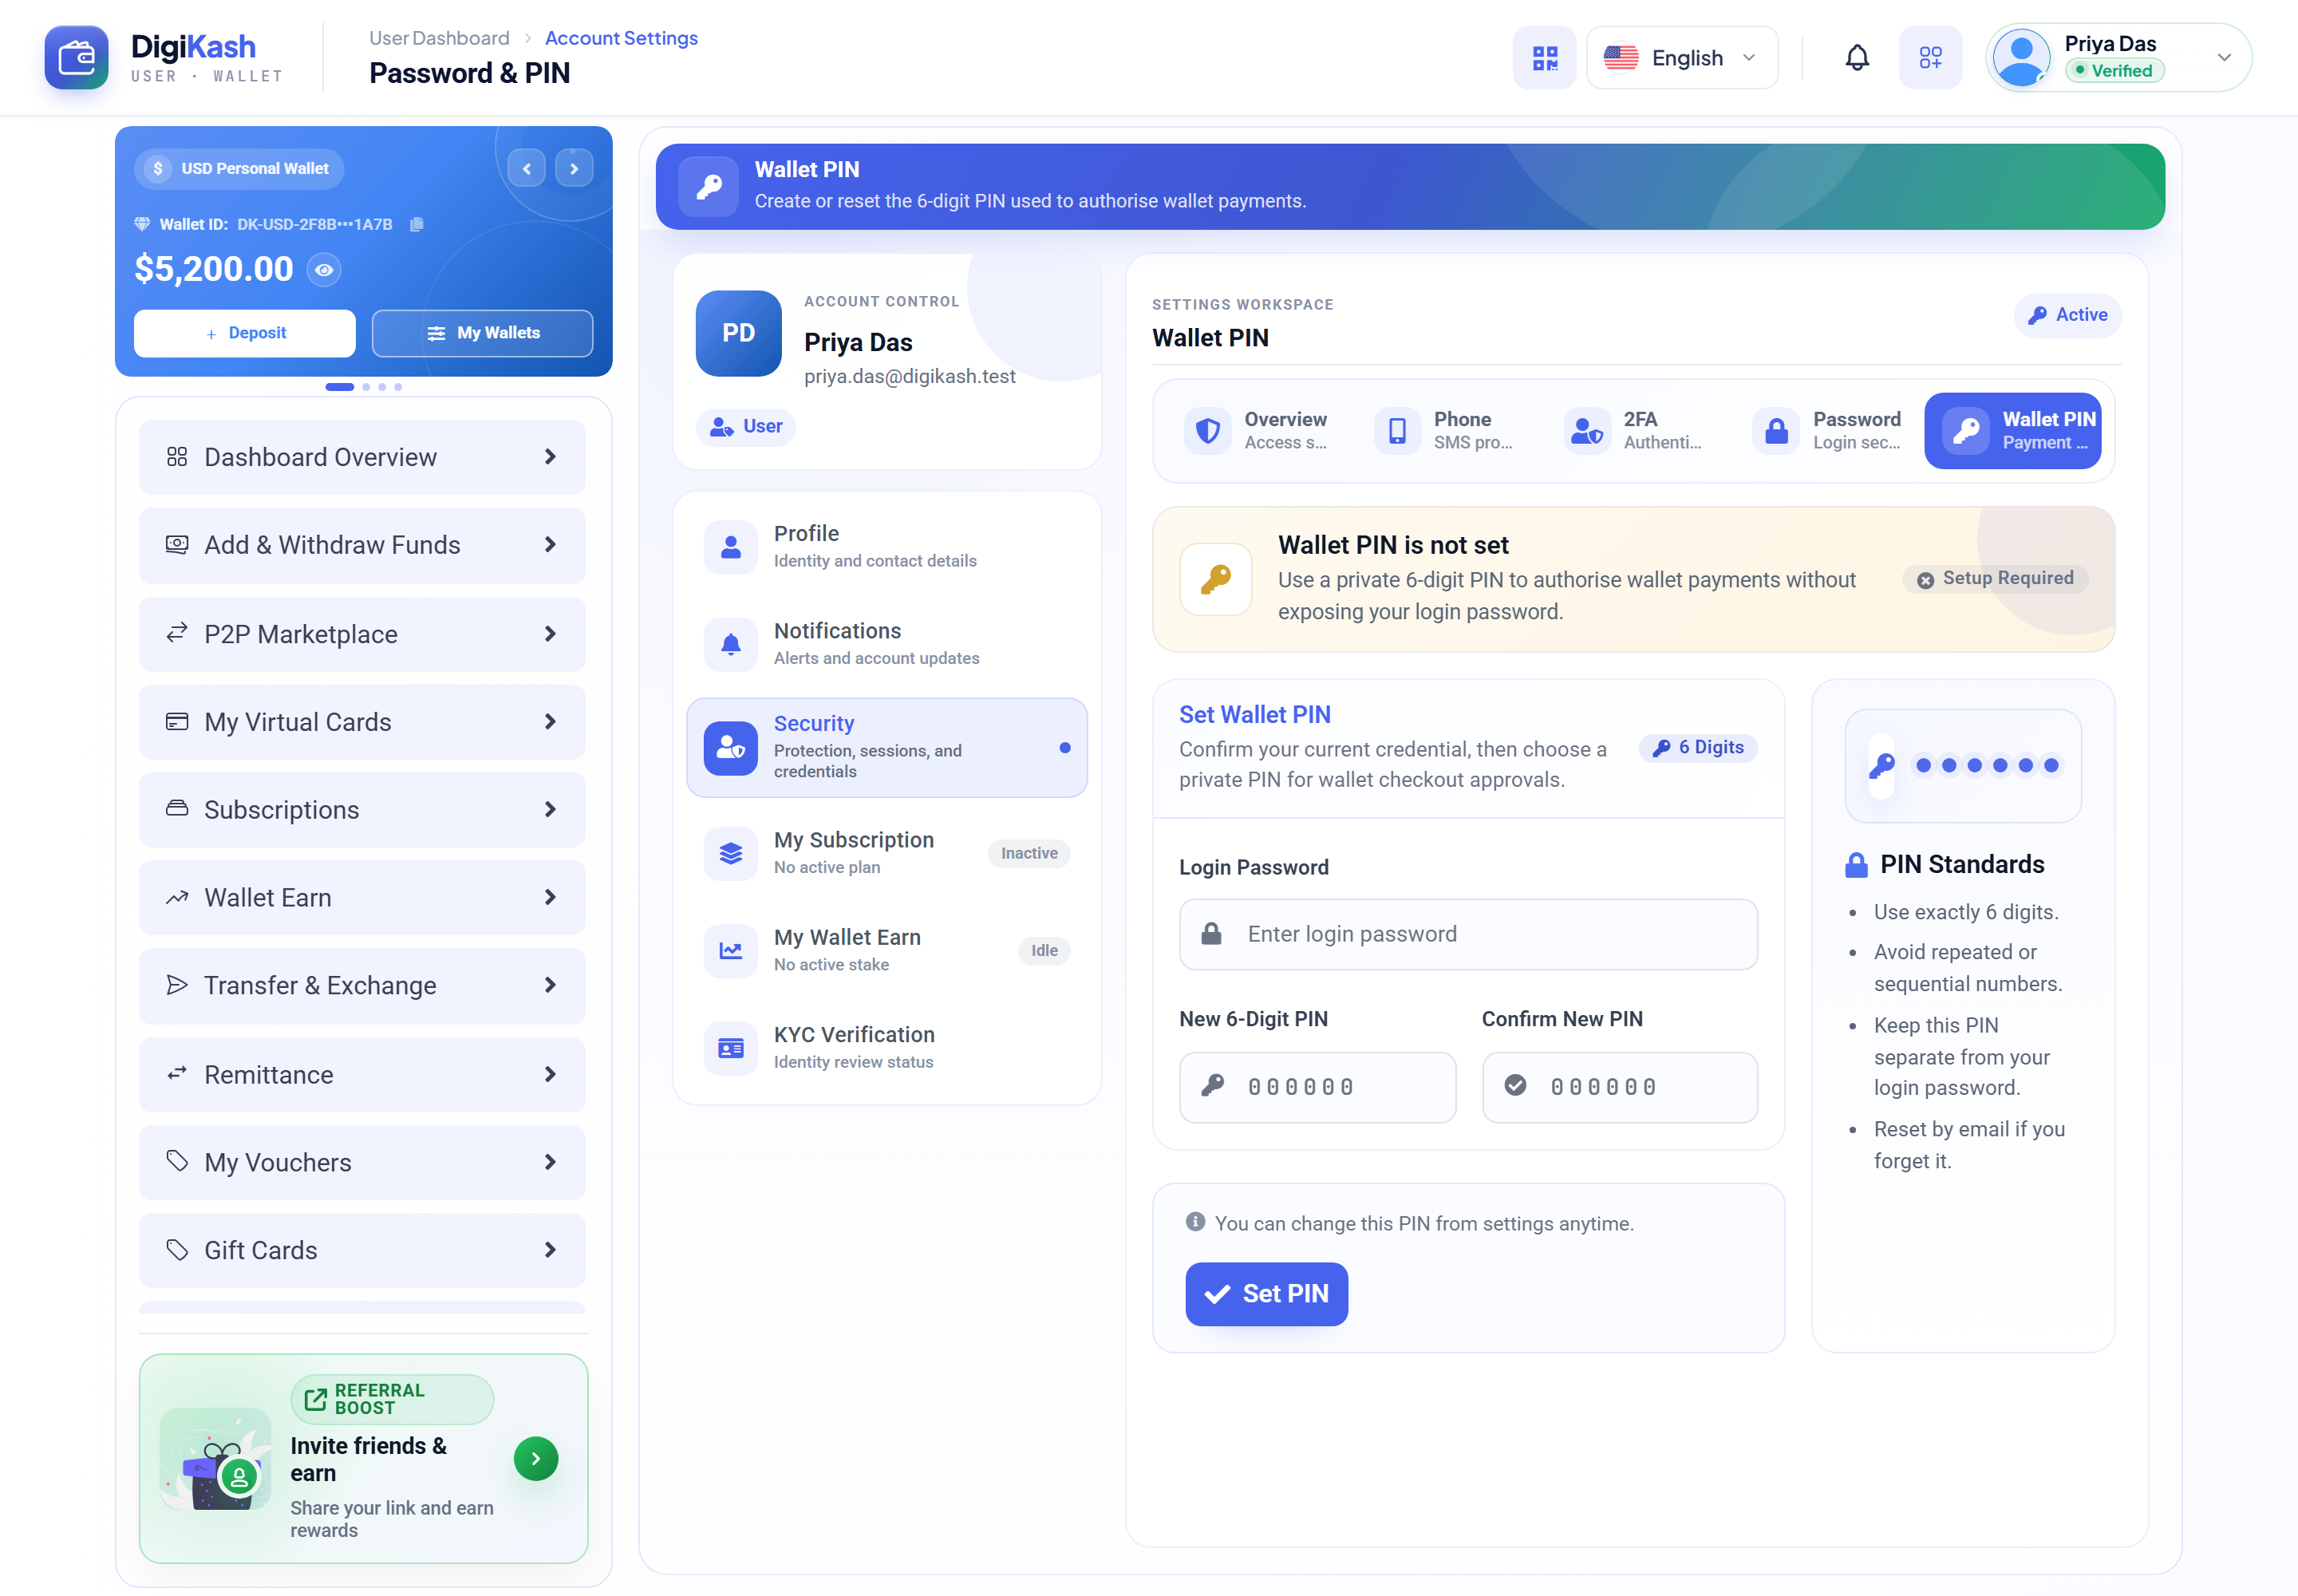
A private 6-digit PIN that authorises wallet payments — so money can't move from an already-signed-in session without a second secret only the account owner knows.
Think of it as a checkout PIN, separate from the login password. The password gets you into the account; the Wallet PIN is asked for at the moment of payment — a transfer, a withdrawal, or a card checkout — so funds stay protected even if someone reaches an open screen.
Setting it up
Open the Wallet PIN tab
Go to Settings → Security → Wallet PIN. A Setup Required badge shows until a PIN is set.
Confirm it's really you
Enter your current login password — this stops anyone else setting a PIN on your account.
Choose & confirm the PIN
Type a 6-digit PIN twice, then press Set PIN. You'll use it from then on to approve payments.
PIN standards
- Use exactly 6 digits.
- Avoid repeated or sequential numbers (no
111111or123456). - Keep it different from your login password.
- Forgot it? Reset by email — which also re-verifies your password (and 2FA if it's on).
Once set, the Wallet PIN is required before transfers, withdrawals, and card payments. Never share it — support will never ask for it, and it can always be reset securely by email.
User Dashboard
After login, every user lands on a dashboard that summarizes wallet balances, recent activity, and quick actions for the most-used features.
Multi-currency Wallets
Each enabled currency gets its own balance card with available, pending, and locked amounts.
Quick Actions
One-tap shortcuts for Deposit, Withdraw, Send, Request, Exchange, and Pay Merchant.
Activity Snapshot
Recent transactions, pending requests, KYC status, and rank progress shown above the fold.
Notifications Inbox
In-app inbox for payments, transfers, KYC decisions, and support replies.
Sidebar Navigation
- Wallet — balances, deposits, withdrawals, transfers, exchange, transaction history.
- Pay — merchant checkout, payment links, vouchers, mobile recharge.
- Earn — wallet staking plans, referral tree, ranking progress.
- Cards — virtual card requests, active cards, top-ups, withdrawals.
- P2P — marketplace offers, my orders, advertise, payment accounts.
- Account — profile, KYC, security (2FA, PIN), subscriptions, notification preferences.
Deposit Money
Top up the wallet using any active automatic gateway (card, crypto, mobile money) or a manual deposit method with proof-of-payment upload.
Pick a Method
Choose between automatic gateways (instant credit) or manual methods (admin review). Each method shows its min, max, fees, and supported currencies.
Enter Amount
The form previews the fee, the net you receive, and the final wallet credit before submitting.
Complete Payment
For automatic methods you are redirected to the gateway checkout. For manual methods you upload proof and wait for admin approval.
Wallet Credited
Auto deposits credit instantly on successful callback. Manual deposits credit after admin approval — both trigger a notification and an entry in transaction history.
- Supports any currency the admin has enabled for users.
- Per-gateway fee preview before confirmation — no surprise charges.
- Manual proof uploads accept image / PDF receipts.
- Deposit history shows status, method, gateway reference, fee, and net amount.
- Failed gateway callbacks reverse pending entries automatically.
Withdraw Money
Cash out wallet balance to a linked bank account, crypto address, or mobile-money number. Automatic methods process instantly through the gateway; manual methods queue for admin review.
Add a Withdraw Account
Save bank, crypto, or mobile-money payout details under Withdraw Accounts for fast reuse.
Pick a Method
Automatic methods send the payout straight from the gateway. Manual methods require admin approval and finance processing.
Enter Amount & Confirm
The form previews the fee, payable amount, and wallet deduction. Wallet PIN and 2FA prompt if enabled.
Track Status
Withdraw history shows the request status — Pending, Processing, Completed, or Rejected — with admin notes when applicable.
Withdraw is KYC-gated by default. Users see a clear prompt to complete KYC before the first payout.
Scheduled Withdrawals
Admins can restrict withdrawal submissions to specific windows (e.g. Monday + Thursday). Outside the window, users see the next available time slot.
Send & Request Money
Instant wallet-to-wallet transfers between platform accounts, plus payment requests another user can approve and pay from their wallet.
Send Money
- Find the recipient by username, email, or phone number.
- Same-currency transfers settle instantly with zero conversion.
- Cross-currency transfers use the live exchange rate with a confirmed preview.
- Add a private note and an optional memo visible only to the recipient.
- Wallet PIN + 2FA enforced when configured.
Request Money
- Send a payment request to any platform user.
- Recipient sees the request in their inbox with one-tap approve / reject.
- Approved requests transfer the balance instantly and notify both parties.
- Track outstanding, approved, and rejected requests under Money Requests.
Exchange Currencies
Convert wallet balance from one supported currency to another using the live exchange-rate engine — instantly and without leaving the wallet.
- Pick source and destination currencies from your enabled wallets.
- Preview the rate, fee, and amount-you-receive before submitting.
- Conversion is instant — both wallets update immediately on confirmation.
- Every exchange is recorded as a single transaction with FX details for receipts.
- Admin can configure per-currency exchange fees and minimum trade amount.
Wallet Earn — Staking New in 2.0
Lock part of your wallet balance into an admin-defined earning plan and receive rewards automatically on a fixed schedule. The platform handles every payout and the principal return for you — there is nothing to claim manually.
How it works
Pick a Plan
Each plan shows its reward (a fixed amount or a percentage of your stake per payout), payout cycle (daily / weekly / monthly / end of term), lock term, currency, min/max stake, and whether your principal is returned at maturity.
Stake from Wallet
Choose the wallet and amount (within the plan's min/max). The amount is immediately debited and locked from your wallet, and a stake record is created.
Goes Active
If the plan is auto-approved the stake activates instantly; otherwise it stays Pending until an admin approves it. Once active, the maturity date and first payout date are set.
Earn Automatically
On every payout cycle the system credits the reward straight to your wallet and logs a transaction — no action needed. My Stakes shows paid vs. expected profit, payouts completed, and the next payout date.
Matures & Closes
When the term ends (or all scheduled payouts are made) the stake is marked Completed. If the plan returns principal, your original stake is automatically credited back to your wallet.
Example: what a plan looks like
Example: how the money flows
Suppose you stake 1,000 USDT into the "Golden 30" plan above. Here is exactly what happens to your balance:
| When | What happens | Your wallet |
|---|---|---|
| Day 0 | You stake 1,000 USDT — it is locked out of your spendable balance. | − 1,000 USDT |
| Every day | 1% of 1,000 = 10 USDT is credited to your wallet automatically. | + 10 USDT × 30 |
| Day 30 (maturity) | All 30 payouts are done (300 USDT total), and your 1,000 USDT principal is returned. | + 1,000 USDT |
| Result | You keep your 1,000 USDT and earned 300 USDT profit. | 1,300 USDT total |
Numbers are an illustration — your platform's real plans, rates, currencies, and lock terms are set by the admin. A Fixed plan would instead pay the same flat amount each payout regardless of how much you stake.
Example: tracking it on "My Stakes"
Track every stake's status, principal, rewards paid so far, expected total profit, payouts completed, and the next payout date — all from one screen. Each payout and the principal return also appear in your normal transaction history.
A stake moves through Pending → Active → Completed. If a pending stake is Rejected, or an active stake is Canceled by an admin, your full principal is returned to your wallet right away. There is no self-service early unstake — an active stake runs to its maturity date.
By default Wallet Earn requires a verified account. If staking is hidden for you, complete KYC first — the requirement can be changed by the admin under Feature Controls.
Mobile Recharge New in 2.0
Top up any mobile number from wallet balance — for yourself or anyone else — through the platform's configured recharge provider.
Enter Number & Operator
Pick the country and operator from the admin-configured list, then enter the destination phone number.
Choose Amount
Pick from suggested packages or enter a custom amount within the configured min/max.
Confirm & Pay
Fee preview, final cost, and wallet PIN prompt before submission.
Receive Status
Status update — Completed, Pending, or Failed — with a notification + transaction record.
- Supported drivers: Sandbox (testing), Reloadly (global airtime), generic HTTP API.
- Recharge history shows every top-up with operator, amount, fee, and provider reference.
- Failed recharges automatically refund the wallet.
Pay Merchants
Three ways to pay registered merchants — scan a QR code, open a payment link, or apply a voucher at checkout.
QR Code
Merchants display their unique payment QR; customers open it from a camera or QR app to load the checkout page directly.
Payment Link
Open a merchant's payment link from chat, email, or social — sign in or pay as guest with a supported gateway.
Voucher Code
Apply a redeemable voucher at checkout to reduce the payable amount or pay in full.
Digital Receipt
Every merchant payment generates a downloadable PDF receipt with order reference and tax breakdown.
Create Payment Links
Generate shareable links to collect money from anyone — even people without a platform account.
- Choose Fixed Amount (locked) or Buyer-defined (payer chooses).
- Pick currency, optional expiry date, and a maximum number of uses.
- Share the generated link by chat, email, social, or QR.
- Payers can pay from their wallet or any active gateway — no signup required for guest gateway payments.
- Track collected payments, refunds, and link status from My Payment Links.
P2P Trading New in 2.0
Buy or sell currency directly with other platform users through escrow-protected peer-to-peer trades.
The marketplace works like a familiar crypto P2P board: pick Buy or Sell, filter by asset, currency, and payment method, and trade with vetted advertisers who show their completion rate, trade count, and a Trusted badge.
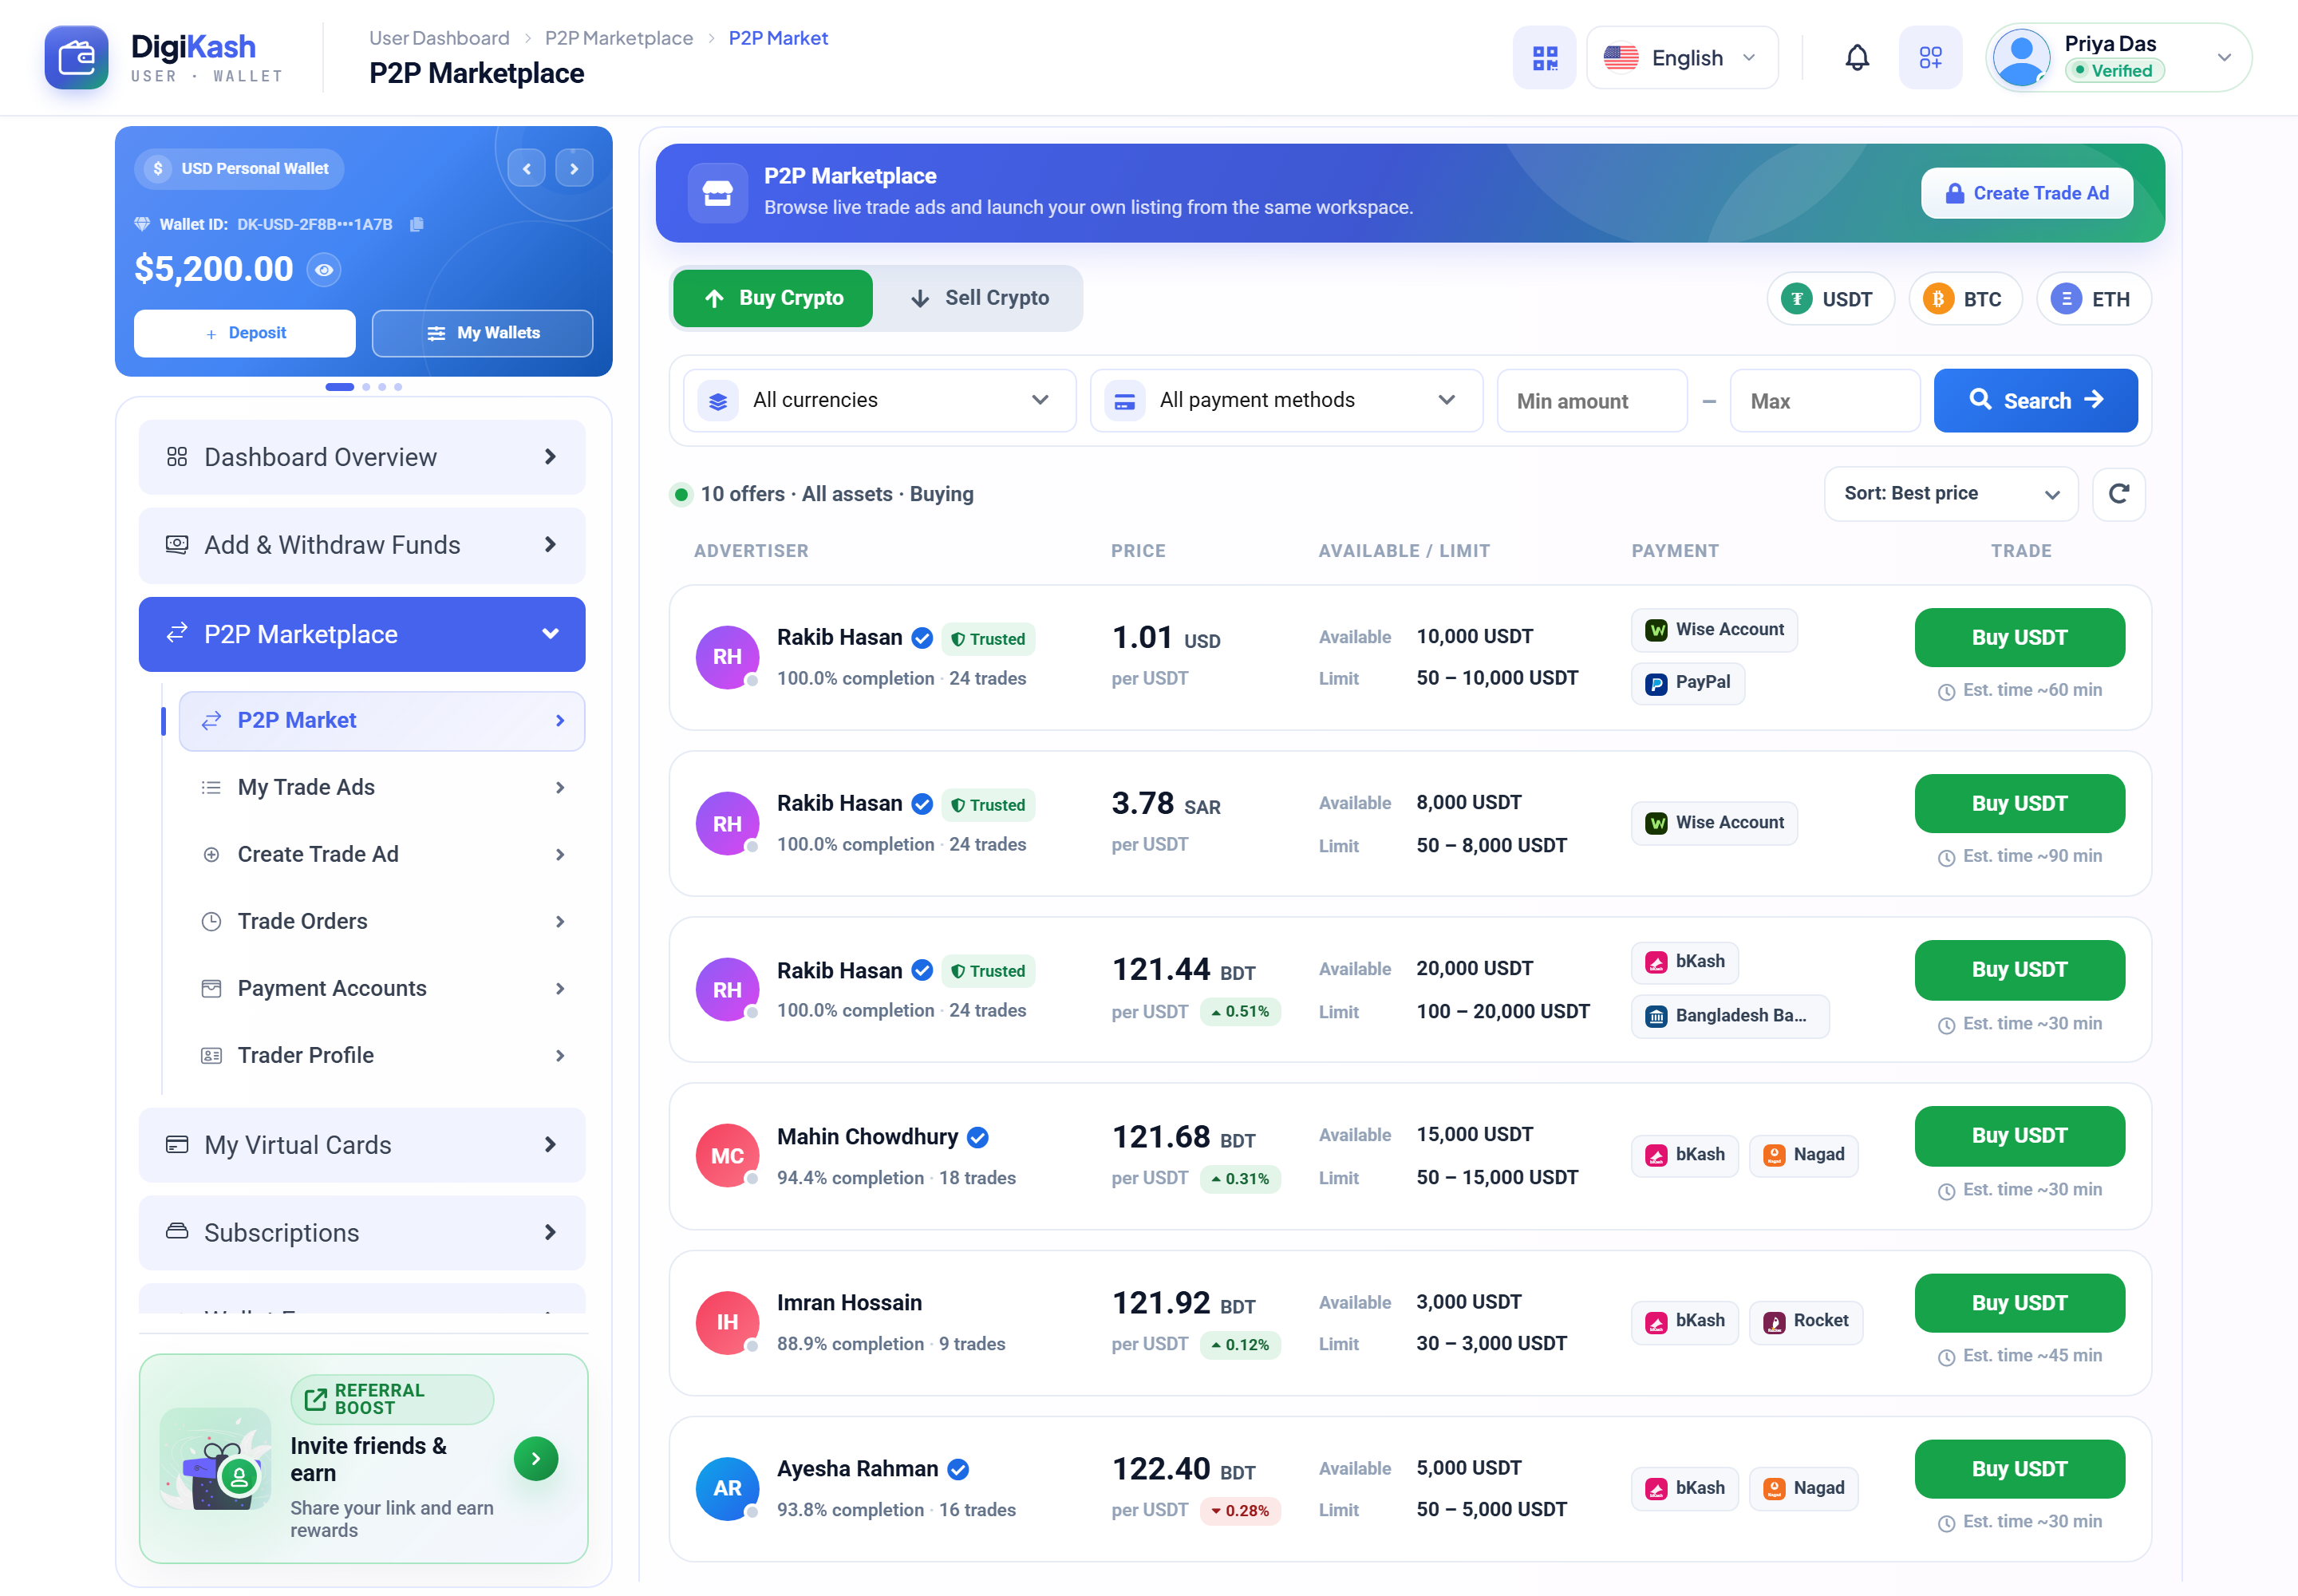
As a Buyer / Seller
- Browse the marketplace — filter offers by currency, payment method, country, and price.
- Open an order: the seller's funds are locked in escrow immediately.
- Pay (or receive payment) through the agreed off-platform method.
- Mark as paid / confirm receipt — escrow releases automatically.
- Rate the counterparty after the trade closes.
As an Advertiser
- Post offer ads with your own price, min/max trade limits, payment methods, and terms.
- Save reusable Payment Accounts (bank, mobile money, cash) for fast offer creation.
- Promote offers with paid Promotion Packages for featured placement.
- Built-in trader profile with completion rate, response time, and rating.
Disputes & Safety
- Open a dispute from inside the trade chat with proof attachments.
- Platform admins review history and rule on the verdict.
- Escrow only releases on mutual confirmation or admin verdict — funds are never at risk in transit.
Virtual Cards
Apply for a virtual card, top it up from your wallet, and use it for online payments anywhere Visa or Mastercard is accepted.
The My Cards page is your hub. The top row totals your balance, monthly spend, and pending authorizations across all cards, and the selected card shows its live balance, masked number, expiry, and a Reveal button for the full details — with Freeze and Set Limits right below (where the provider supports them). The left tabs switch between My Cards, Cardholders, and My Requests.
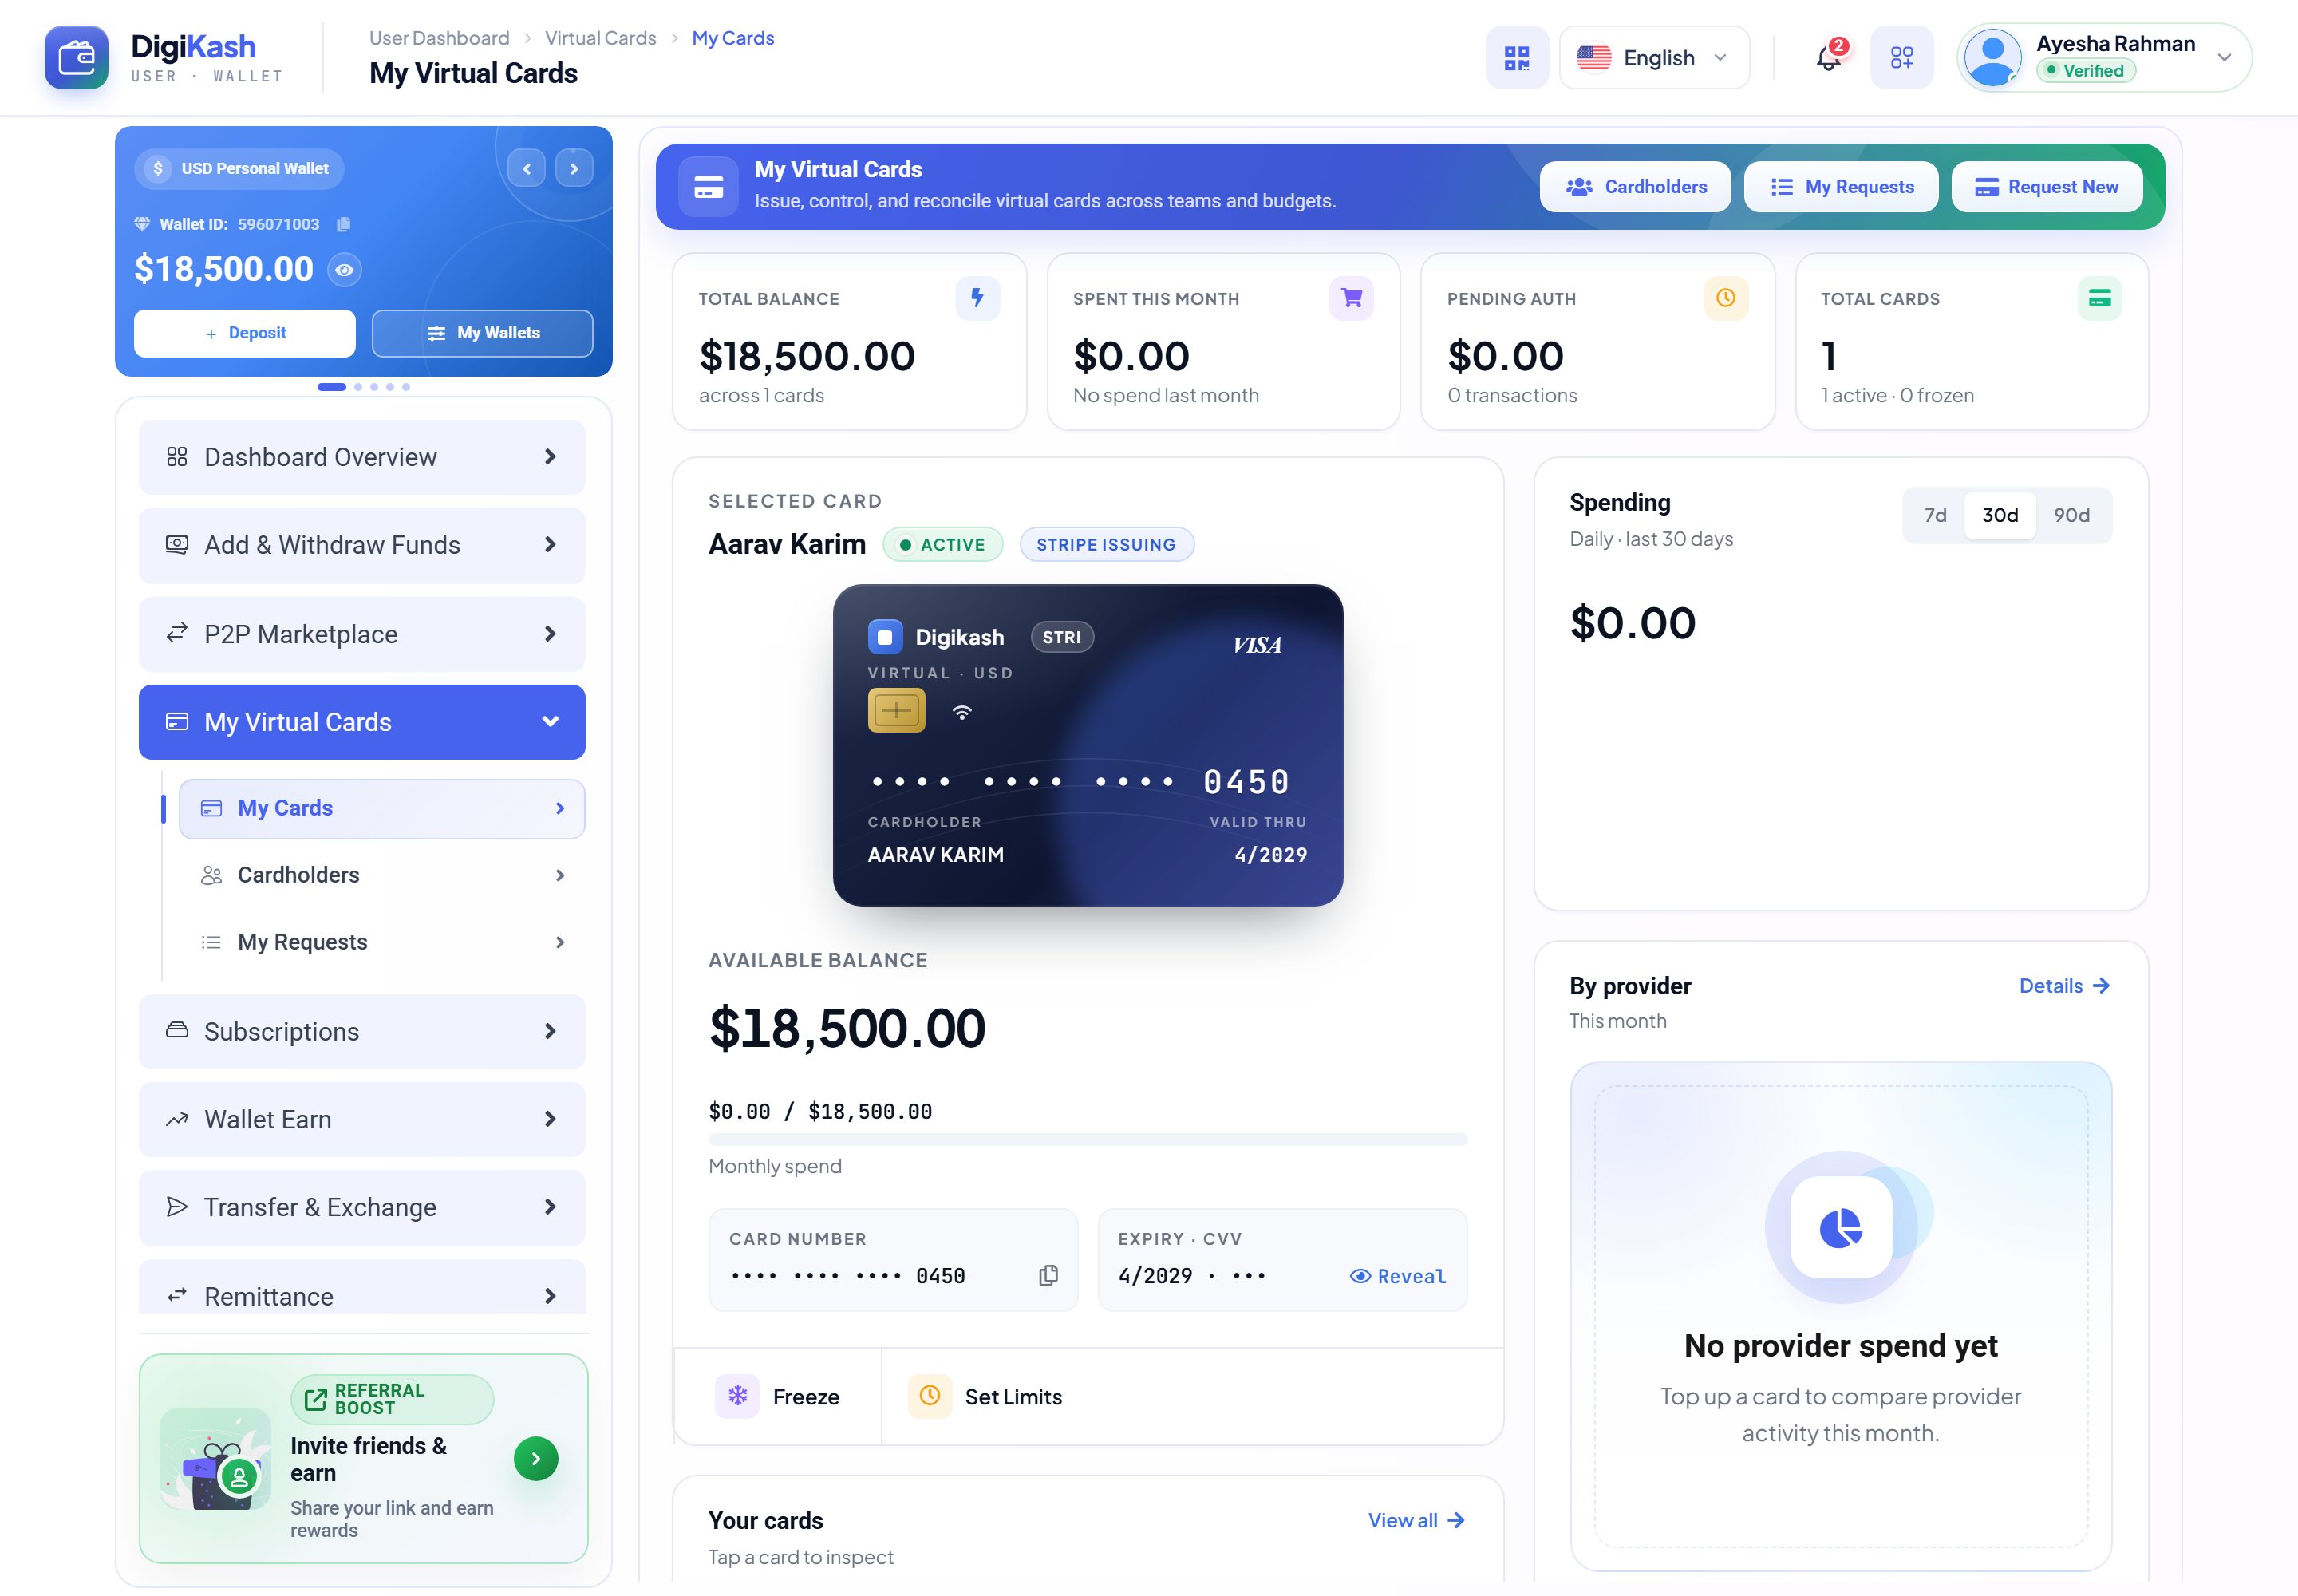
Your wallet balance funds the card, and the exact actions you'll see — top-up, withdraw, freeze, spend limits — depend on the provider your platform issued it through. Here's the journey from request to first payment:
Request a card
Open Request New Card, choose the currency and network, and fill in any KYC fields the provider asks for (name on card, address, date of birth).
Get approved
Your request goes to the admin review queue. On approval the card is issued and the one-time issuance fee is taken from your wallet.
Add funds
Move wallet balance onto the card from My Cards to set its spendable amount. Pull funds back anytime with Withdraw, where the provider supports it.
Pay online
Reveal the card number, expiry, and CVV in the secure panel, then use it anywhere Visa or Mastercard is accepted. Freeze it instantly if it's ever lost.
- Each card keeps a full transaction history — every authorization and settlement is listed.
- Card details stay masked by default; reveal the full number and CVV only when you need them.
- Lost the card? Freeze it in one tap (available when your provider supports freeze).
- Top-up and withdraw fees are set by your platform and shown before you confirm.
Your virtual card number, expiry, and CVV can spend real money — never share them, only enter them on sites you trust, and freeze the card the moment something looks off.
Gift Cards
Users send a designed gift card funded straight from their wallet, or redeem a code they've received — all backed by a catalog of themed templates you control as the admin.
For users — send & redeem
The Gift Cards page leads with Create Gift Card and Redeem Code, and tracks everything you've Sent, Received, and Redeemed.
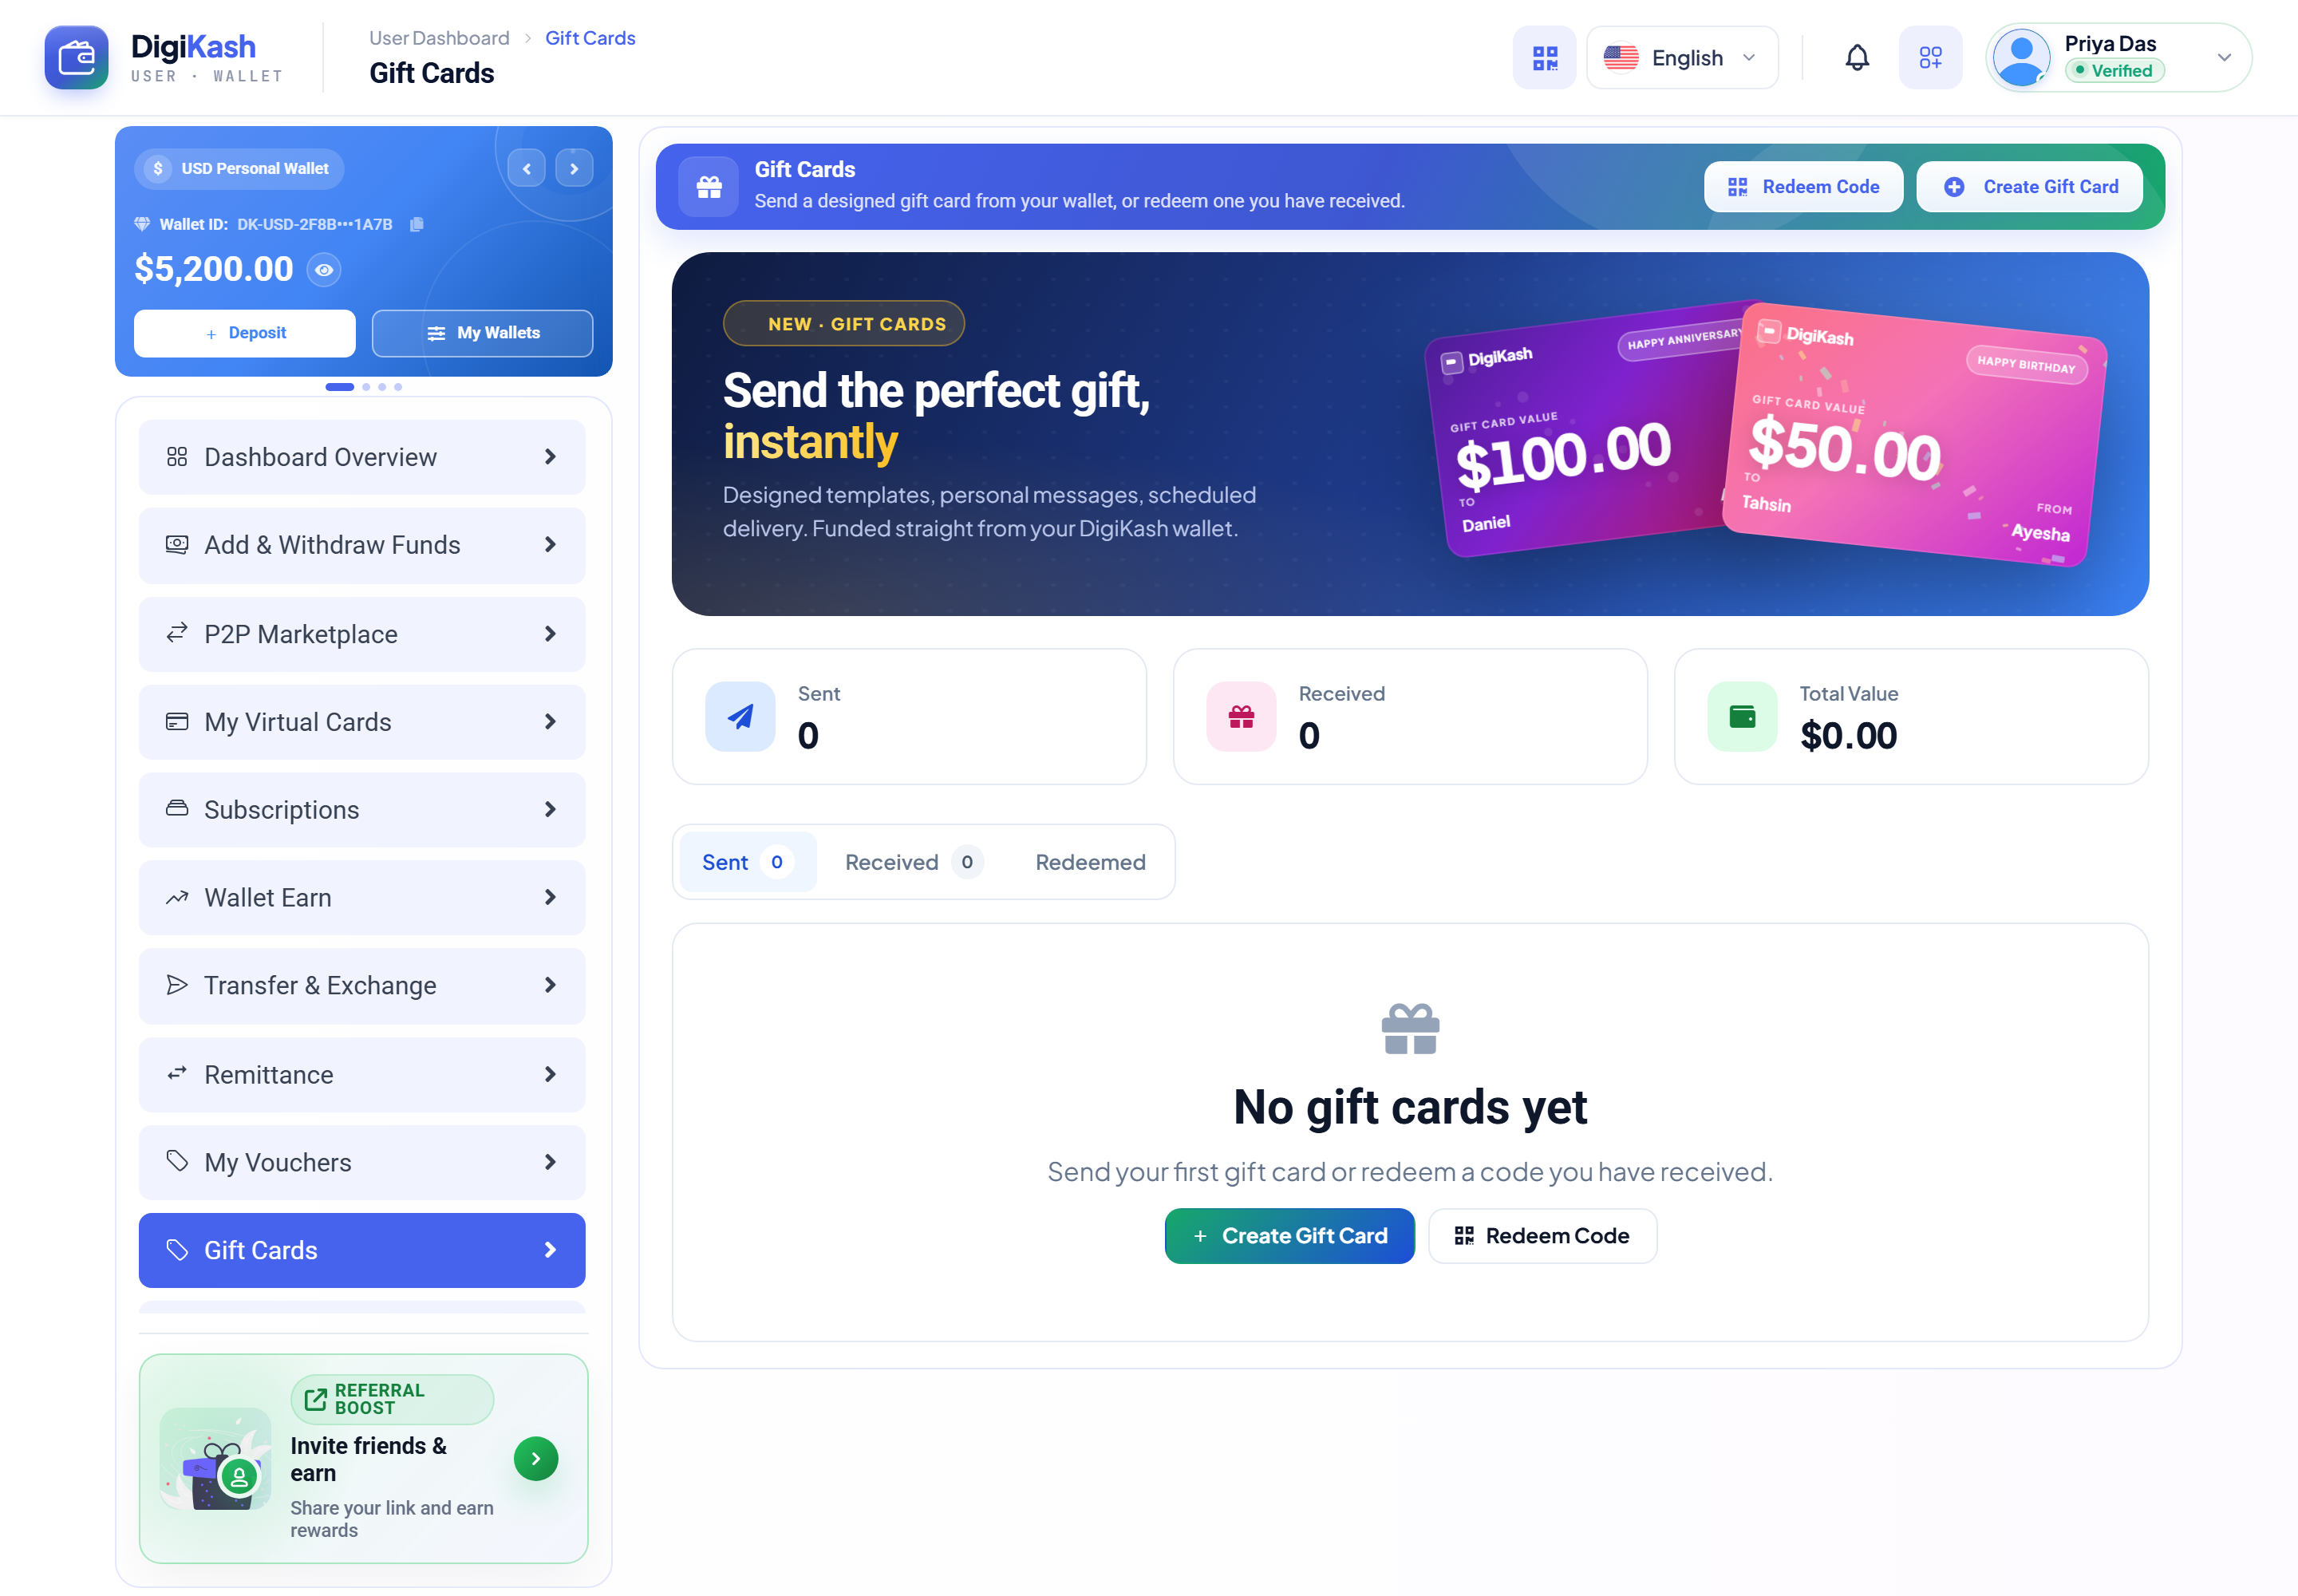
- Send — pick a template, set the amount and recipient email, add a personal message, and optionally schedule delivery. It's funded straight from your wallet.
- Redeem — enter a gift-card code you've received and the value lands in your wallet.
- Track — the Sent / Received / Redeemed tabs keep a full history with each card's status.
For admins — templates & oversight
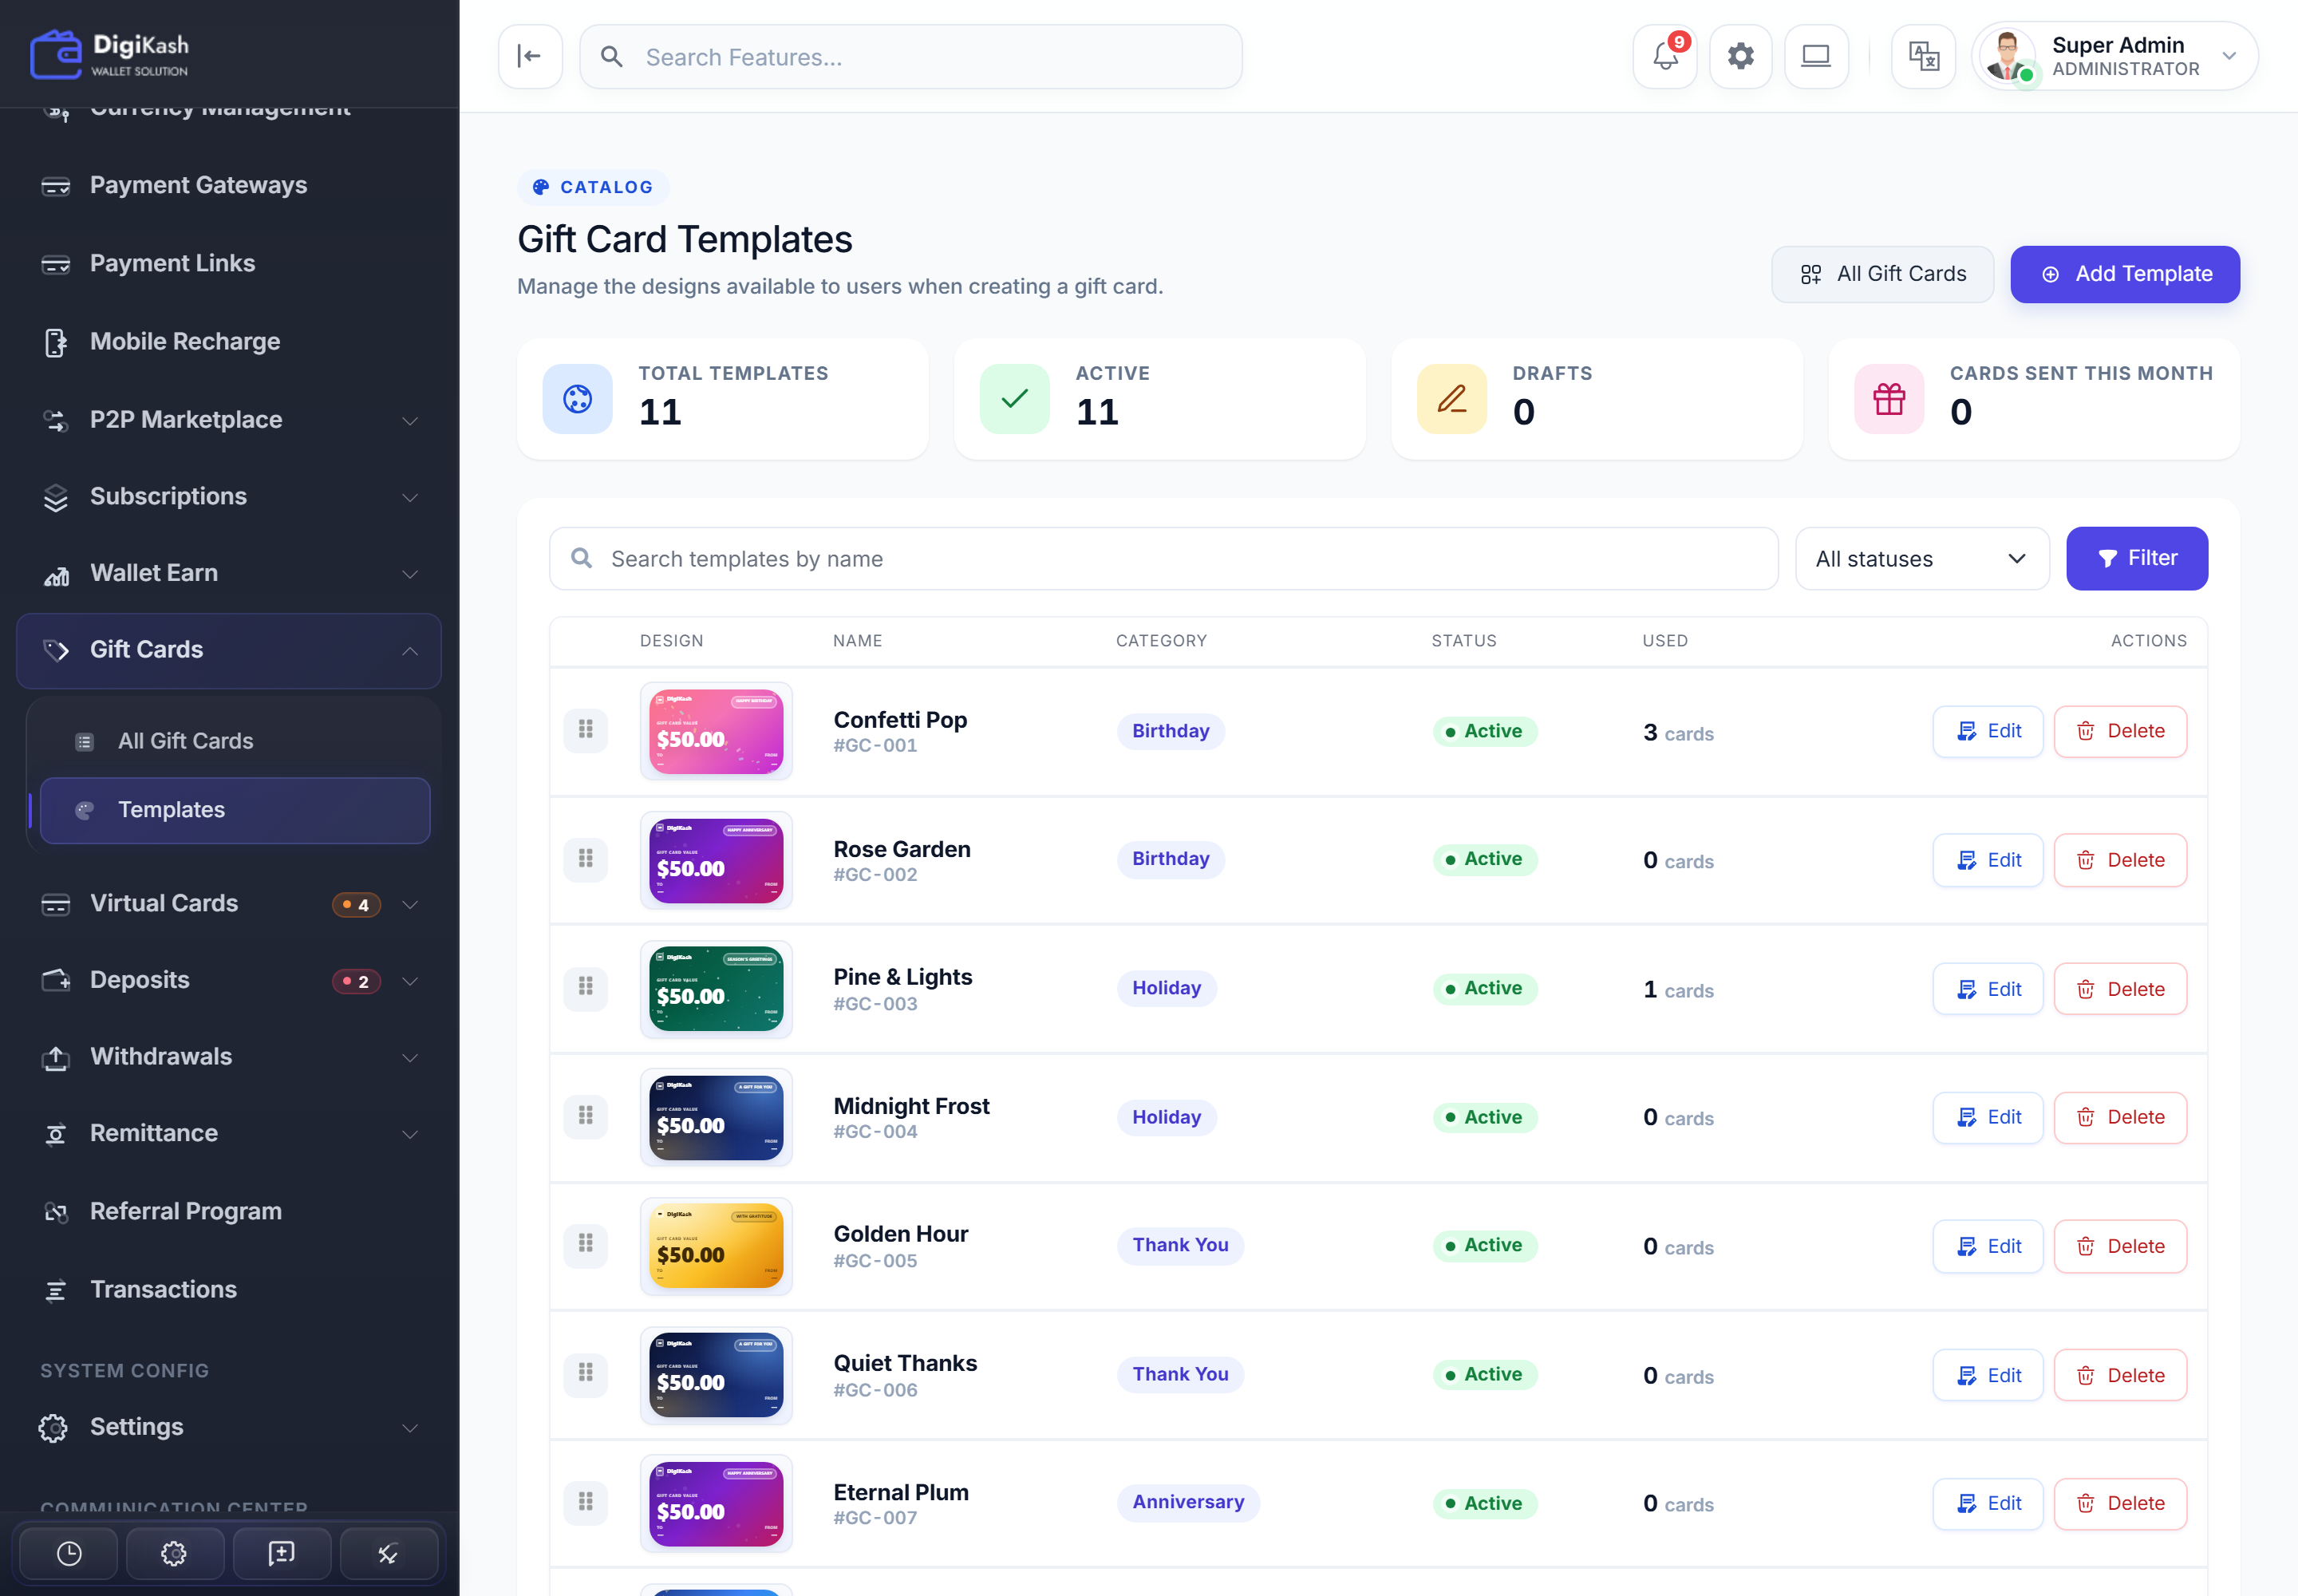
Templates is the design catalog users choose from — each template has a name, category (Birthday, Holiday, Thank You, Anniversary…), and active/draft status.
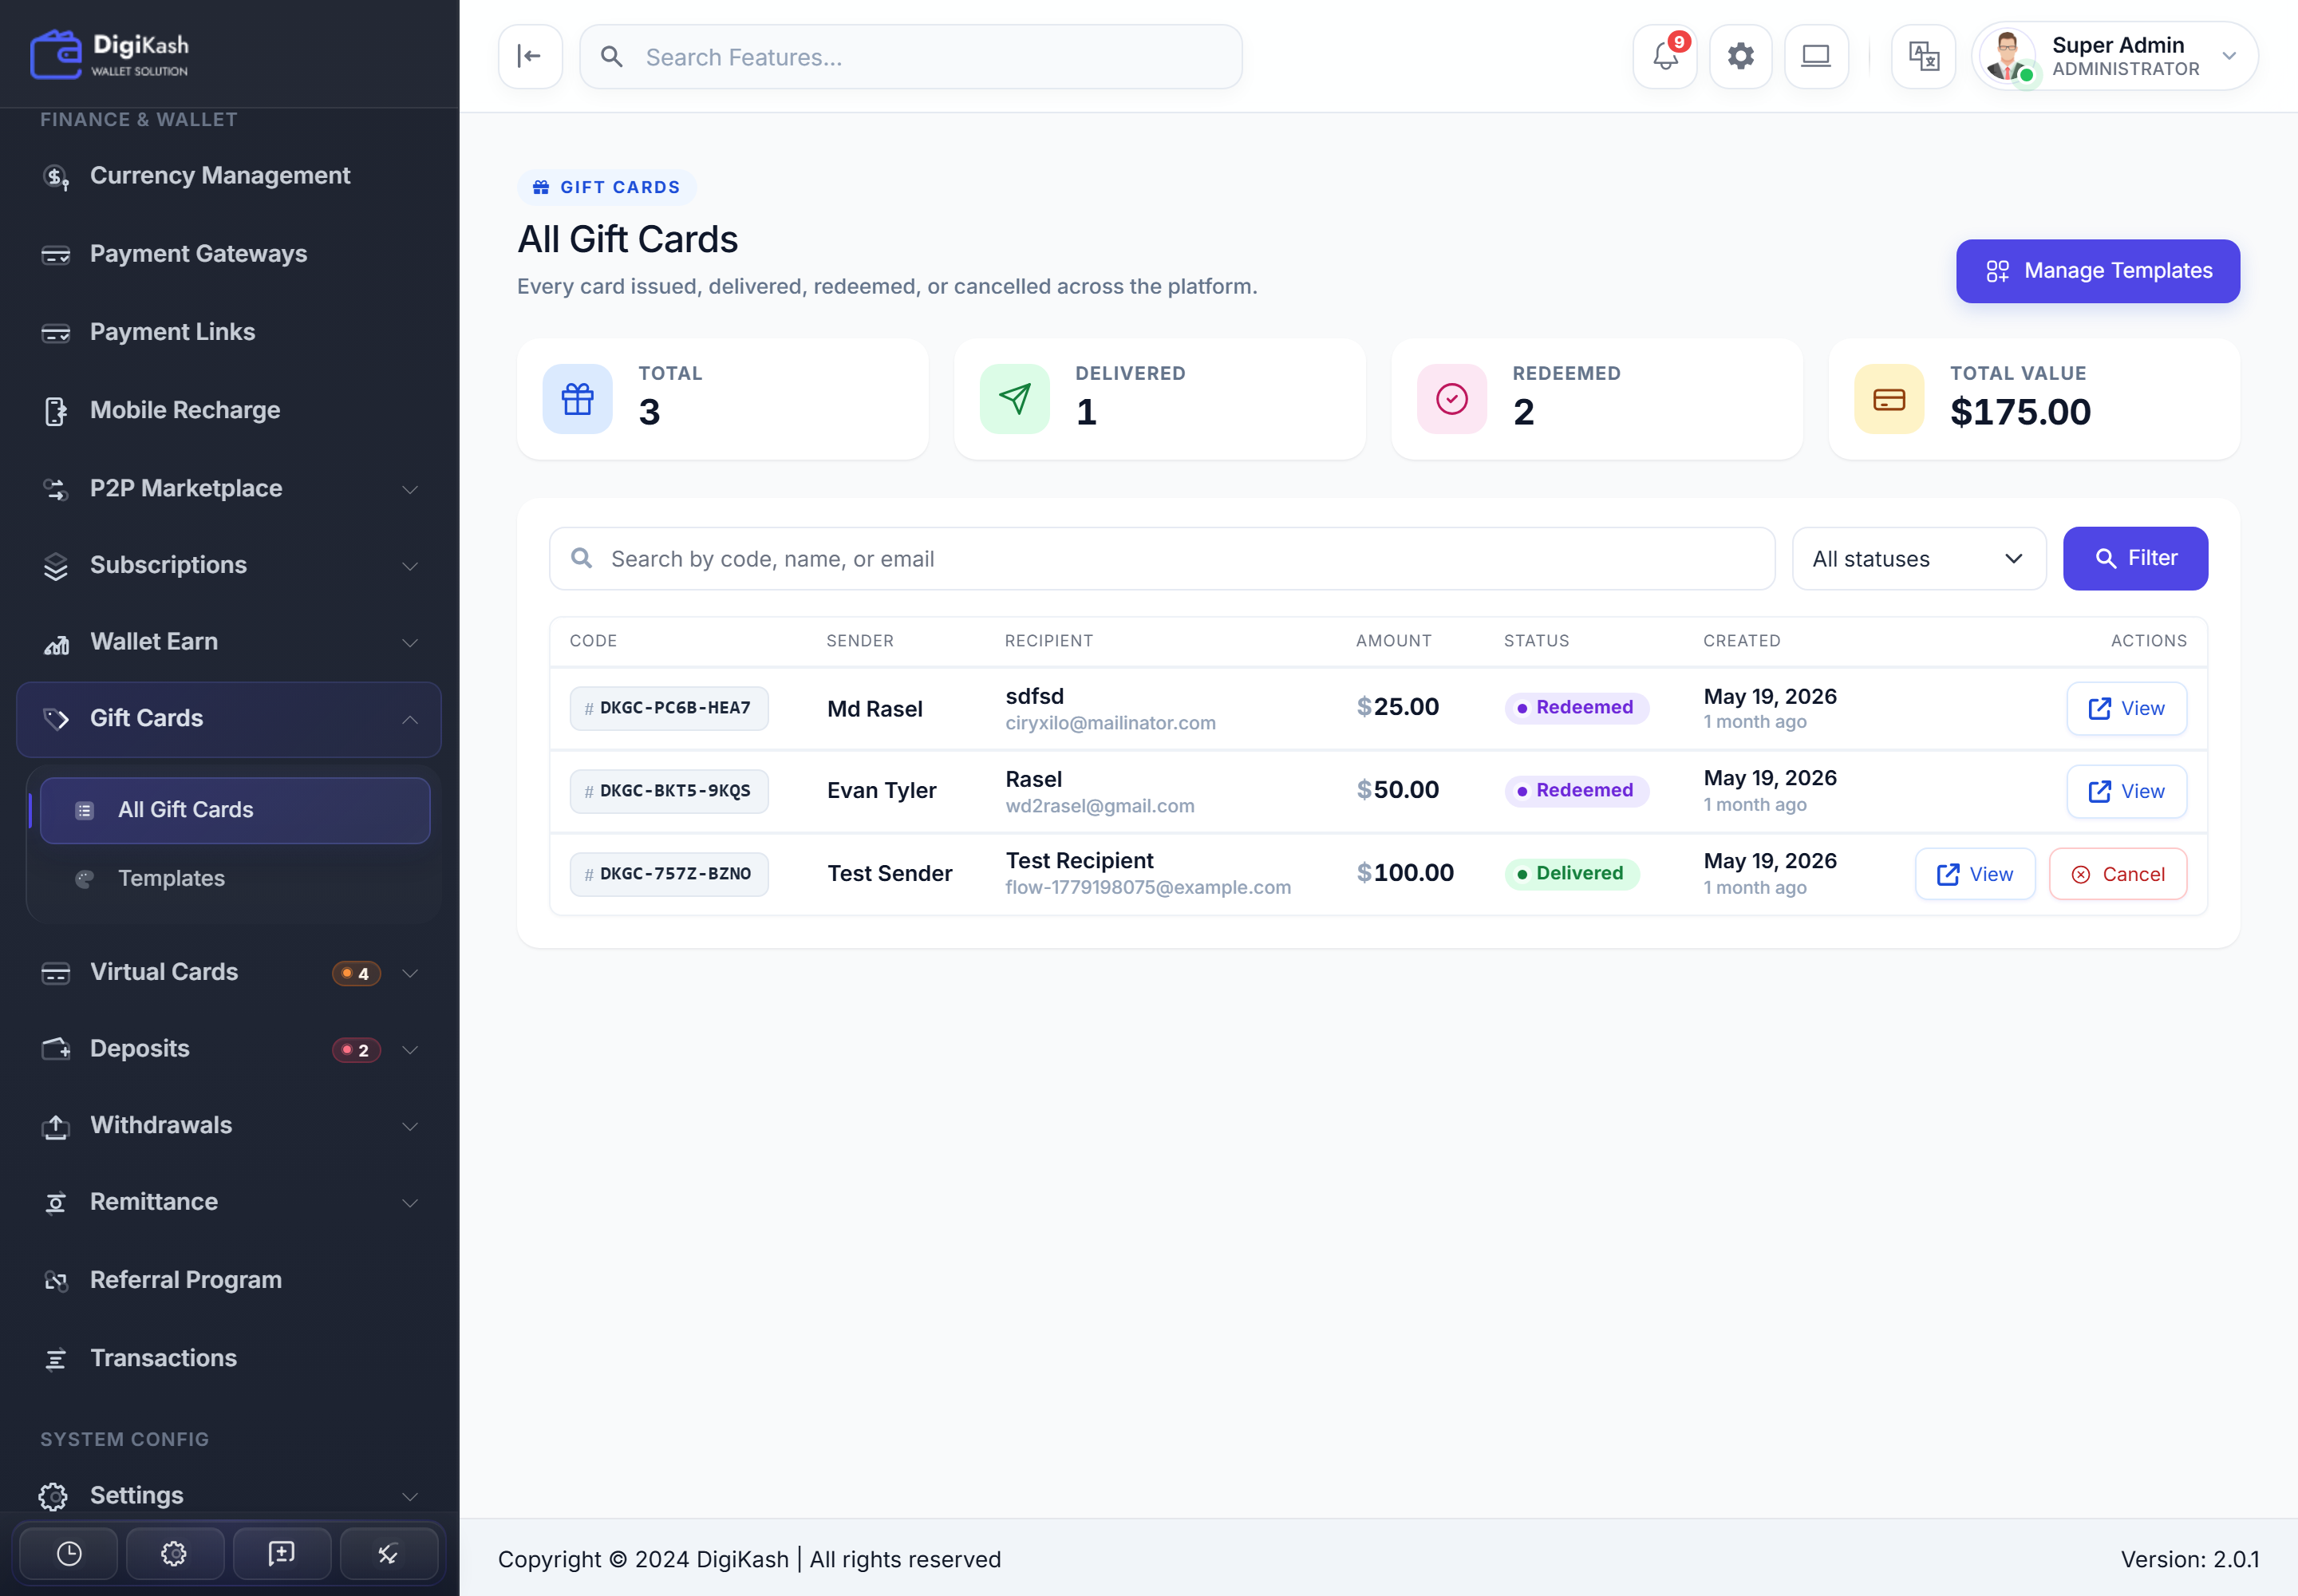
Every issued card shows up under All Gift Cards with its code, sender, recipient, amount, and status — and you can cancel a delivered card that hasn't been redeemed.
International Remittance New in {{V}}
Cross-border money transfer. Users send to recipients abroad with live FX quotes and clear fees, along corridors you define — each with its own margin, limits, and payout routing.
For users — send money abroad
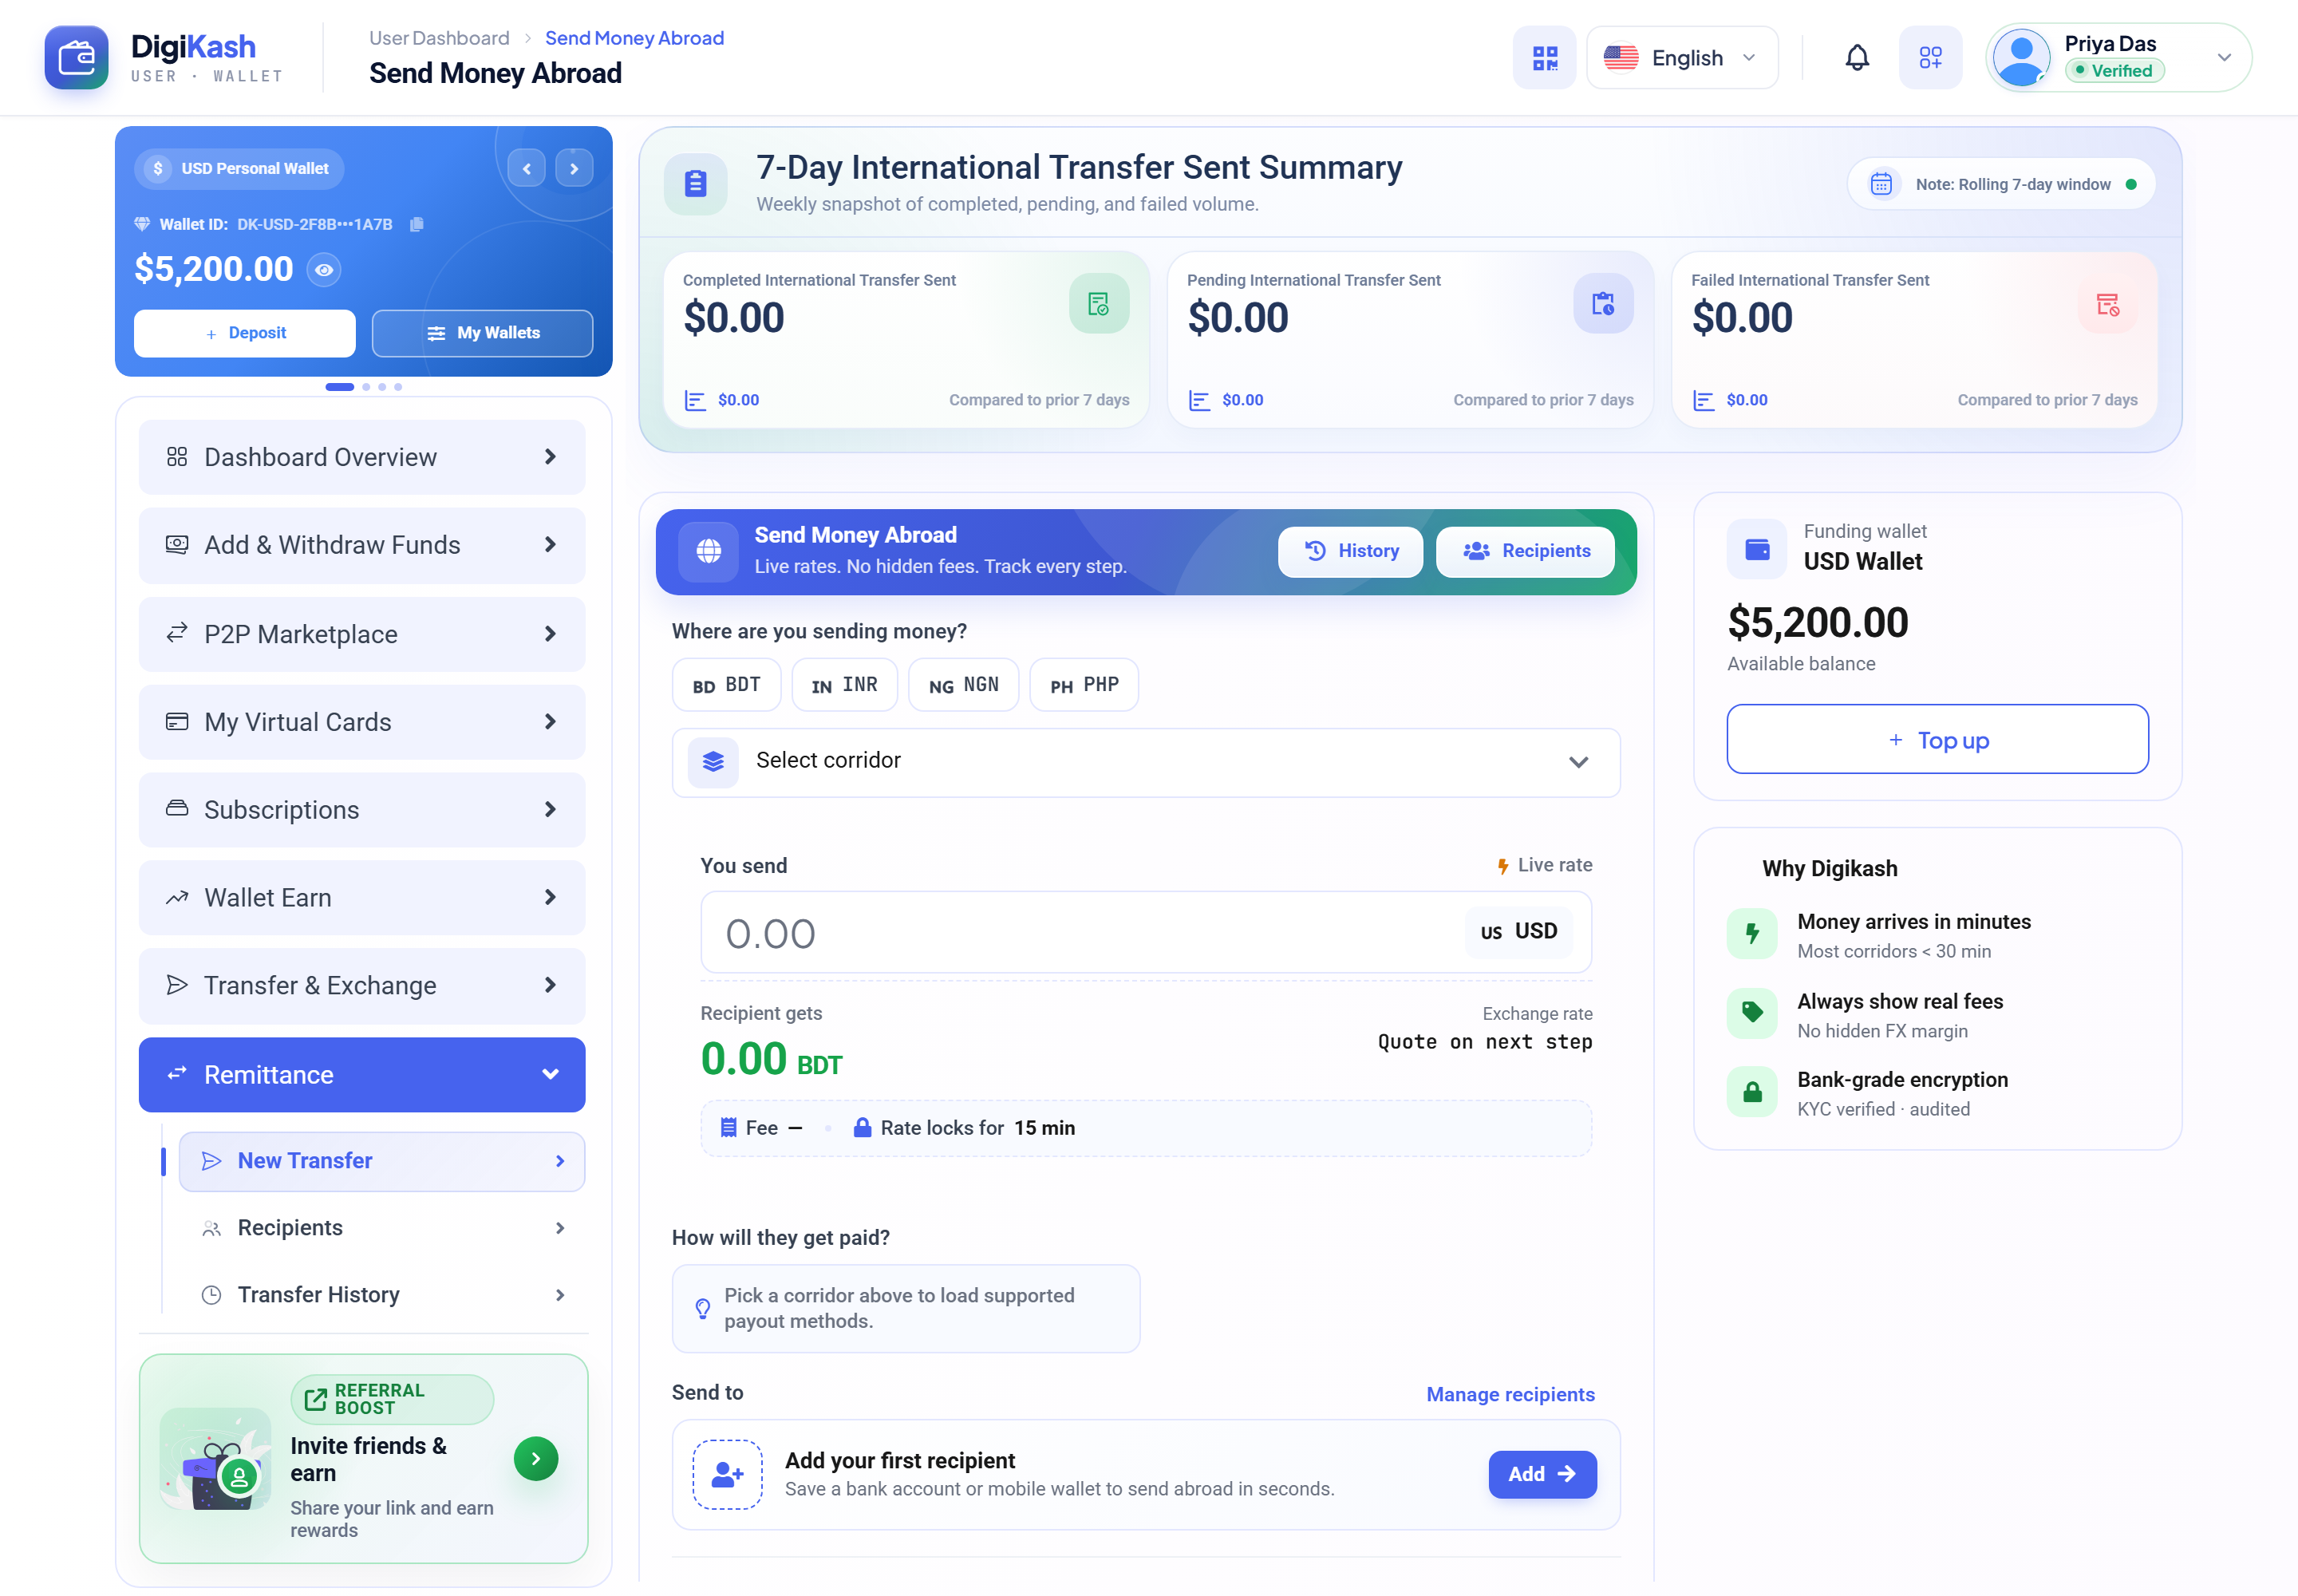
Choose a corridor
Pick the destination (e.g. USD → BDT). The live exchange rate and fee appear instantly.
Enter the amount
See exactly how much you send and how much the recipient gets. The quoted rate locks for ~15 minutes.
Pick payout & recipient
Choose how they get paid, then add or select a saved recipient.
Pay & track
Pay from your wallet and follow every step under Transfer History.
For admins — corridors & transfers
A corridor is a country pair with its own FX spread, fee (fixed + percentage), limits, and payout gateway. Add one per route you support — the sample below runs USD into Bangladesh, India, Nigeria, and the Philippines.
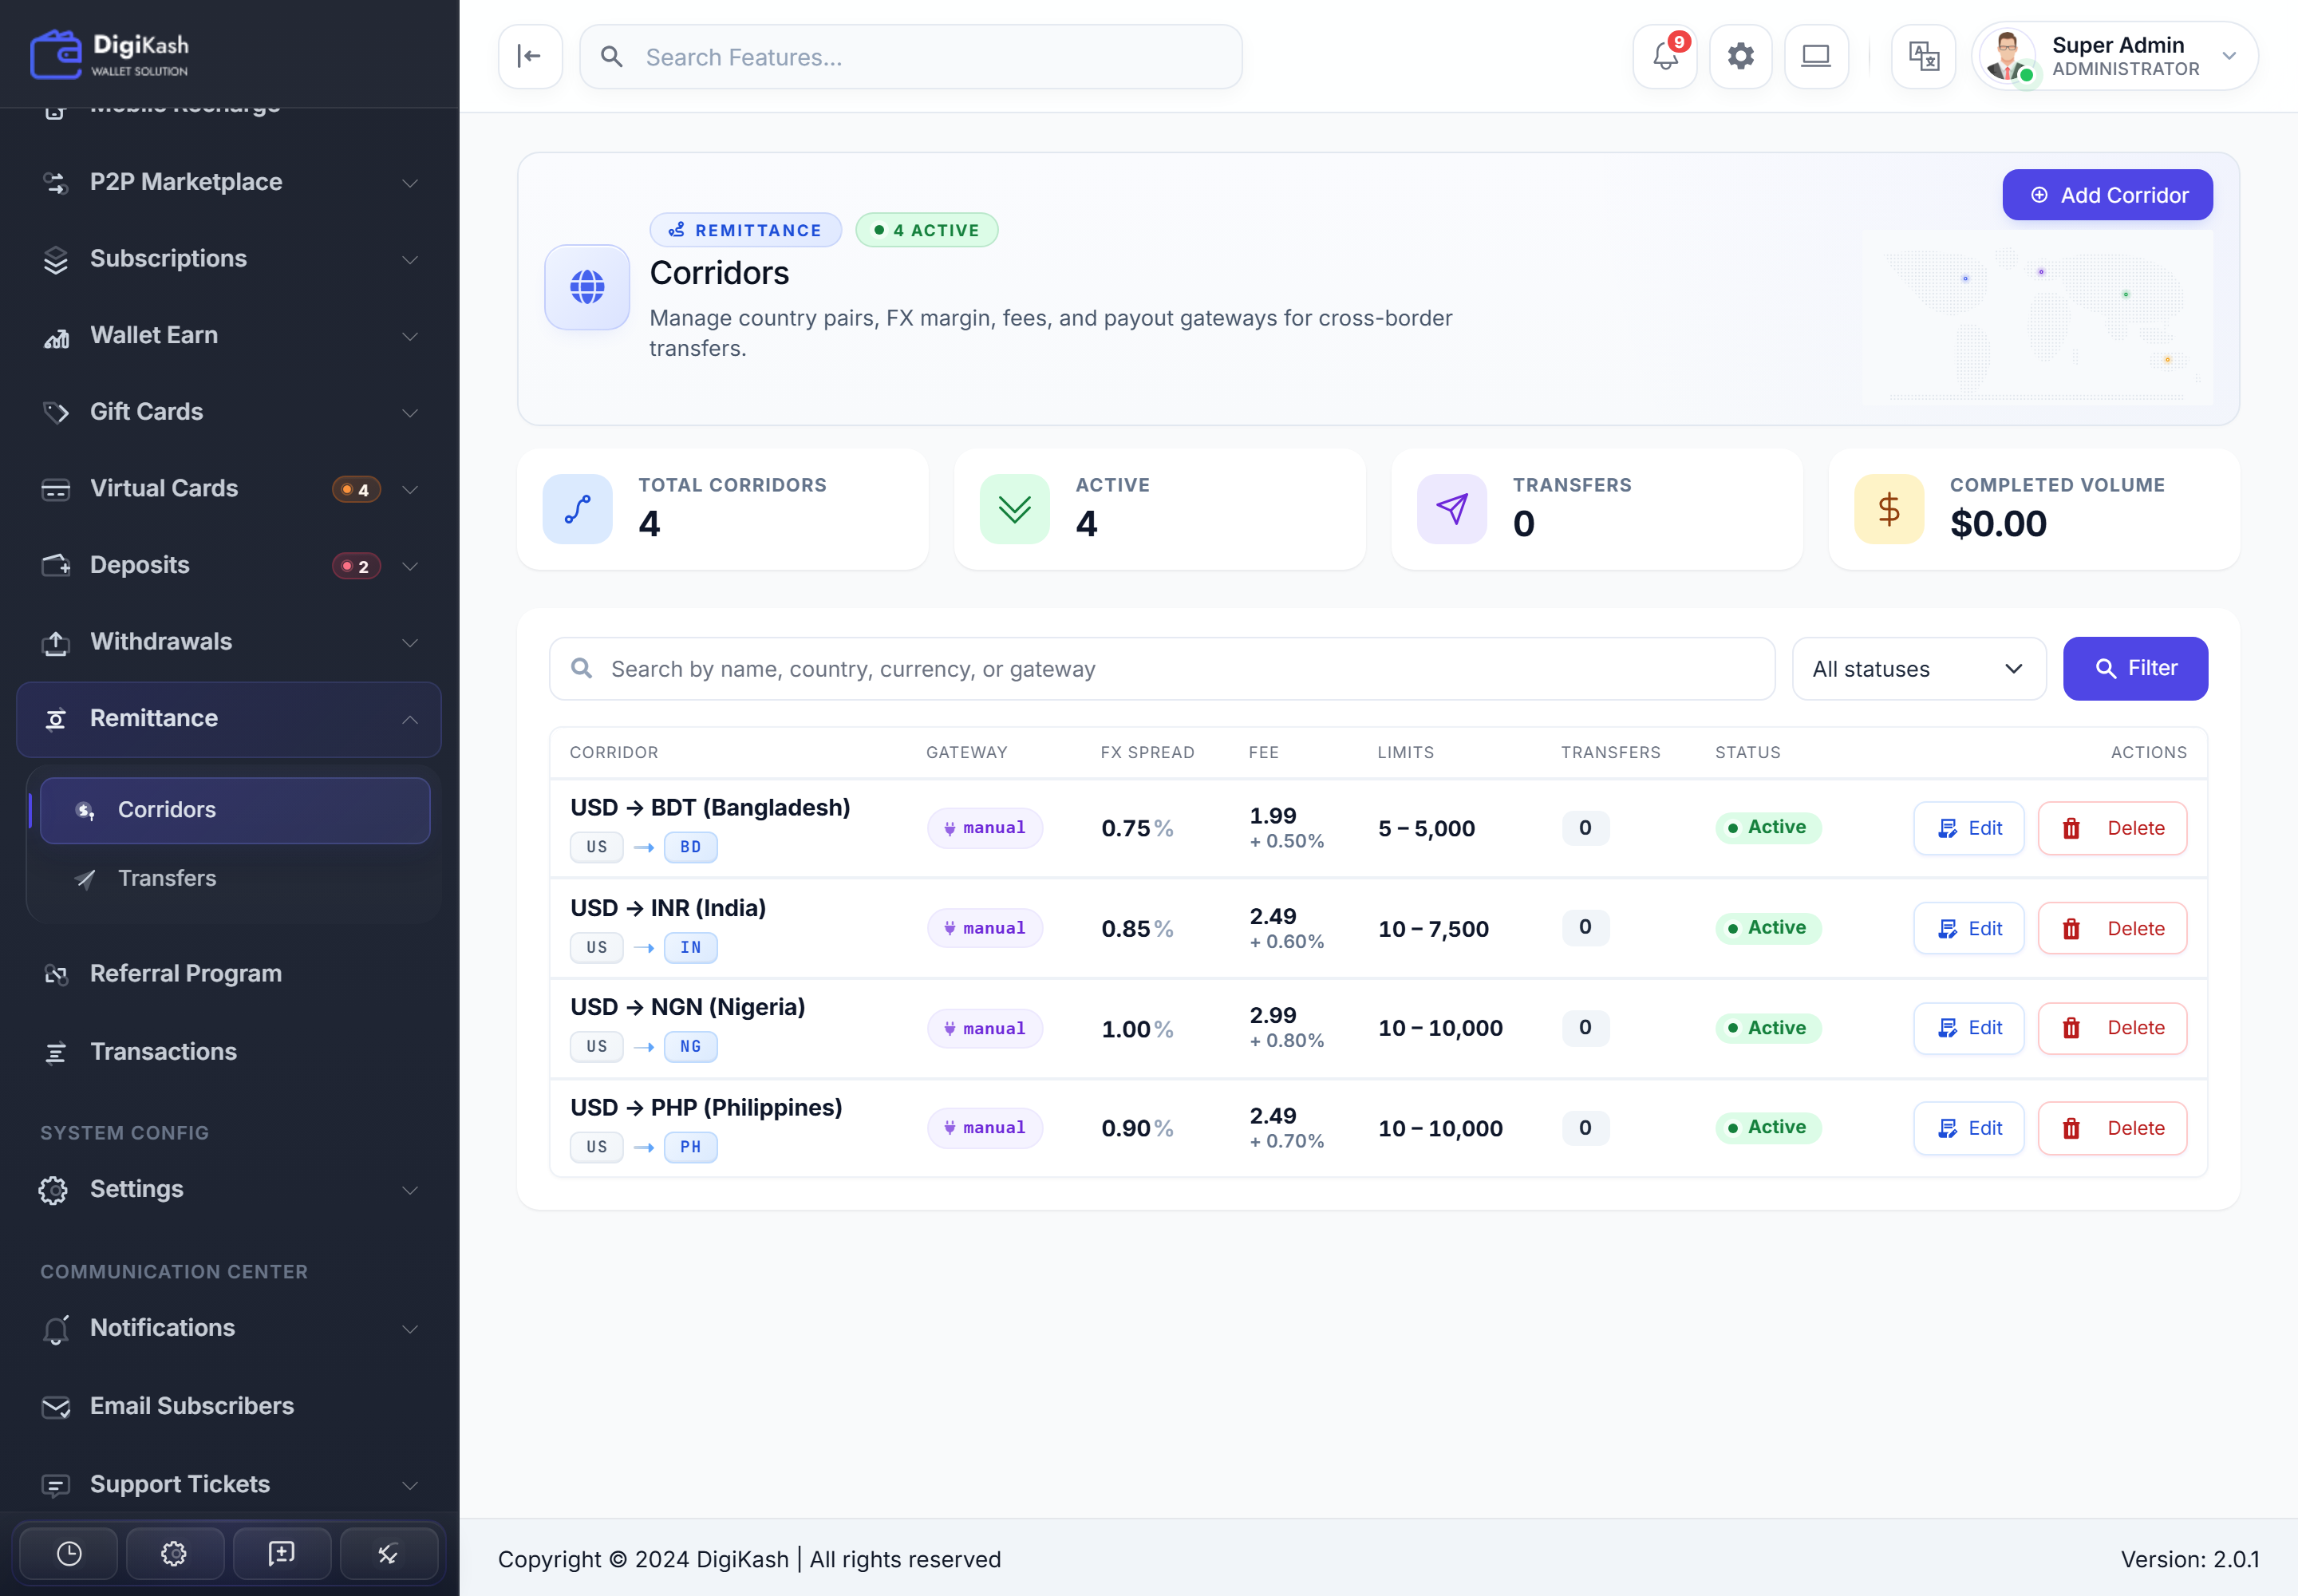
Every transfer is monitored under Transfers, so you can follow status and step in if a payout needs attention.
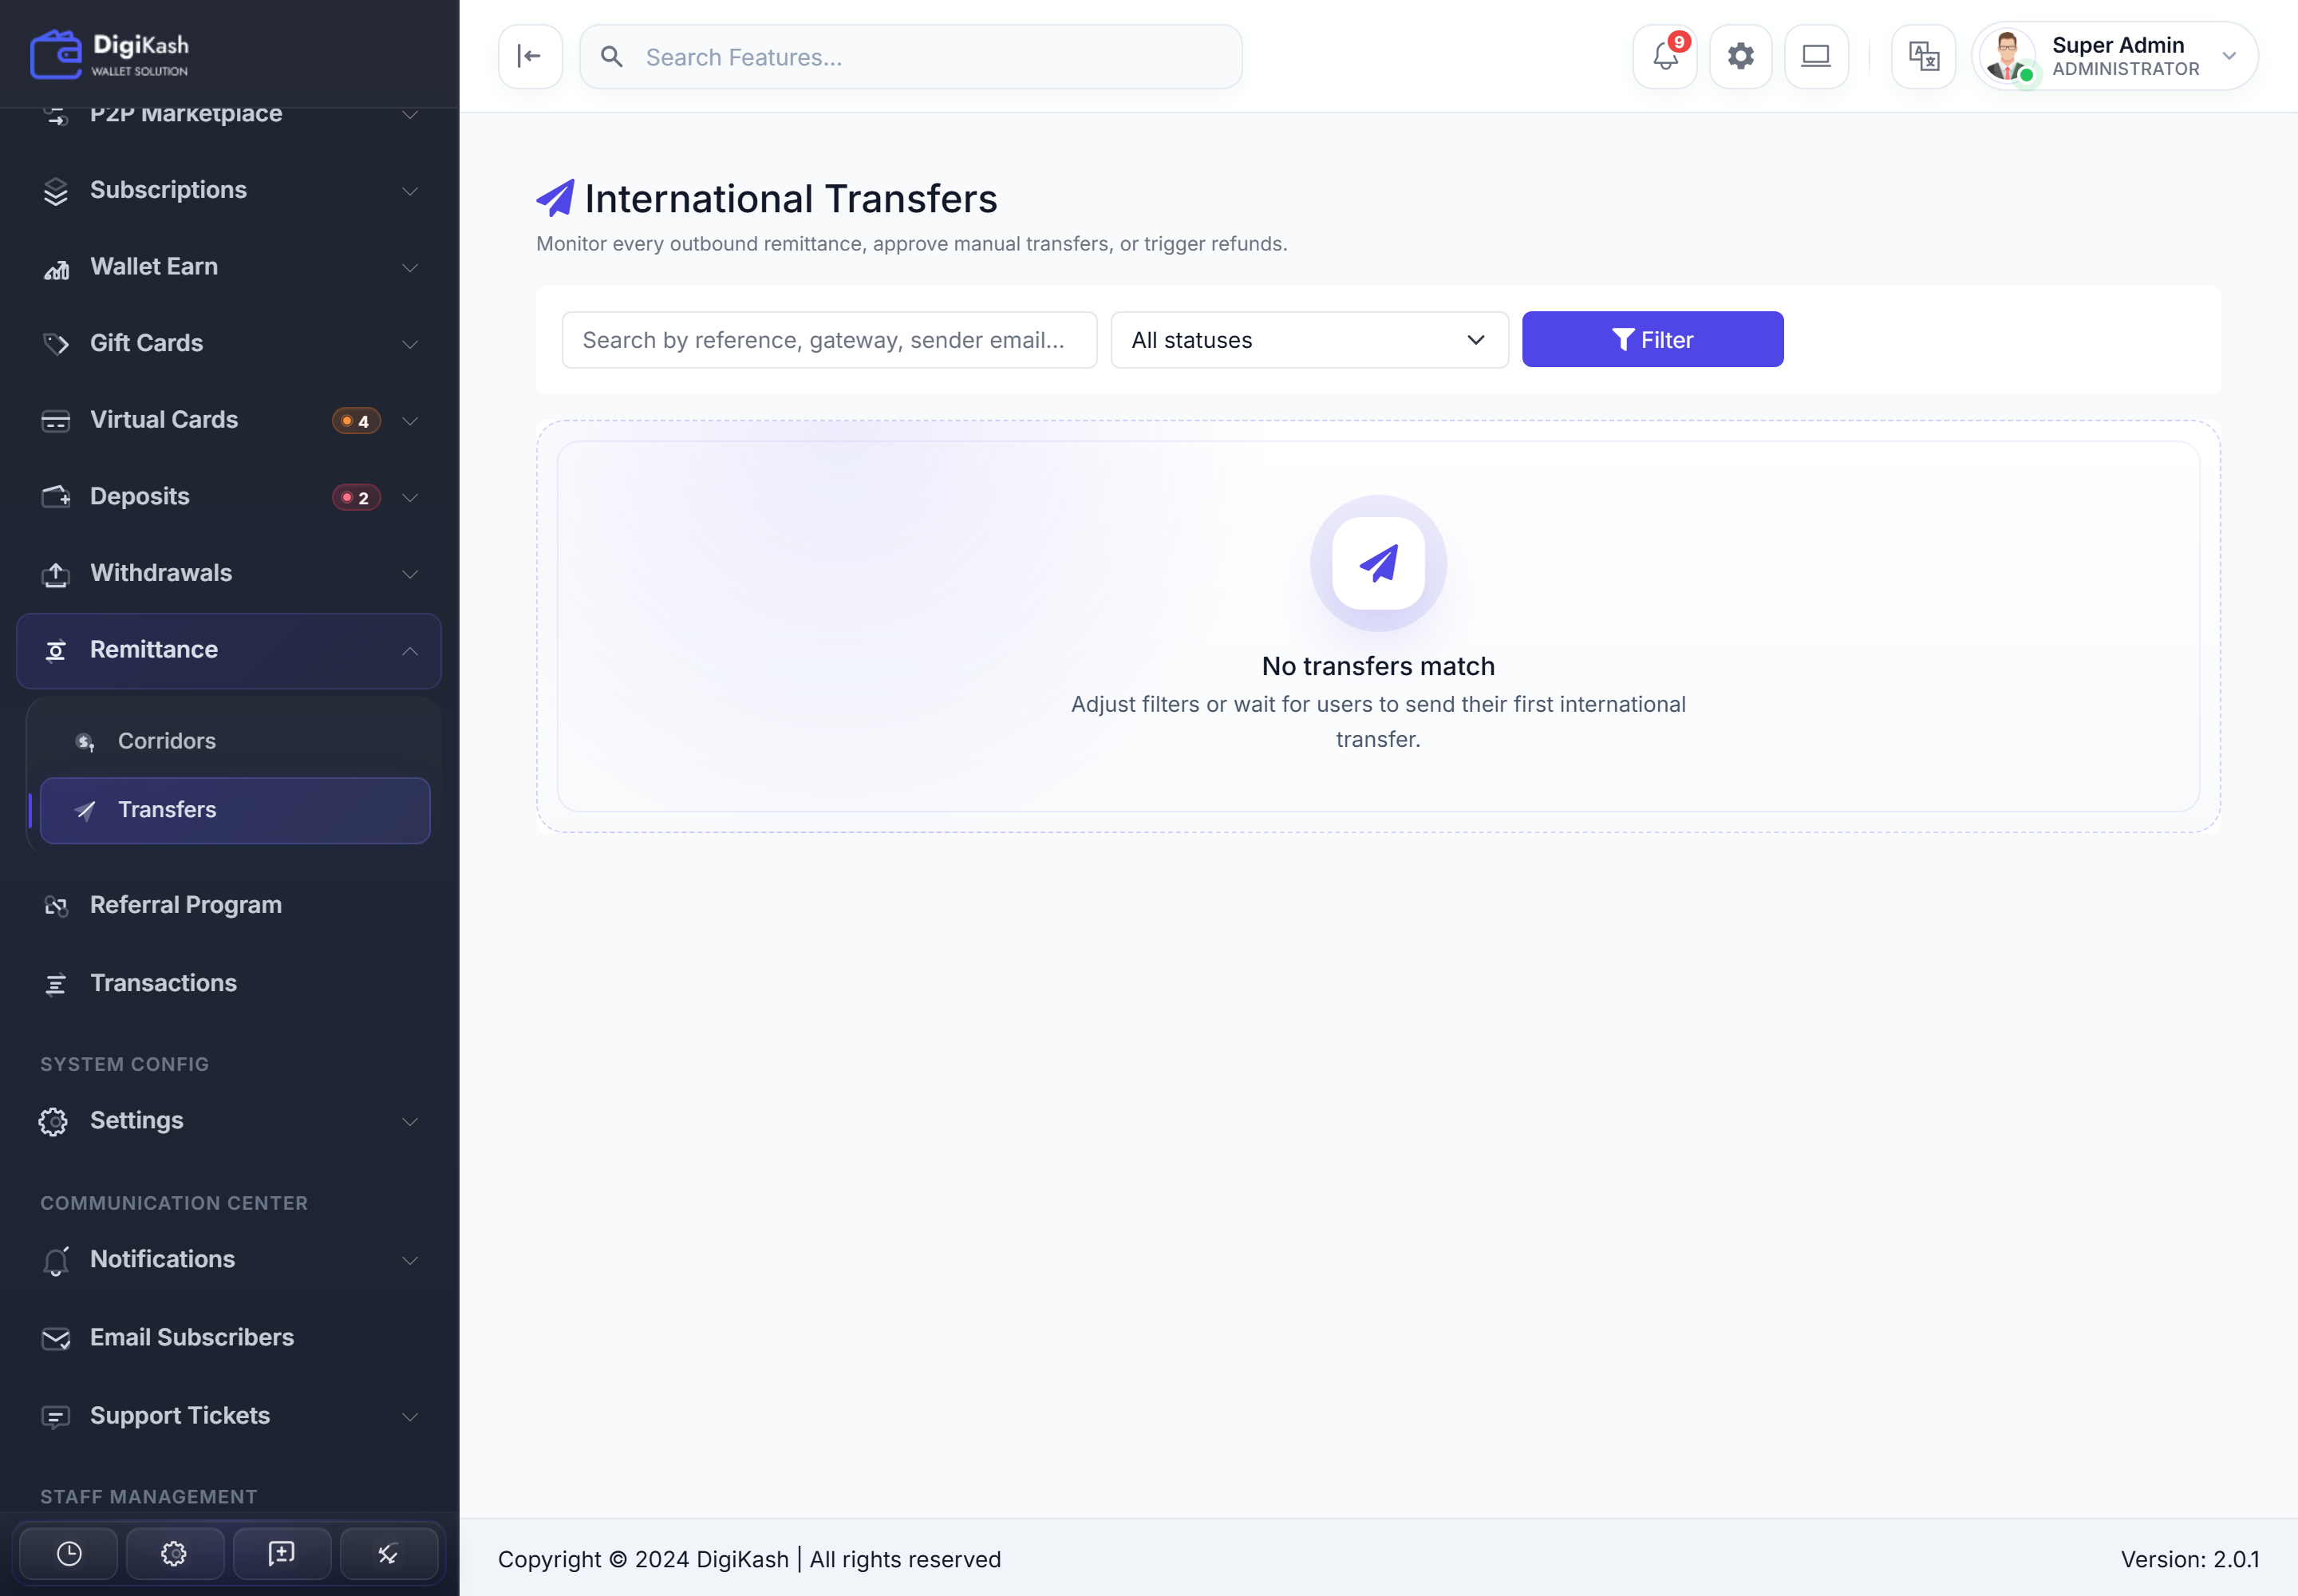
Cross-border transfers are regulated. Require KYC before remittance, set realistic per-corridor limits, and use the FX spread to cover your provider costs. Keep payout-gateway credentials in sandbox until you've tested a full transfer end-to-end.
Subscriptions New in 2.0
Browse available plans, subscribe to unlock platform features and quota upgrades, and manage billing from a single screen.
- Plan cards show price, billing cycle, included features, and quota limits.
- Subscribe in one tap — pays from wallet or any active gateway.
- Switch tiers anytime — proration applied automatically.
- Cancel anytime from My Subscription. Plan stays active until the period ends.
- Full transaction history with downloadable invoices.
Referral Program & Vouchers
Referral Program
- Get a unique referral code and shareable link from your profile.
- Earn configurable rewards when a referred friend signs up, completes KYC, or makes their first deposit.
- See your referral tree with each referred user, their status, and reward earned.
- Rewards credit directly to your wallet — no separate withdrawal step.
User Rankings
- Progress through ranks (Bronze → Silver → Gold → Platinum or admin-defined tiers).
- Each rank unlocks higher wallet limits, deeper referral tree depth, and reward multipliers.
- Promotion happens automatically as you cross the activity threshold.
Vouchers
- Redeem voucher codes from Wallet → Redeem Voucher.
- Codes credit the wallet instantly or apply as a discount at merchant checkout.
- Per-voucher expiry, amount, and usage limit enforced automatically.
KYC Verification
Submit identity documents to unlock KYC-gated features like withdrawals, virtual cards, P2P trading, and send-money limits.
Open KYC Form
The admin-configured KYC template lists the exact fields required for your account type.
Upload Documents
Upload required ID images / PDFs (e.g. national ID, passport, address proof, selfie).
Submit for Review
Submission queues for admin review. Status visible on the dashboard banner.
Decision Notification
The admin approves or rejects (with optional remarks). All KYC-gated features unlock immediately on approval; if rejected you can resubmit after fixing the flagged fields.
If a submission is rejected, you can fix the flagged fields and resubmit without losing previous data.
Profile & Security
Manage your personal details, account security, sessions, and verification from a single Settings workspace, organised into clear tabs.
Profile tab
Your identity and contact details — name, username, email, phone, avatar, language, and country. These feed your card name, receipts, and notifications.
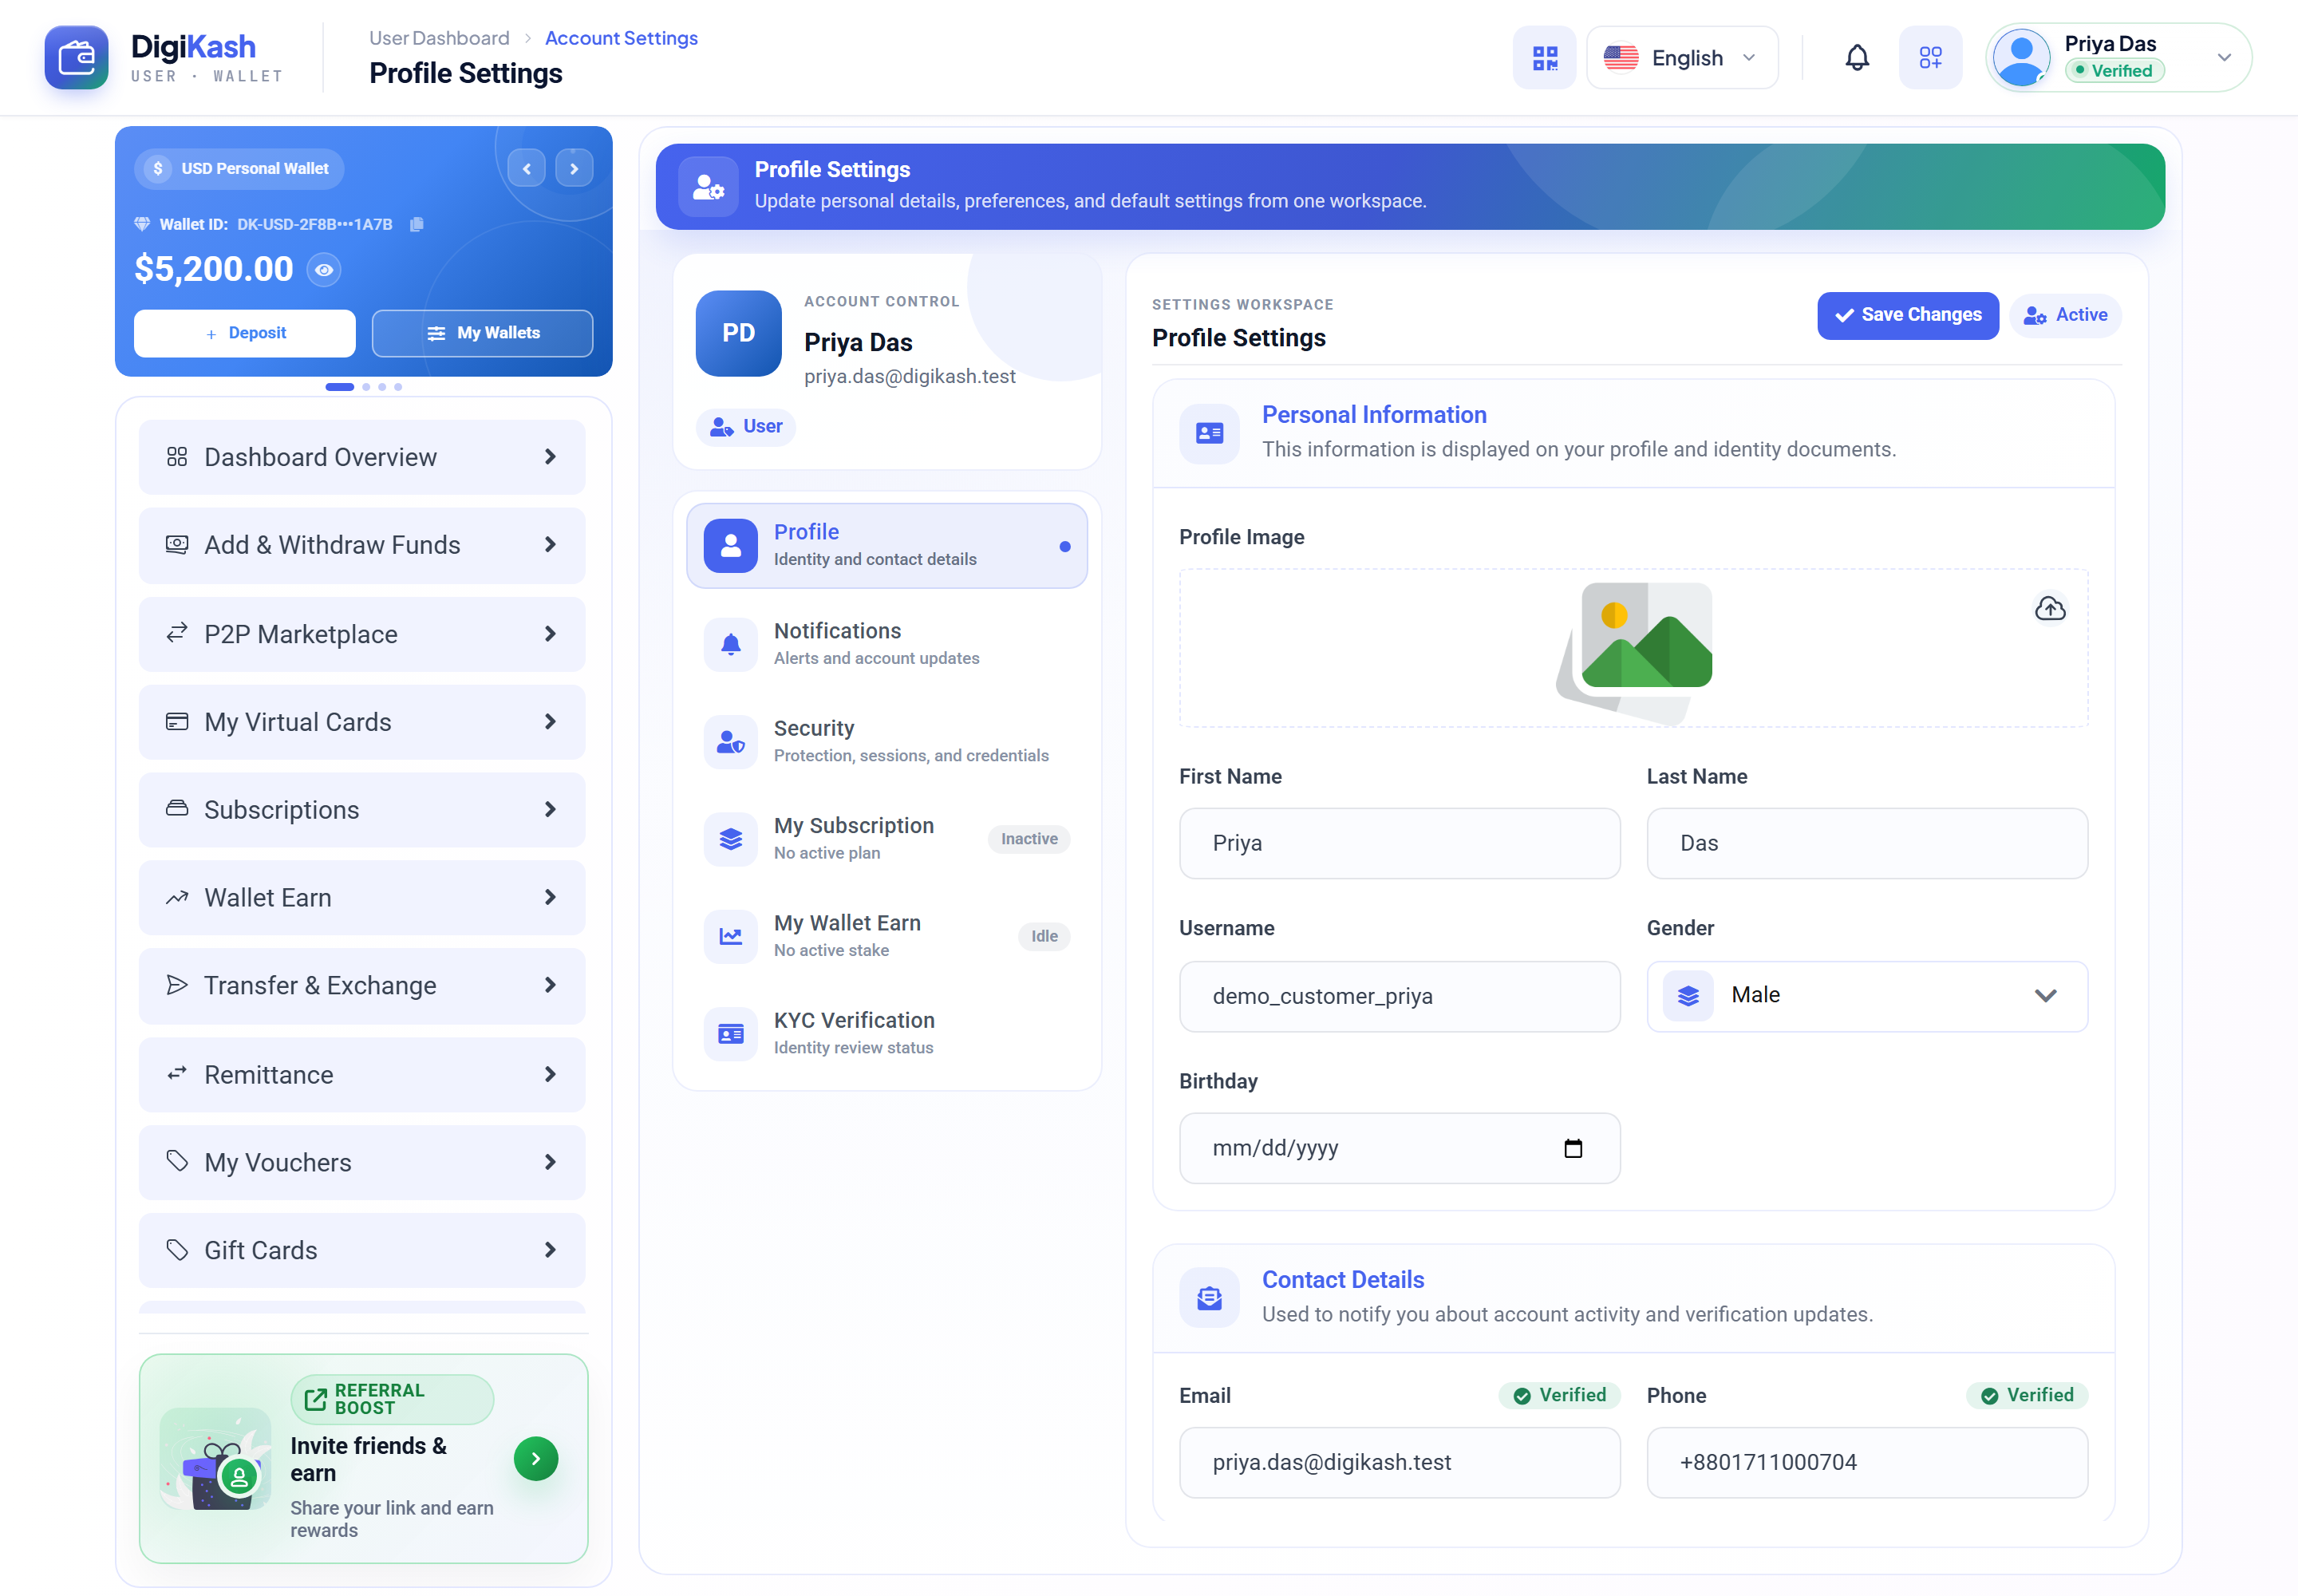
Security tab
The Security Center puts everything that protects the account on one screen — with a readiness meter that tracks email verification, 2FA, and the Wallet PIN, plus recent sign-in activity and one-click session sign-out.
What each control does
Profile
Name, username, email, phone, avatar, language, and country.
Password
Change it anytime — length, mixed case, and number rules are enforced.
Phone Verification
Verify by SMS code to unlock SMS alerts and mobile recharge.
Sessions & Activity
See recent sign-ins (IP, device, location) and sign out other sessions in one click.
Notifications & Support
Notification Inbox
- In-app inbox for payments, transfers, KYC, P2P, support, and system alerts.
- Channel preferences — opt in/out of email, SMS, push, and in-app per event type.
- Mark all as read or filter by unread / category.
Support Tickets
- Open a ticket from Support → New Ticket with category, subject, and message.
- Attach files (screenshots, receipts) to the ticket body.
- Reply thread shows admin responses with timestamps.
- Ticket categories drive auto-routing to the right staff role.
- Close a ticket when resolved — re-open if the issue returns.
Dashboard & Control Panel
The dashboard summarizes user growth, merchant activity, transaction totals, wallet balances, and recent movement. The Control Panel surface adds searchable shortcuts to every admin module.
Overview Widgets
Live counts for users, merchants, agents, KYC queues, transactions, virtual cards, and payment links.
Control Panel
Categorized shortcuts: Overview, Account Operations, Compliance, Wallet & Payments, Communication, Site Content, Platform Configuration.
Quick Search
Permission-aware search across menu items, settings, and reports — driven by control_panel.php.
Sidebar Footer Shortcuts
Activity log, Settings, In-Progress Tickets, and Site Optimize — always one click away.
Accounts & KYC
Manage users, merchants, agents, KYC submissions, account status, and support conversations with a consistent review workflow.
User Accounts
- List, filter, and search every registered user.
- Dedicated views for Active, Suspended, Unverified, and KYC-Pending users.
- Manage profile, wallet balance, features, password, and status from a single screen.
- "Login as user" for safe support sessions (audit logged).
- Bulk mail to all users from the admin panel.
Merchants & Agents
- Approve or reject merchant and agent applications after reviewing profile + documents.
- Manage active/inactive status, business profiles, and commission rules (agents).
- Convert user accounts to merchants when needed.
KYC Verification
- Define required fields per audience using KYC Templates.
- Process submissions from a Pending Reviews queue.
- Approve or reject with optional admin remarks — the user is notified automatically.
- Rejected users can resubmit a fresh KYC after correcting the flagged fields.
- Features gated by KYC (withdraw, send money, virtual cards, P2P) automatically unlock on approval.
Finance & Wallet
Configure supported currencies, manage exchange rates, and use the transactions ledger as the source of truth for money movement.
Currency Management
- Add, edit, or disable currencies with code, symbol, exchange rate, and per-role availability.
- Connect to an exchange API for live rates, or manage rates manually.
- Tag currencies as user-facing, merchant-facing, agent-facing, or all three.
Transactions Ledger
- Single, searchable list of every deposit, withdrawal, transfer, exchange, reward, voucher, and payment link transaction.
- Filter by user, type, status, date range, gateway, and currency.
- Export to CSV for finance reconciliation.
Payment Gateways
DigiKash ships with first-class integrations for 25+ payment providers covering cards, mobile money, crypto, and African / Asian regional gateways — all behind a single provider-agnostic abstraction.
Bundled providers
| Category | Providers |
|---|---|
| Cards / global | Stripe, PayPal, 2Checkout, Mollie |
| African gateways | Flutterwave, Paystack, Moneroo, Paymob, Voguepay, MTN, Airtel, Cashmaal |
| Indian gateways | Razorpay, Instamojo |
| Crypto | Cryptomus, Coinbase Commerce, CoinGate, CoinPayments, NowPayments, Binance Pay, Blockchain, Block.io, BitPay Server |
| Manual | Bank transfer / cash / any custom method via the Manual Payment System |
- Stripe, Mollie, Cryptomus, and additional gateways available out of the box.
- Enable per currency and set per-gateway minimums, maximums, fees, and surcharges.
- Test in sandbox mode before flipping to live credentials.
- Webhook callback URLs are auto-generated — copy them into the provider dashboard.
- Disabled gateways automatically hide dependent deposit / withdraw methods.
Most providers refuse to deliver webhooks to non-HTTPS endpoints. Use ngrok or a staging subdomain with a valid certificate when testing locally.
Deposits & Withdrawals
Each side of money movement supports both Automatic (gateway) and Manual (bank/cash) methods with separate review queues.
Deposit Methods
Configure automatic gateway methods or manual deposit instructions. Per-method fee, limit, and currency rules.
Manual Deposit Requests
Review proof-of-payment uploads, approve to credit the wallet, or reject with a reason.
Withdraw Methods
Set up automatic payouts (crypto, gateway-based) and manual bank/cash methods with per-method limits.
Scheduled Withdrawals
Cap withdrawal processing to defined windows so finance teams can batch payouts.
Separate User & Merchant Fees
Configure deposit and withdrawal fees independently for users and merchants.
Deposit & Withdraw History
Dedicated historical views with status, gateway, fee, and net-amount columns.
Payment Links, Merchant Payments & Mobile Recharge
Money-out products users and merchants can issue, share, and collect on.
Payment Links
- Generate shareable links that customers can pay from a wallet or supported gateway.
- Configurable amount (fixed or buyer-defined), currency, expiry, and reuse policy.
- Track payments, refunds, and link status from the admin list.
Merchant Payments
- Customers pay merchants from their wallet or any active payment gateway.
- Merchants share a unique payment QR code (printed in-store or shown on screen); customers open it to load the checkout.
- Voucher redemption is supported at the checkout step.
- WooCommerce plugin ships pre-built at
public/general/woocommerce-gateway-v2.8.0/for eCommerce integration. - Sanctum-authenticated Merchant API with HMAC-signed webhooks (see
/api-docs).
Mobile Recharge
- Top up mobile numbers from wallet balance through pluggable providers.
- Supported drivers:
sandbox(testing),reloadly(global airtime),http(generic HTTP API). - Configurable minimum, maximum, fixed fee, and percentage fee from
config/mobile_services.php. - Per-provider operator catalog managed under Mobile Recharge → Providers.
Merchant API & Payment Security (PCI DSS)
How a merchant accepts payments through DigiKash — and exactly where a customer's card data goes. The short version: card details never touch DigiKash or the merchant's server. They go straight to the payment provider's own PCI-certified page.
DigiKash uses a redirect-to-hosted-gateway model. The buyer types their card on the payment processor's own secure page (Stripe, PayPal, Razorpay, Flutterwave, Paystack, and 25+ more). DigiKash and your server never see, transmit, or store the card number or CVV — so your PCI DSS exposure stays at the minimal SAQ A level.
How the Merchant API works on the buyer's end
Integration is server-to-server. Your backend talks to DigiKash; your customer is simply redirected to a secure checkout. No payment SDK or card field lives in your app.
Where exactly does the card data go?
Card data flows directly from the buyer's browser to the payment processor. It is never posted to DigiKash and never written to the DigiKash database.
- No raw card storage. DigiKash never receives the PAN (card number) or CVV, so there is nothing sensitive to store or leak.
- Tokenization happens at the gateway. Stripe, PayPal, Razorpay, etc. tokenize and process the card on their own infrastructure — each is independently certified PCI DSS Level 1.
- DigiKash only sees the outcome — transaction status plus masked, non-sensitive metadata (e.g. last 4 digits, brand) returned by the gateway.
- Minimal PCI scope for you. Because card entry is fully delegated to a redirect/hosted page, a typical merchant qualifies for the lightest self-assessment (SAQ A).
DigiKash is not a payment processor and does not claim its own PCI certification — it doesn't need one, because it never handles card data. Compliance for the card itself is carried by the connected gateways. Your responsibility is simply to keep DigiKash on HTTPS and your API keys secret.
Authentication & the request your server sends
The Merchant API is authenticated with per-merchant keys plus an HMAC request signature — never with card data. Each call carries these headers:
X-API-KeyandX-Merchant-Key— your public identifiers (separate keys for sandbox and production).X-Timestamp+X-Signature— an HMAC signature of the request, signed with your secret so requests can't be forged or replayed.X-Environment—sandboxorproduction.
POST /api/v1/initiate-payment
X-API-Key: pk_live_xxxxxxxx
X-Merchant-Key: mk_live_xxxxxxxx
X-Environment: production
X-Timestamp: 1719750000
X-Signature: <hmac-sha256 of the request body>

{
  "ref_trx": "ORDER-10231",
  "currency_code": "USD",
  "payment_amount": 49.99,
  "description": "Order #10231",
  "customer_name": "Jane Doe",
  "customer_email": "jane@example.com",
  "success_redirect": "https://yourstore.com/payment/success",
  "cancel_redirect": "https://yourstore.com/payment/cancel",
  "ipn_url": "https://yourstore.com/webhooks/digikash"
}
Notice there is no card field anywhere in the request — only the order amount and where to send the buyer. DigiKash replies with a payment_url you redirect to.
Refunding a payment New
A completed payment can be refunded in full or in part from your server with one call. The merchant wallet is debited, a refund transaction is recorded, and your ipn_url receives a signed payment.refunded webhook.
POST /api/v1/refund-payment
X-API-Key: pk_live_xxxxxxxx
X-Merchant-Key: mk_live_xxxxxxxx
X-Environment: production
X-Timestamp: 1719750000
X-Signature: <hmac-sha256 of the request body>

{
  "trx_id": "TRXAB12CD34EF",   // the original payment
  "amount": 10.00,              // optional — omit for a full refund
  "reason": "Customer returned item",
  "ref_refund": "RFD-10231"     // optional — makes the call idempotent
}
- Full or partial. Omit
amountto refund everything, or pass a smaller value. Partial refunds add up and an over-refund is rejected. - Idempotent. Pass your own
ref_refundand the same reference will never refund twice. - Tracked.
verify-paymentnow returnsrefunded_amount,refundable_amount, andfully_refundedso you always know a payment's refund state.
The API reverses the platform-side ledger: it debits the amount back out of the merchant wallet and records the refund. Because DigiKash never holds the buyer's card, returning the money to the card itself is completed by the platform through the original gateway (Stripe, PayPal, etc.). The processing fee taken on the original payment is not returned — same as most payment processors.
What about Virtual Cards? (a different feature)
DigiKash can also issue virtual cards to users (Stripe Issuing, StroWallet, Bitnob). That's the opposite direction — creating a card, not collecting one — and it is handled with equal care:
- Full card numbers are created and held by the card provider, not by DigiKash.
- When a user reveals their card details, DigiKash uses the provider's PCI-compliant client-side flow (for Stripe Issuing, an ephemeral key + Issuing Elements), so the number is shown to the user straight from the provider — it never passes through the DigiKash server.
- DigiKash stores only safe, masked references (last 4, brand, status).
Every endpoint, header, field, and example response lives on the live, interactive API docs that ship with each install — open yourdomain.com/api-docs (reference build: digi.coevs.com/api-docs).
P2P Marketplace New in 2.0
Peer-to-peer trading rooms with offer ads, escrow orders, dispute handling, payment-method directory, promotions, and trader profiles.
The P2P Dashboard is mission control: marketplace status, your maker / taker fees, the dispute window and order-expiry timers, and live counts of active offers, pending escrow, and open disputes.
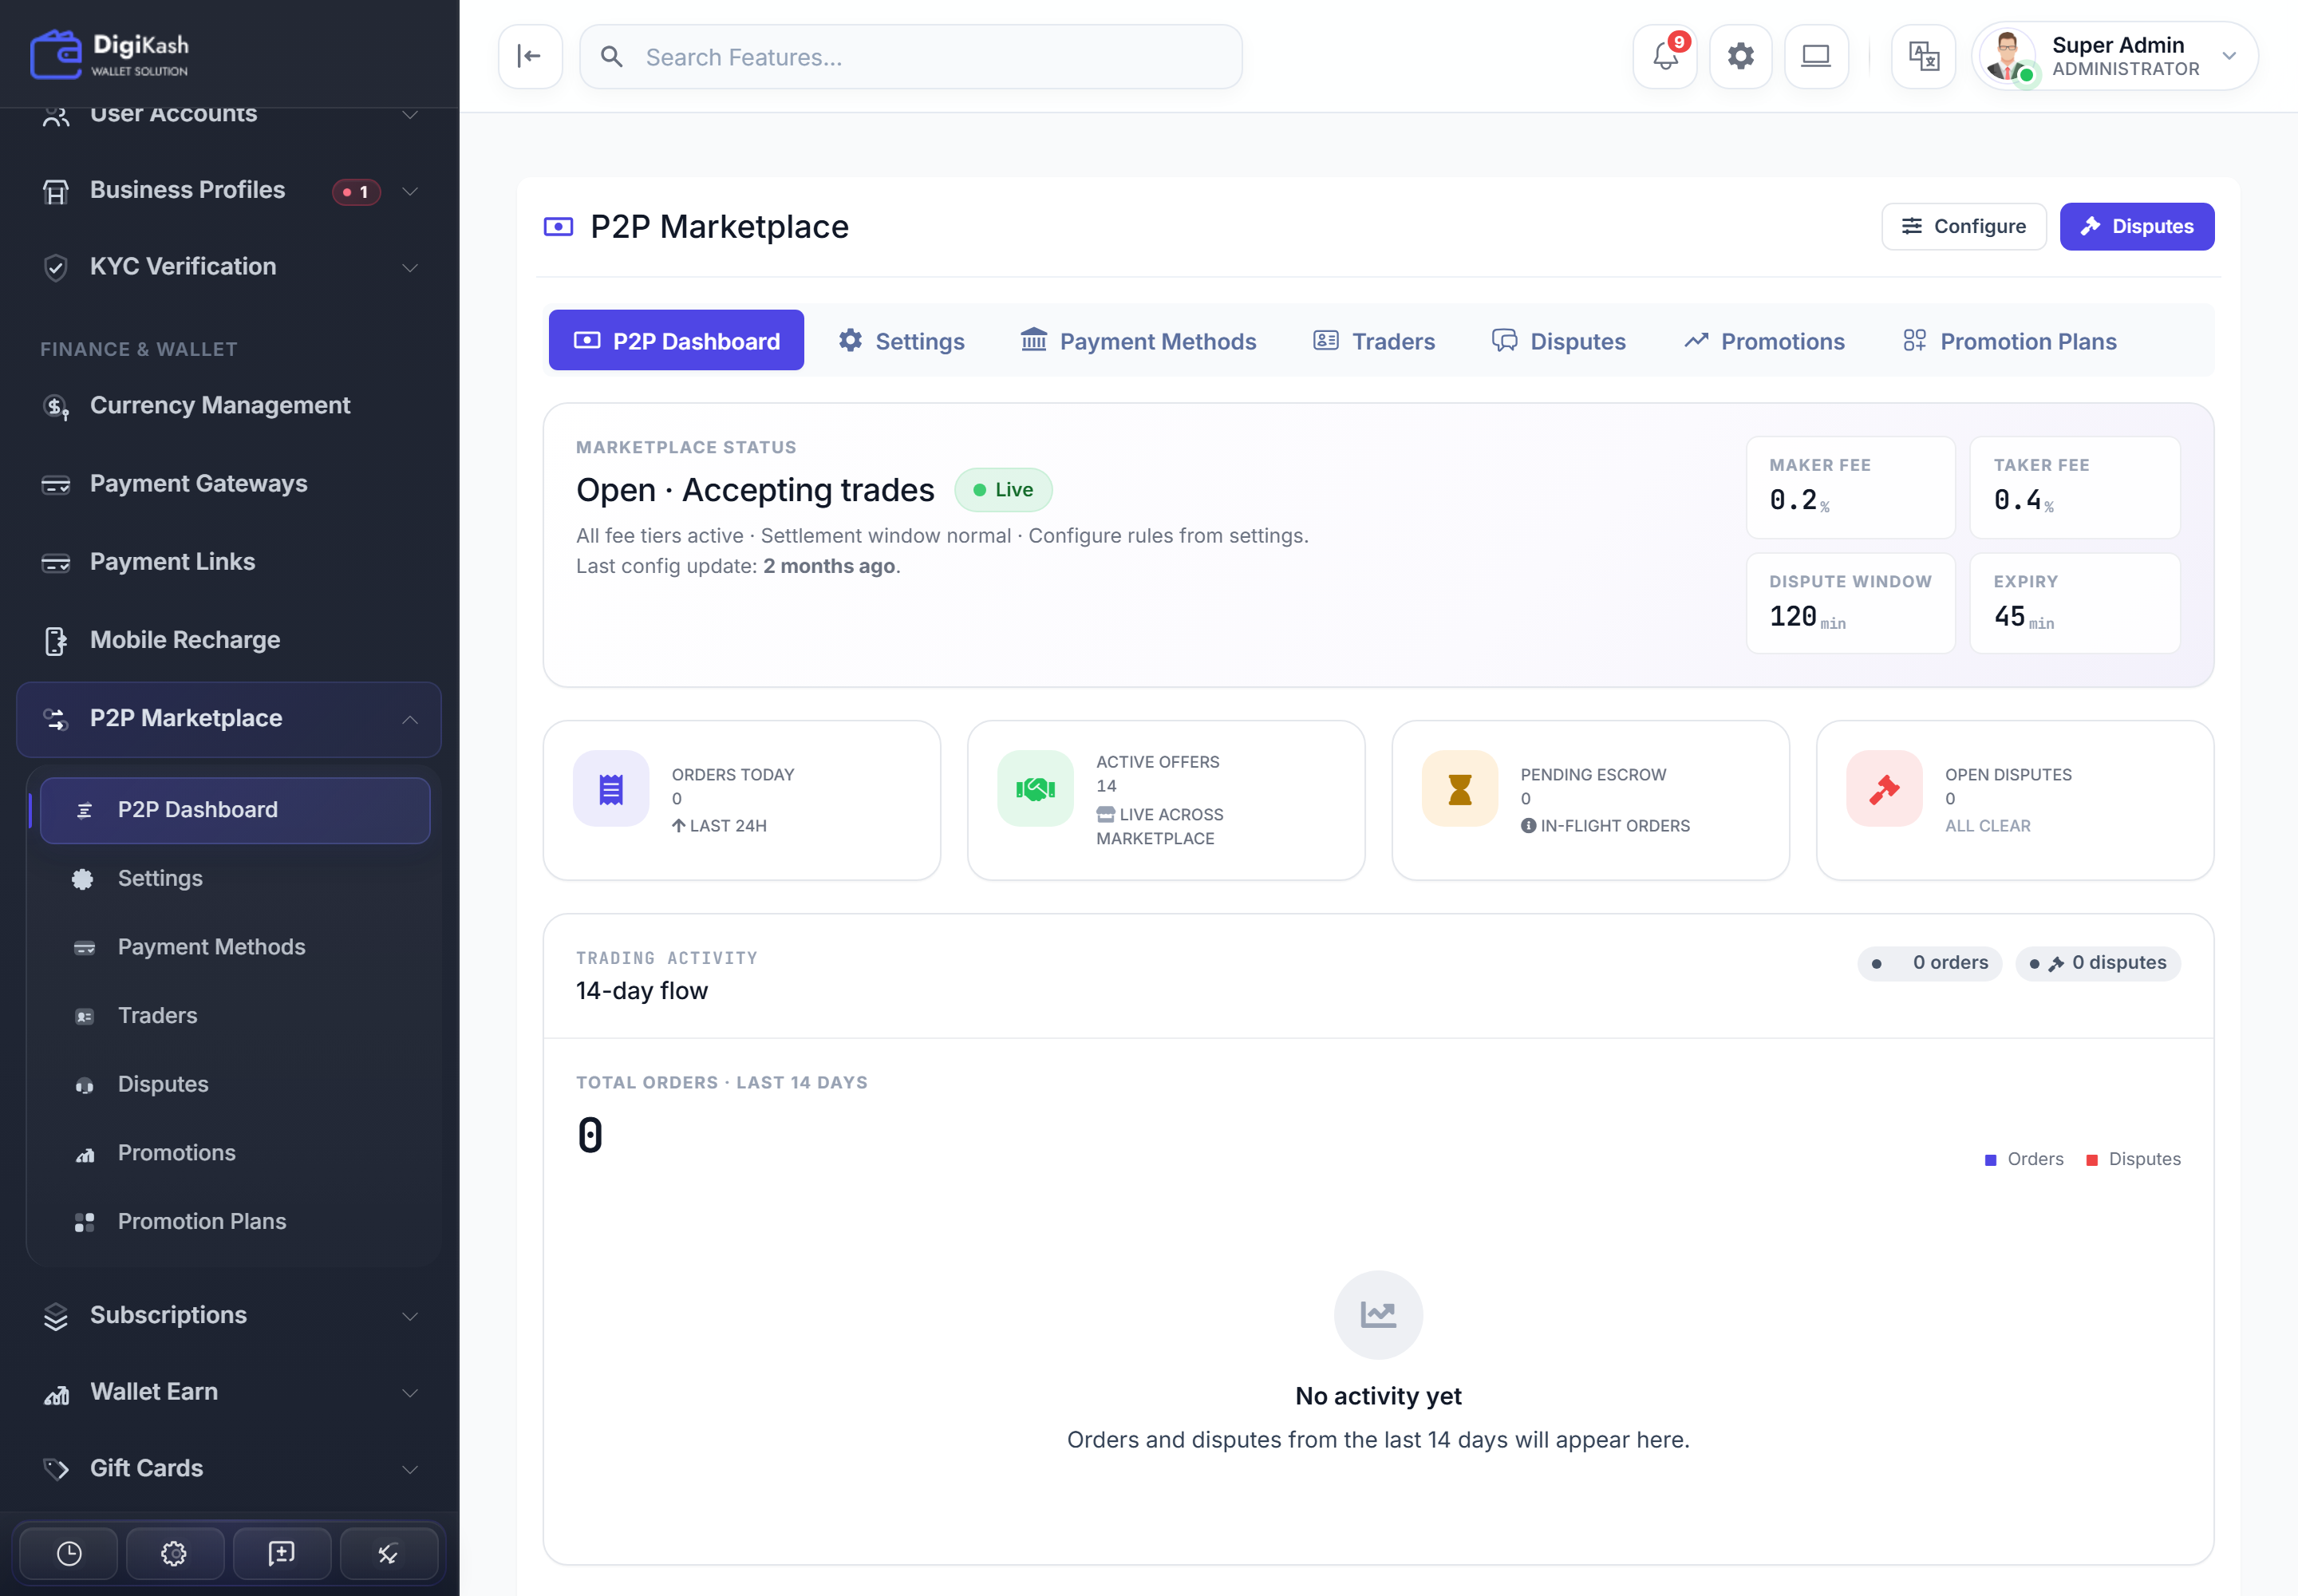
P2P Dashboard
Monitor live offers, open orders, dispute counts, and platform fees in one place.
Settings
Default fees, minimum trade size, escrow duration, dispute timer, and KYC gating.
Payment Methods
Curate the directory of payment methods traders can advertise (banks, mobile money, cash).
Traders
Browse, suspend, or verify advertisers. Review completion rate, response time, and dispute ratio.
Disputes
Handle escalated orders with chat history, attached proof, and a verdict workflow.
Promotions
Sell promotion packages that boost offer visibility — featured slots, badge highlights, search-rank uplift.
Traders & disputes
Under Traders you can review each advertiser's completion rate, trade volume, and verification, then verify or suspend them. Escalated orders land in Disputes, where you review the trade chat and proof before releasing or refunding escrow.
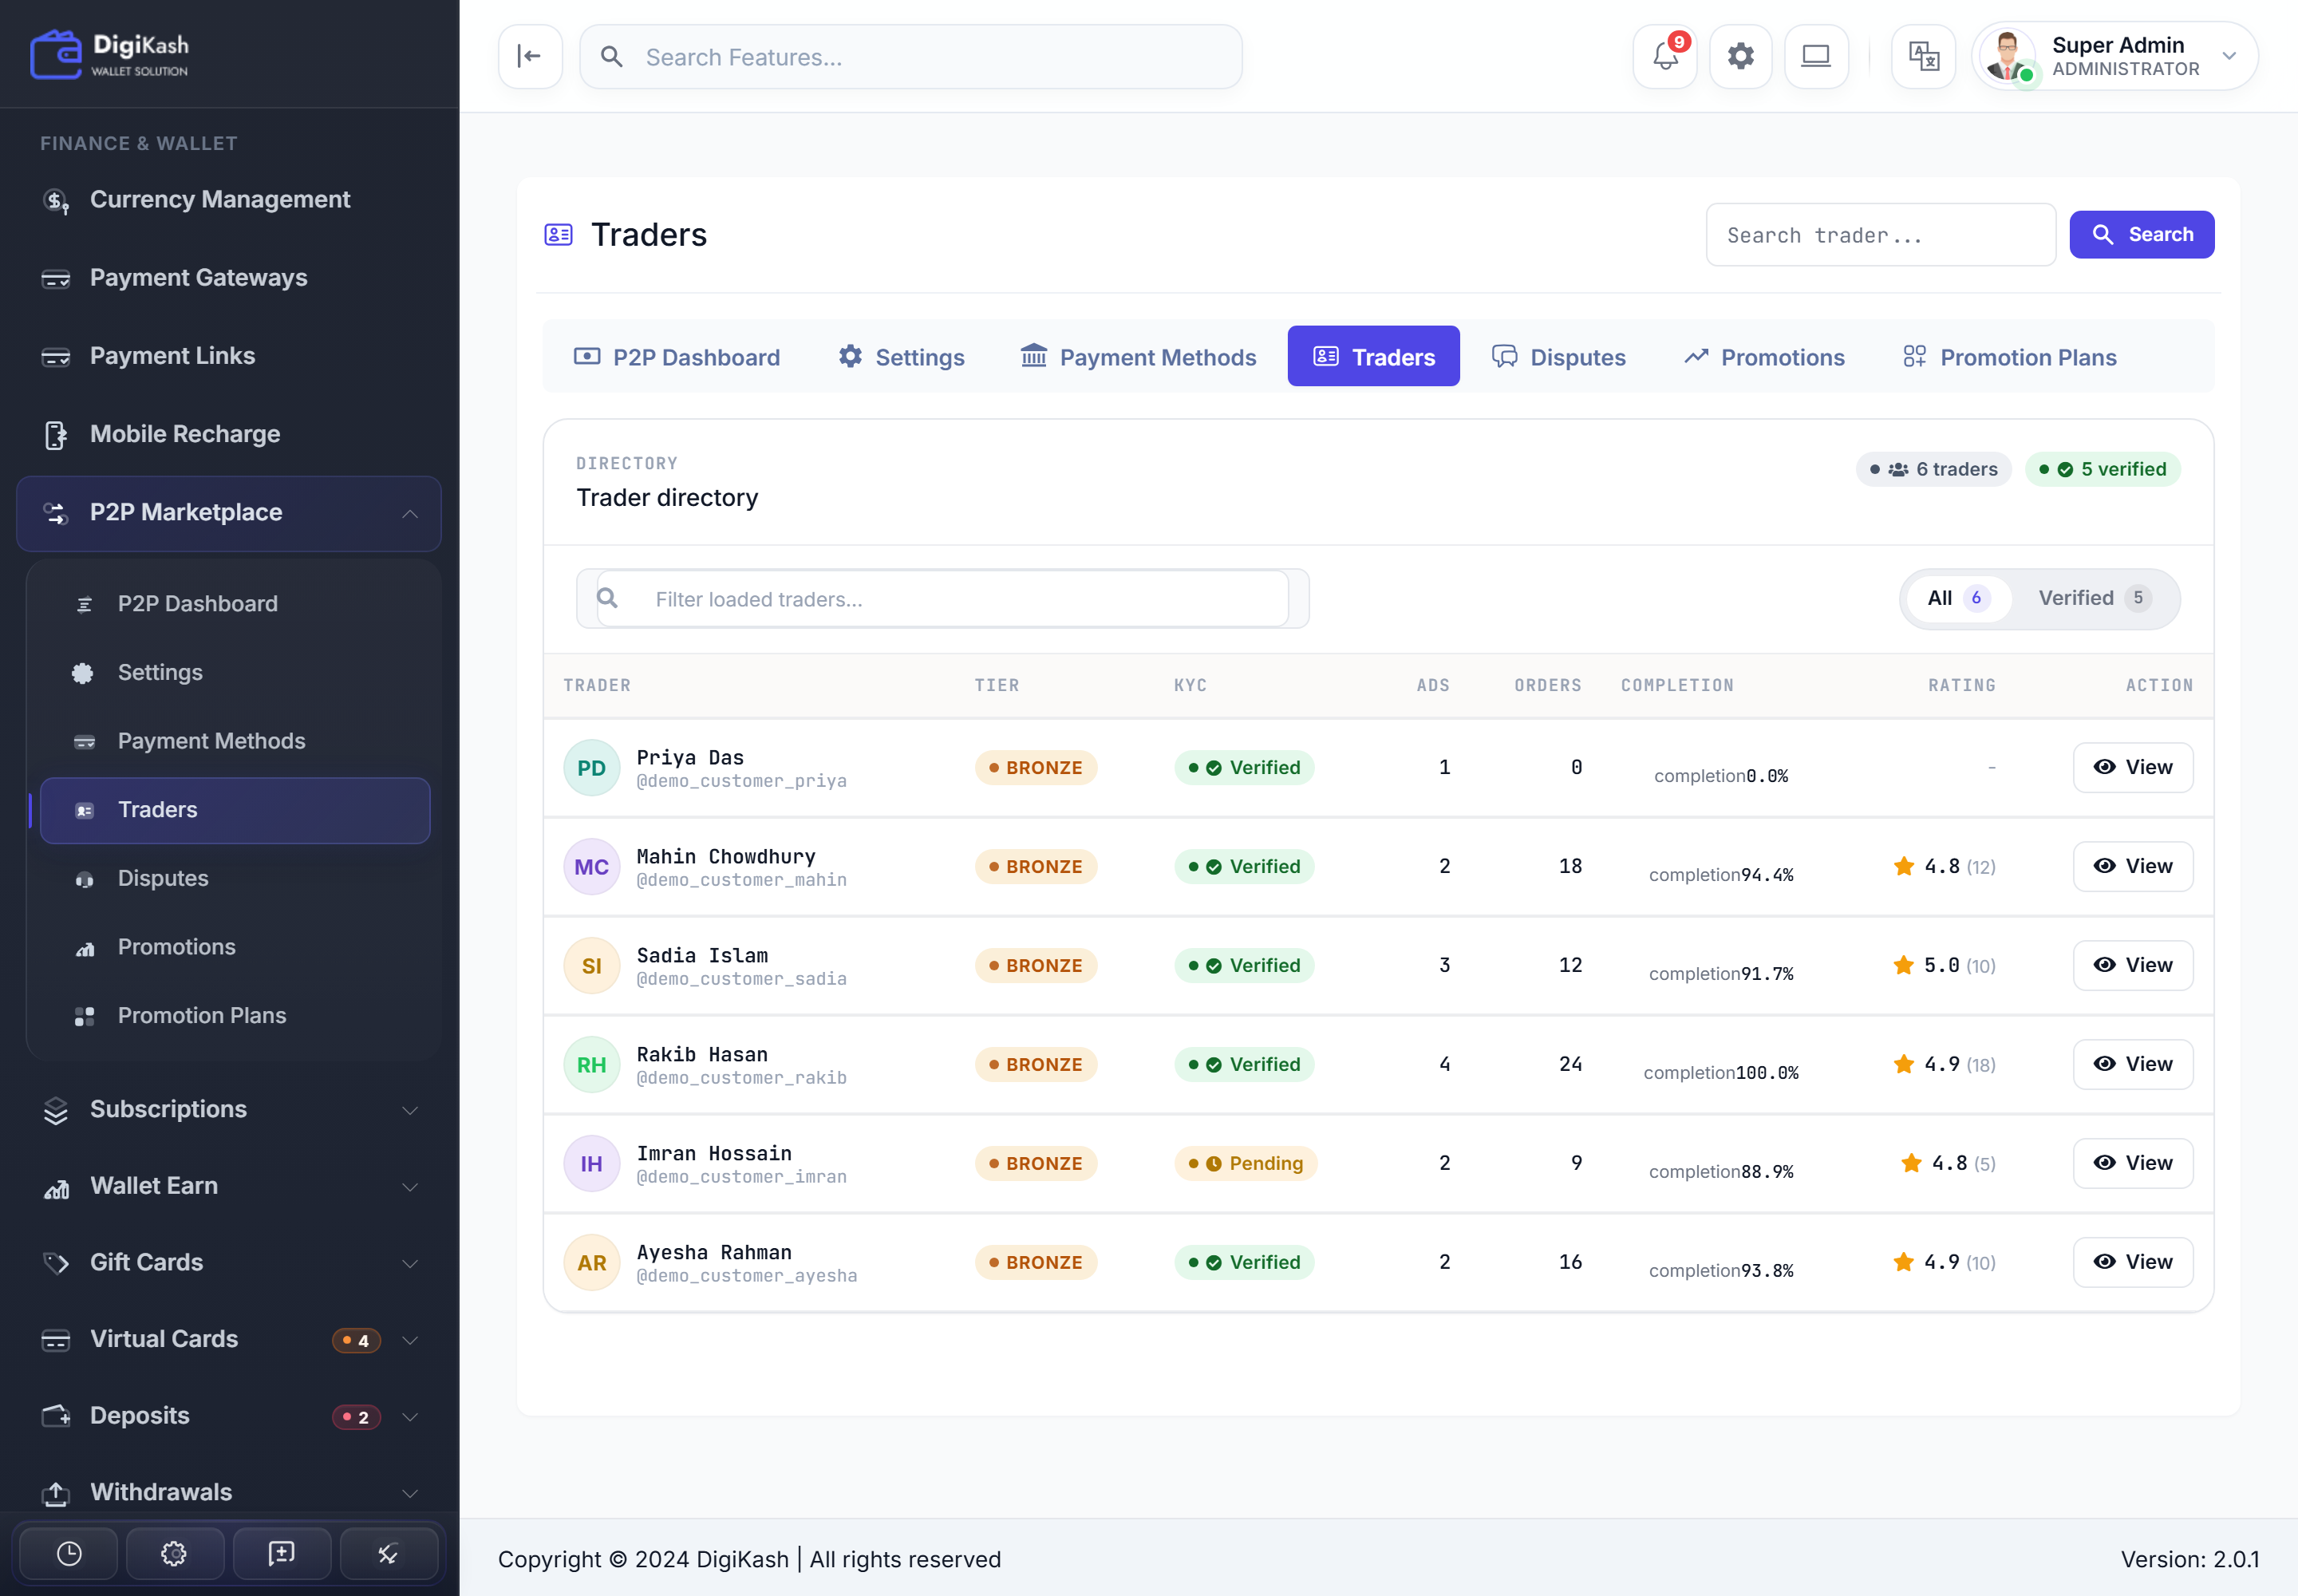
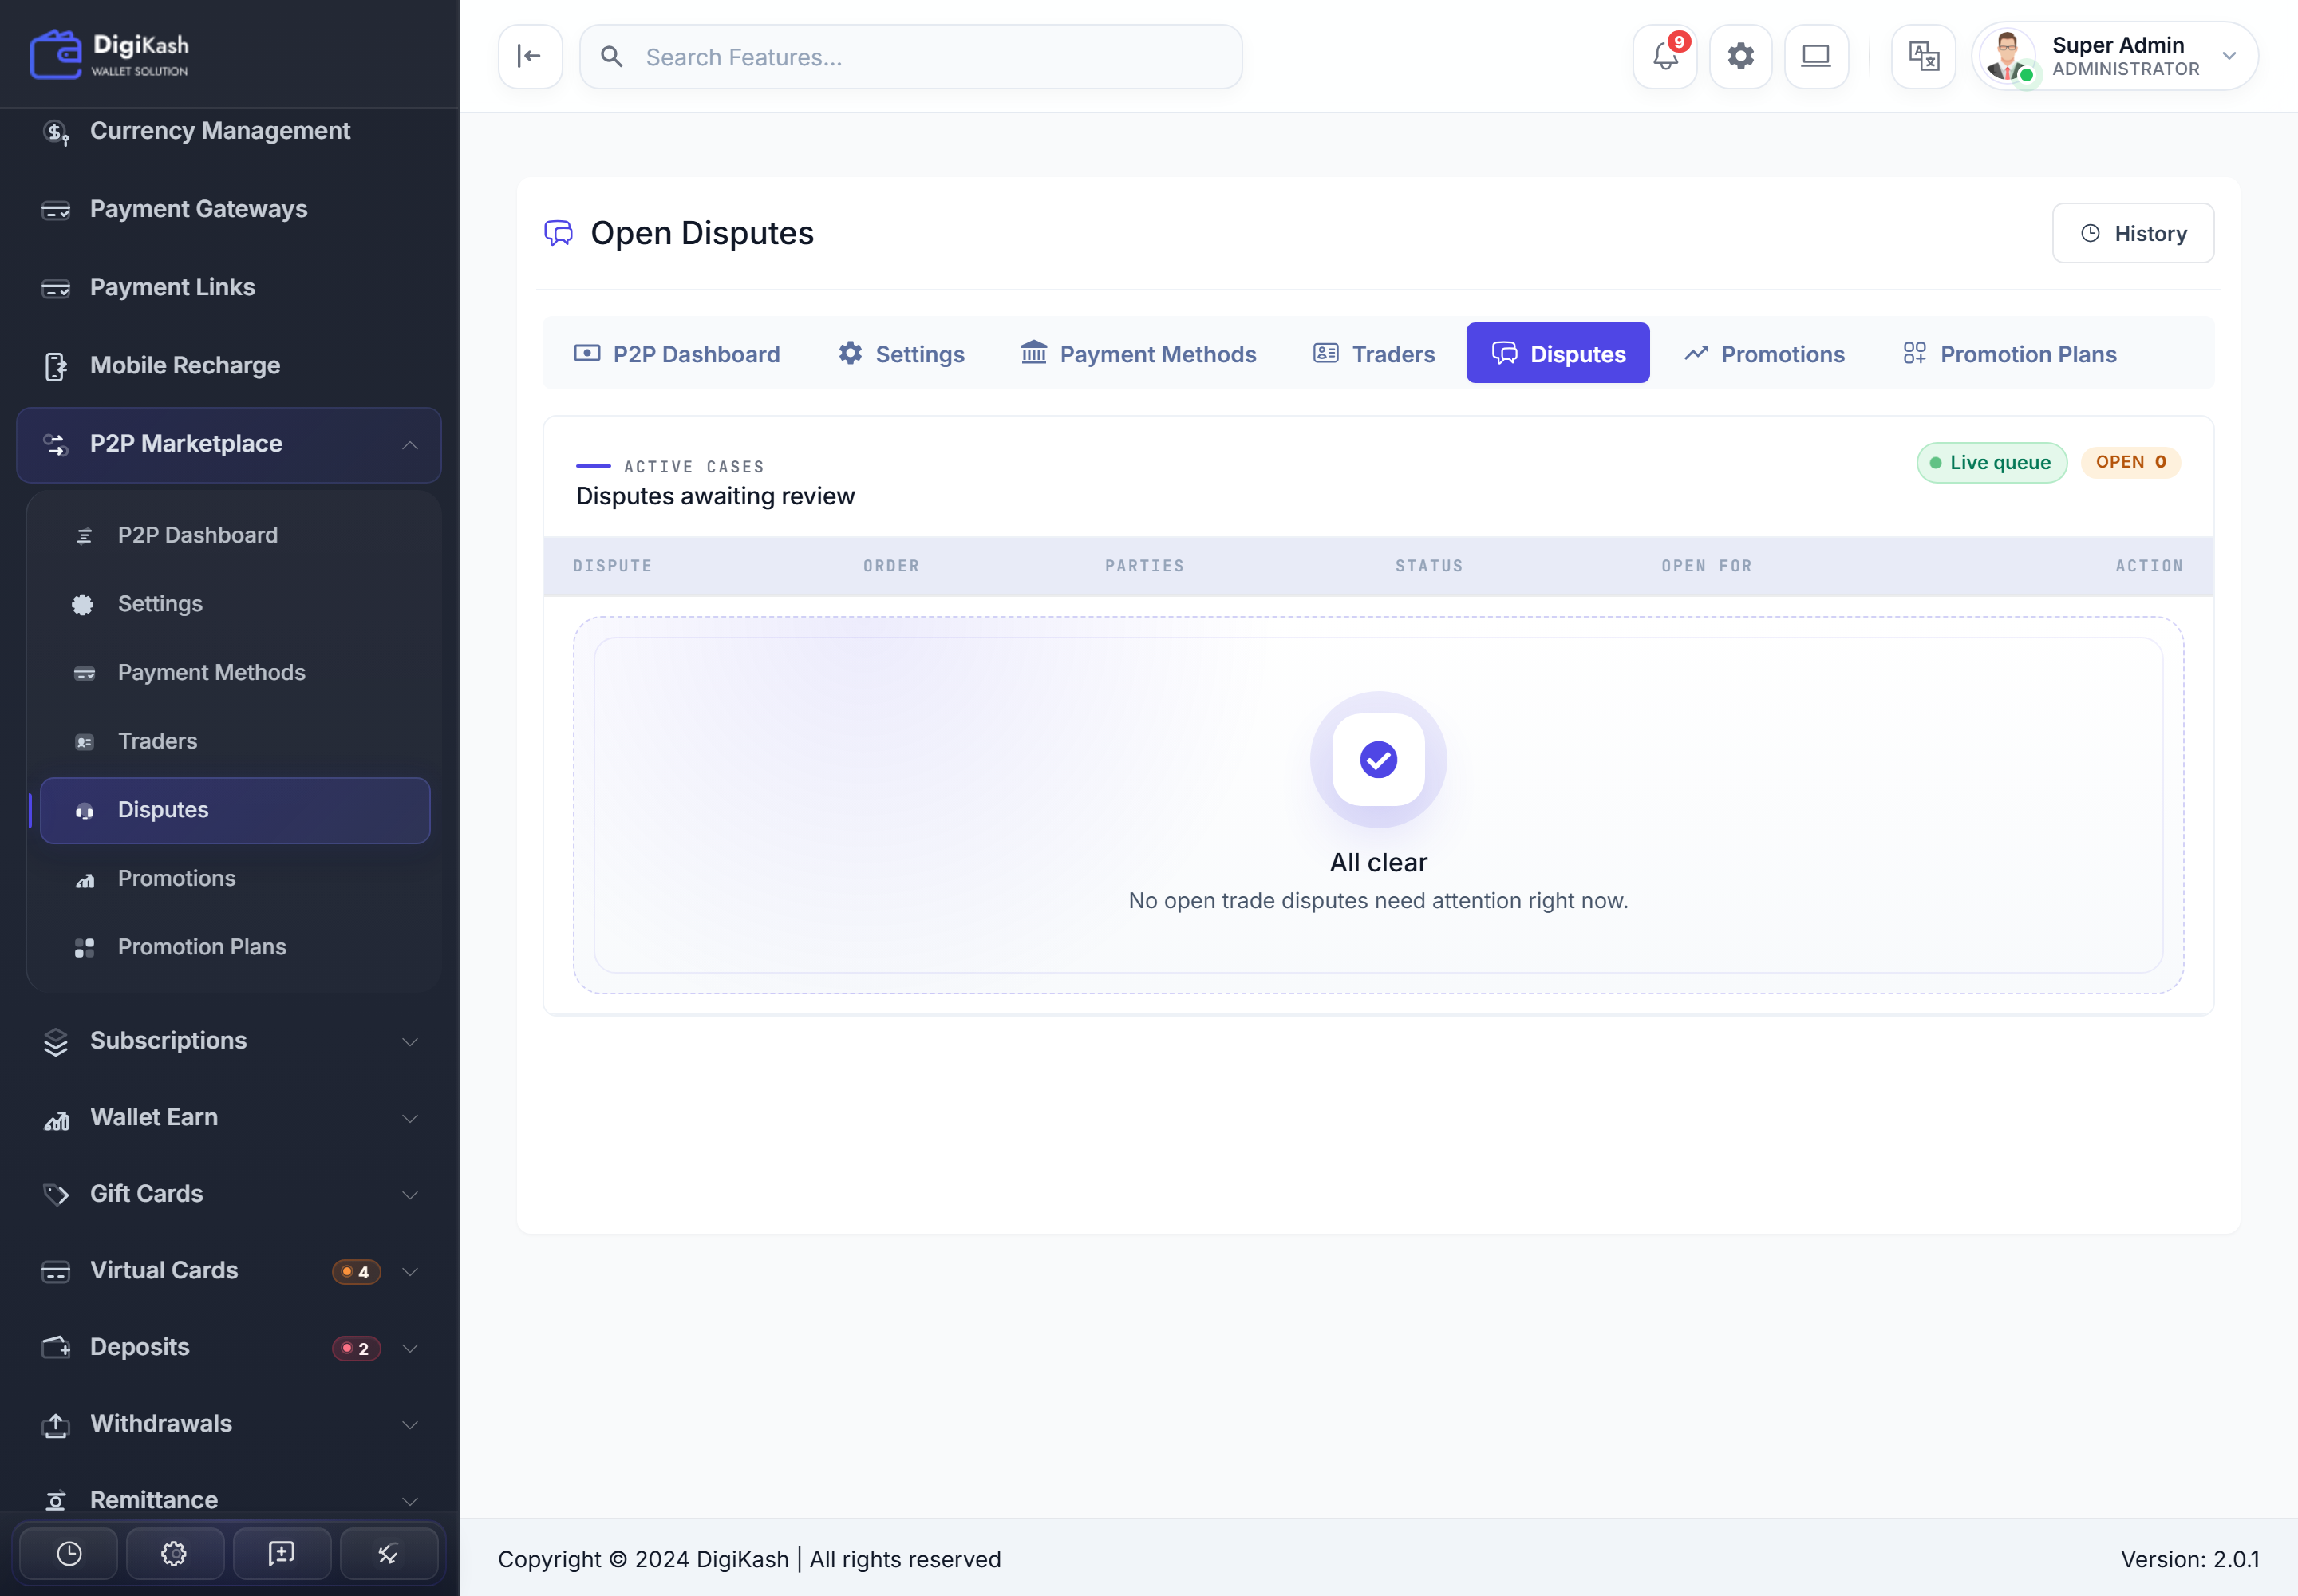
The seller's funds are locked in escrow the moment an order opens and only release on mutual confirmation or your dispute verdict — they're never exposed in transit. Set a sensible dispute window and KYC gating in Settings before opening the market.
Virtual Cards
Issue and manage virtual cards across multiple providers — Stripe Issuing, StroWallet, and Bitnob — from one provider-agnostic control center. Each provider plugs in with its own fees, supported networks, and capability set, so you can offer cards in the markets you serve.
The section opens with six tabs: Awaiting Requests, Cardholders, All Requests, All Cards, Fee Settings, and Provider Settings.
Provider Control Center
Start here. Provider Settings shows every issuing gateway's status, card fee, supported networks, and the exact actions it can perform — all in one place. Activate only the providers you've added valid credentials for; the header counters (active providers, gateways, networks) update as you go.
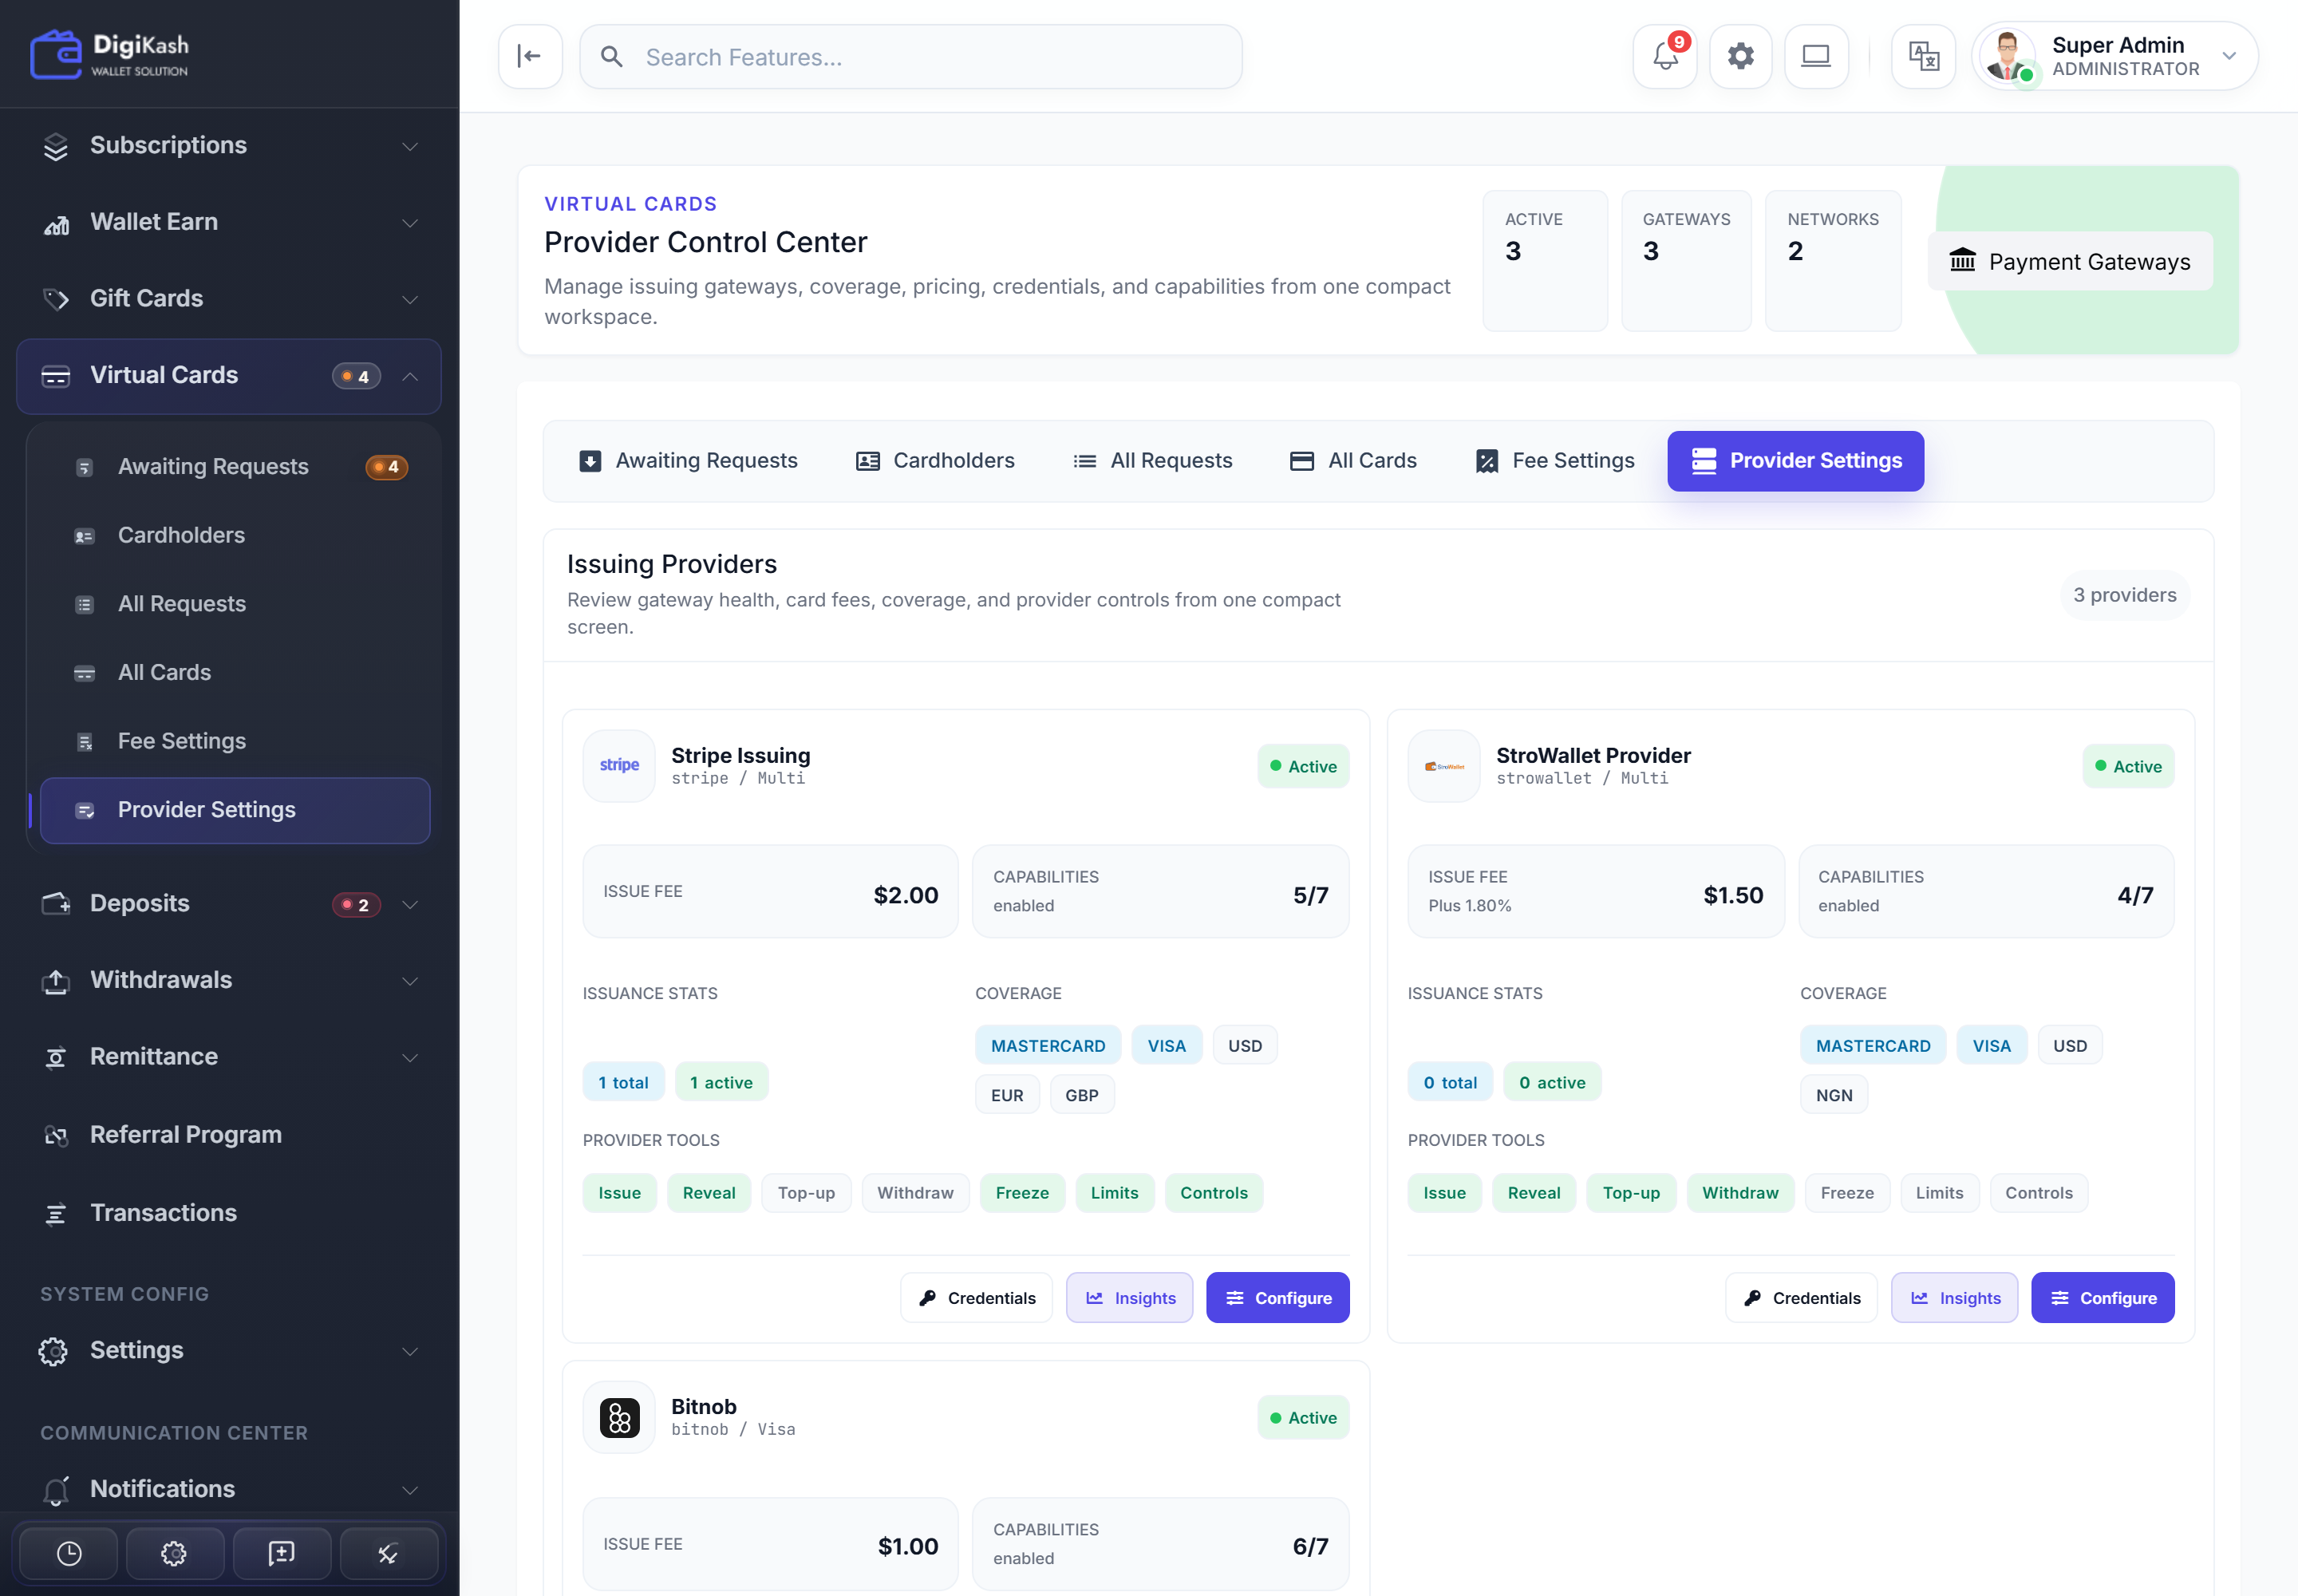
Provider capabilities — they are not all equal
No provider supports every action. Because a cardholder's available controls depend on which provider issued their card, choose providers that match the features you want to give users. These are the seven capabilities and where each provider stands today:
| Provider | Issue | Reveal | Top-up | Withdraw | Freeze | Limits | Controls |
|---|---|---|---|---|---|---|---|
| Stripe Issuing | ✓ | ✓ | — | — | ✓ | ✓ | ✓ |
| StroWallet | ✓ | ✓ | ✓ | ✓ | — | — | — |
| Bitnob | ✓ | ✓ | ✓ | ✓ | ✓ | ✓ | — |
Stripe Issuing funds cards through a spending limit rather than top-up/withdraw, but adds freeze, limits, and spend controls — great for USD/EUR/GBP. StroWallet offers straightforward top-up/withdraw and supports NGN. Bitnob sits in between with top-up, withdraw, freeze, and limits.
Fees — fixed + percentage, per provider & currency
Open Fee Settings to price each operation. A rule combines a fixed amount and a percentage, gated by a threshold and clamped between a min and max. In the example below, a top-up on StroWallet (USD) above the $200 threshold costs $2.00 + 1.00%, never less than $10 or more than $1,000.
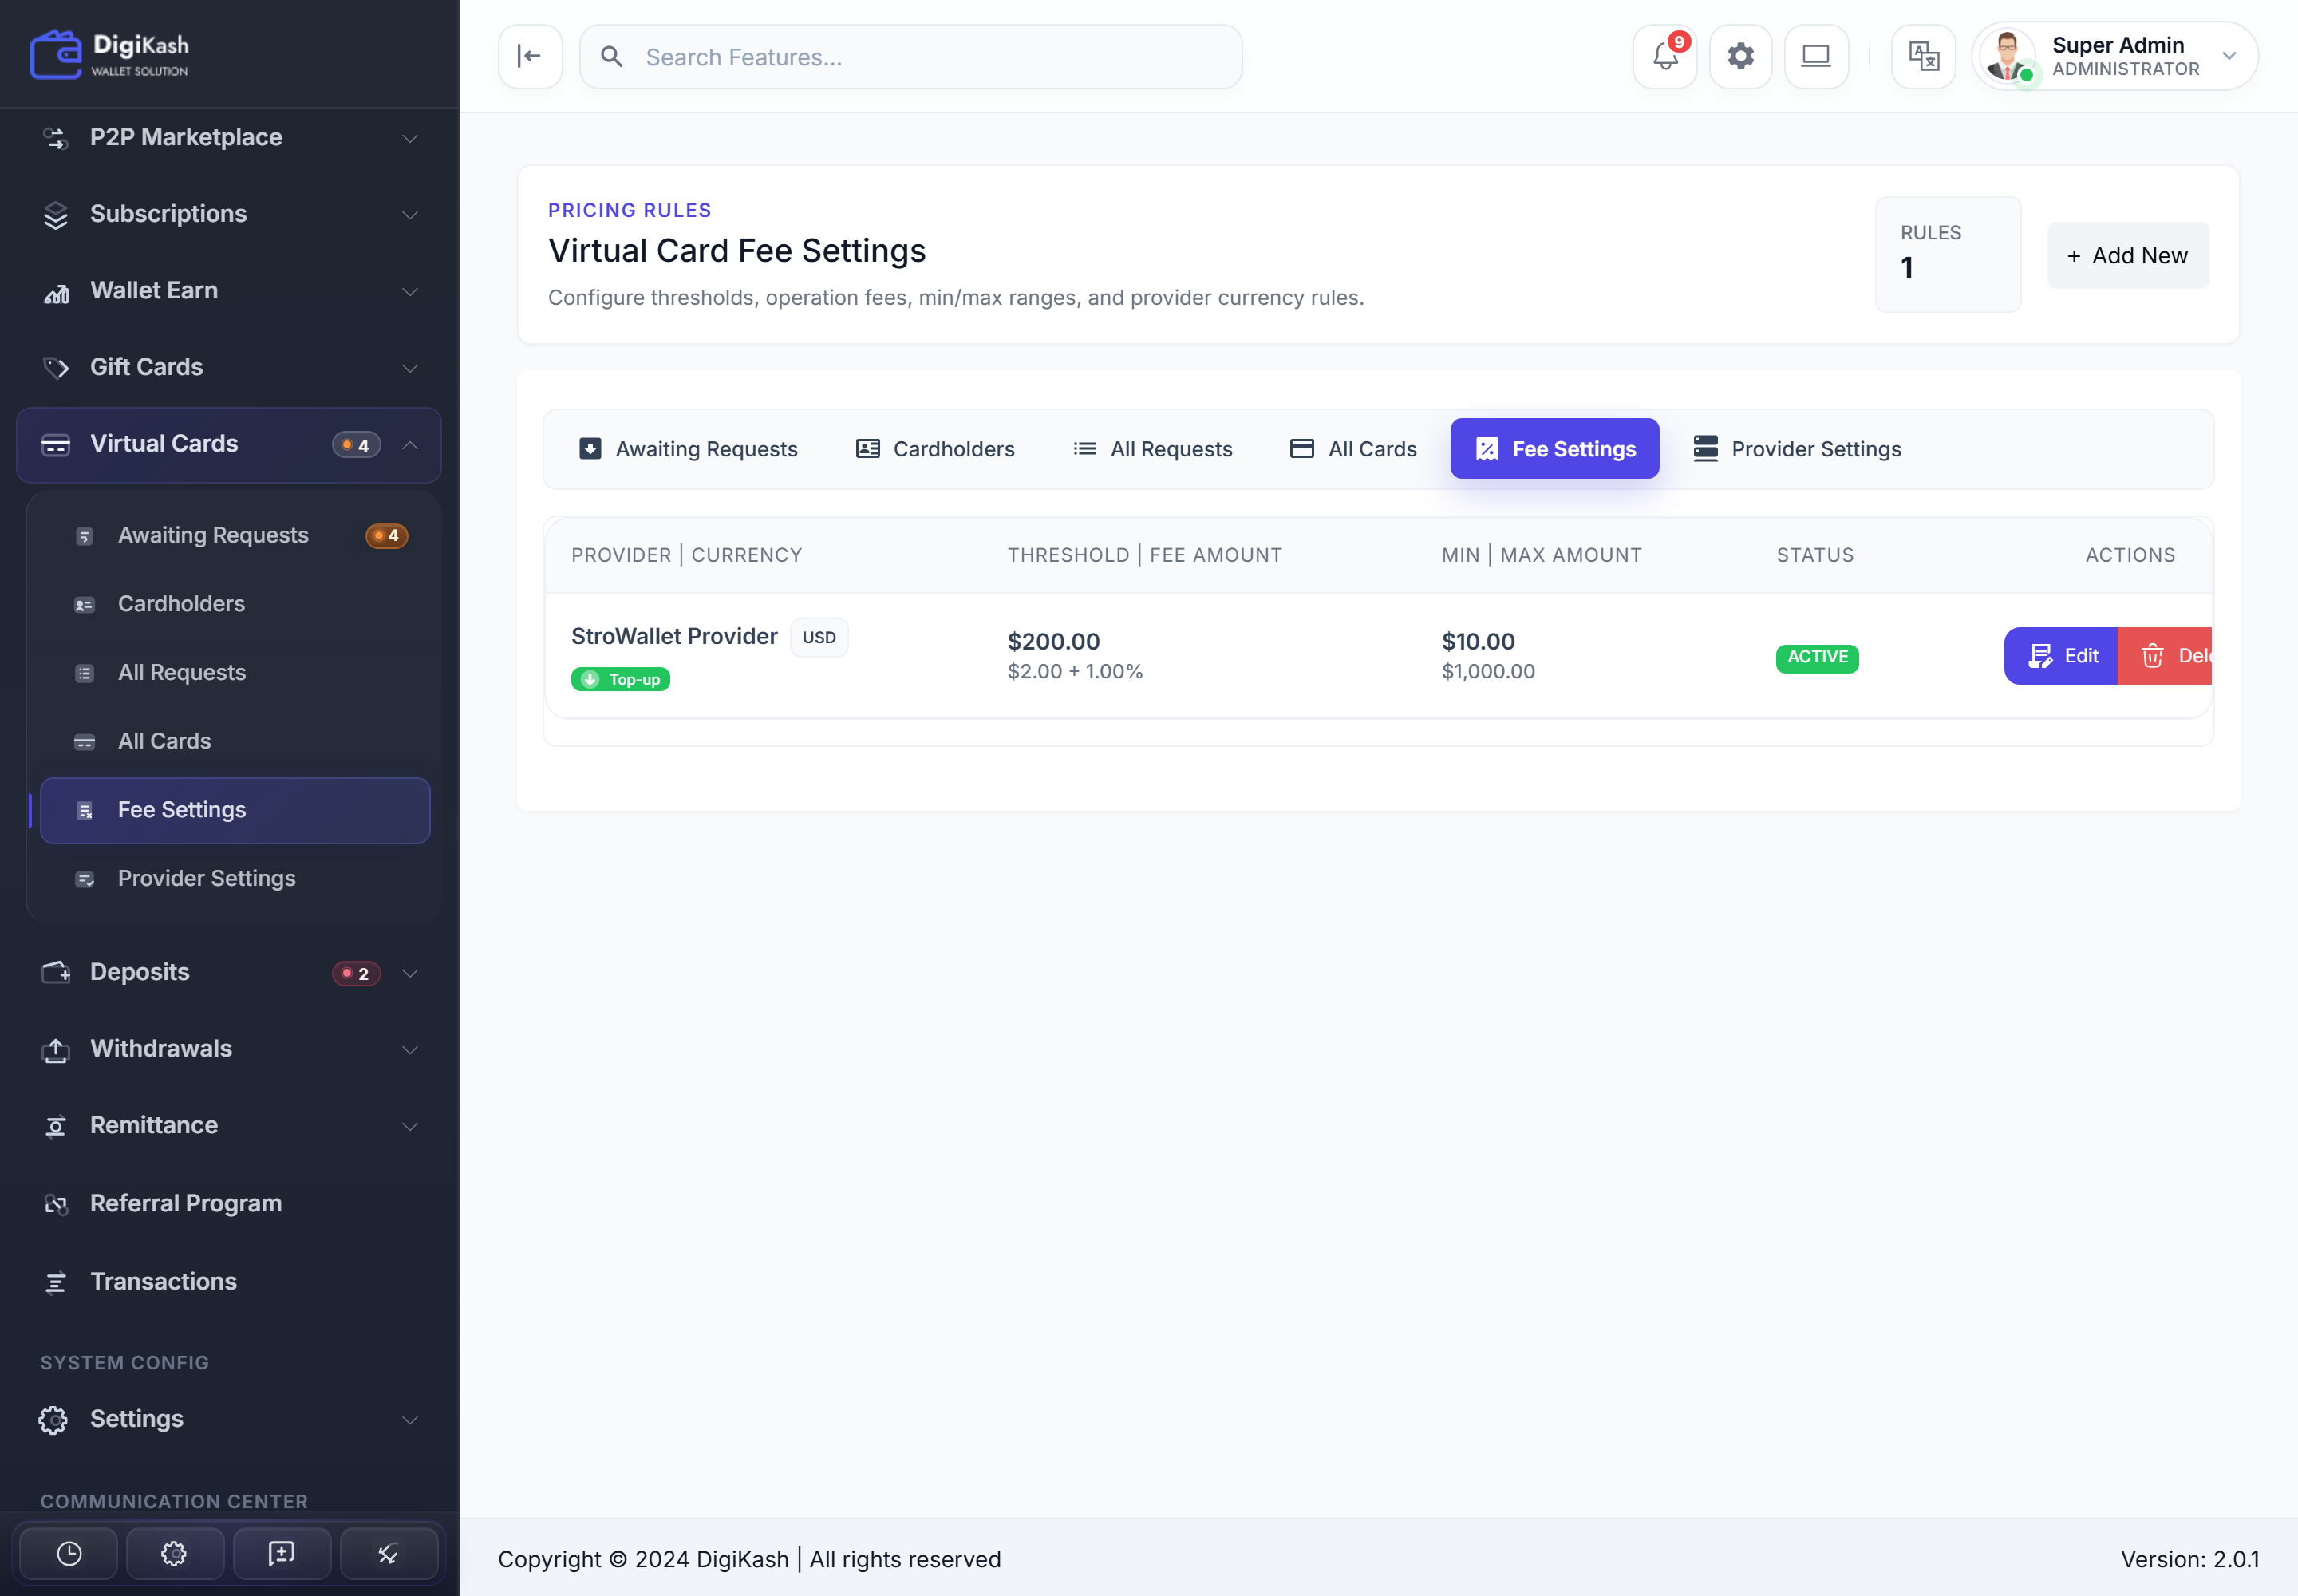
Daily workflow — review requests, track cards
New applications land in the Awaiting Requests review queue with the user's wallet balance, card network, and KYC status. Open Review, approve, and the card is issued and the issuance fee deducted automatically.
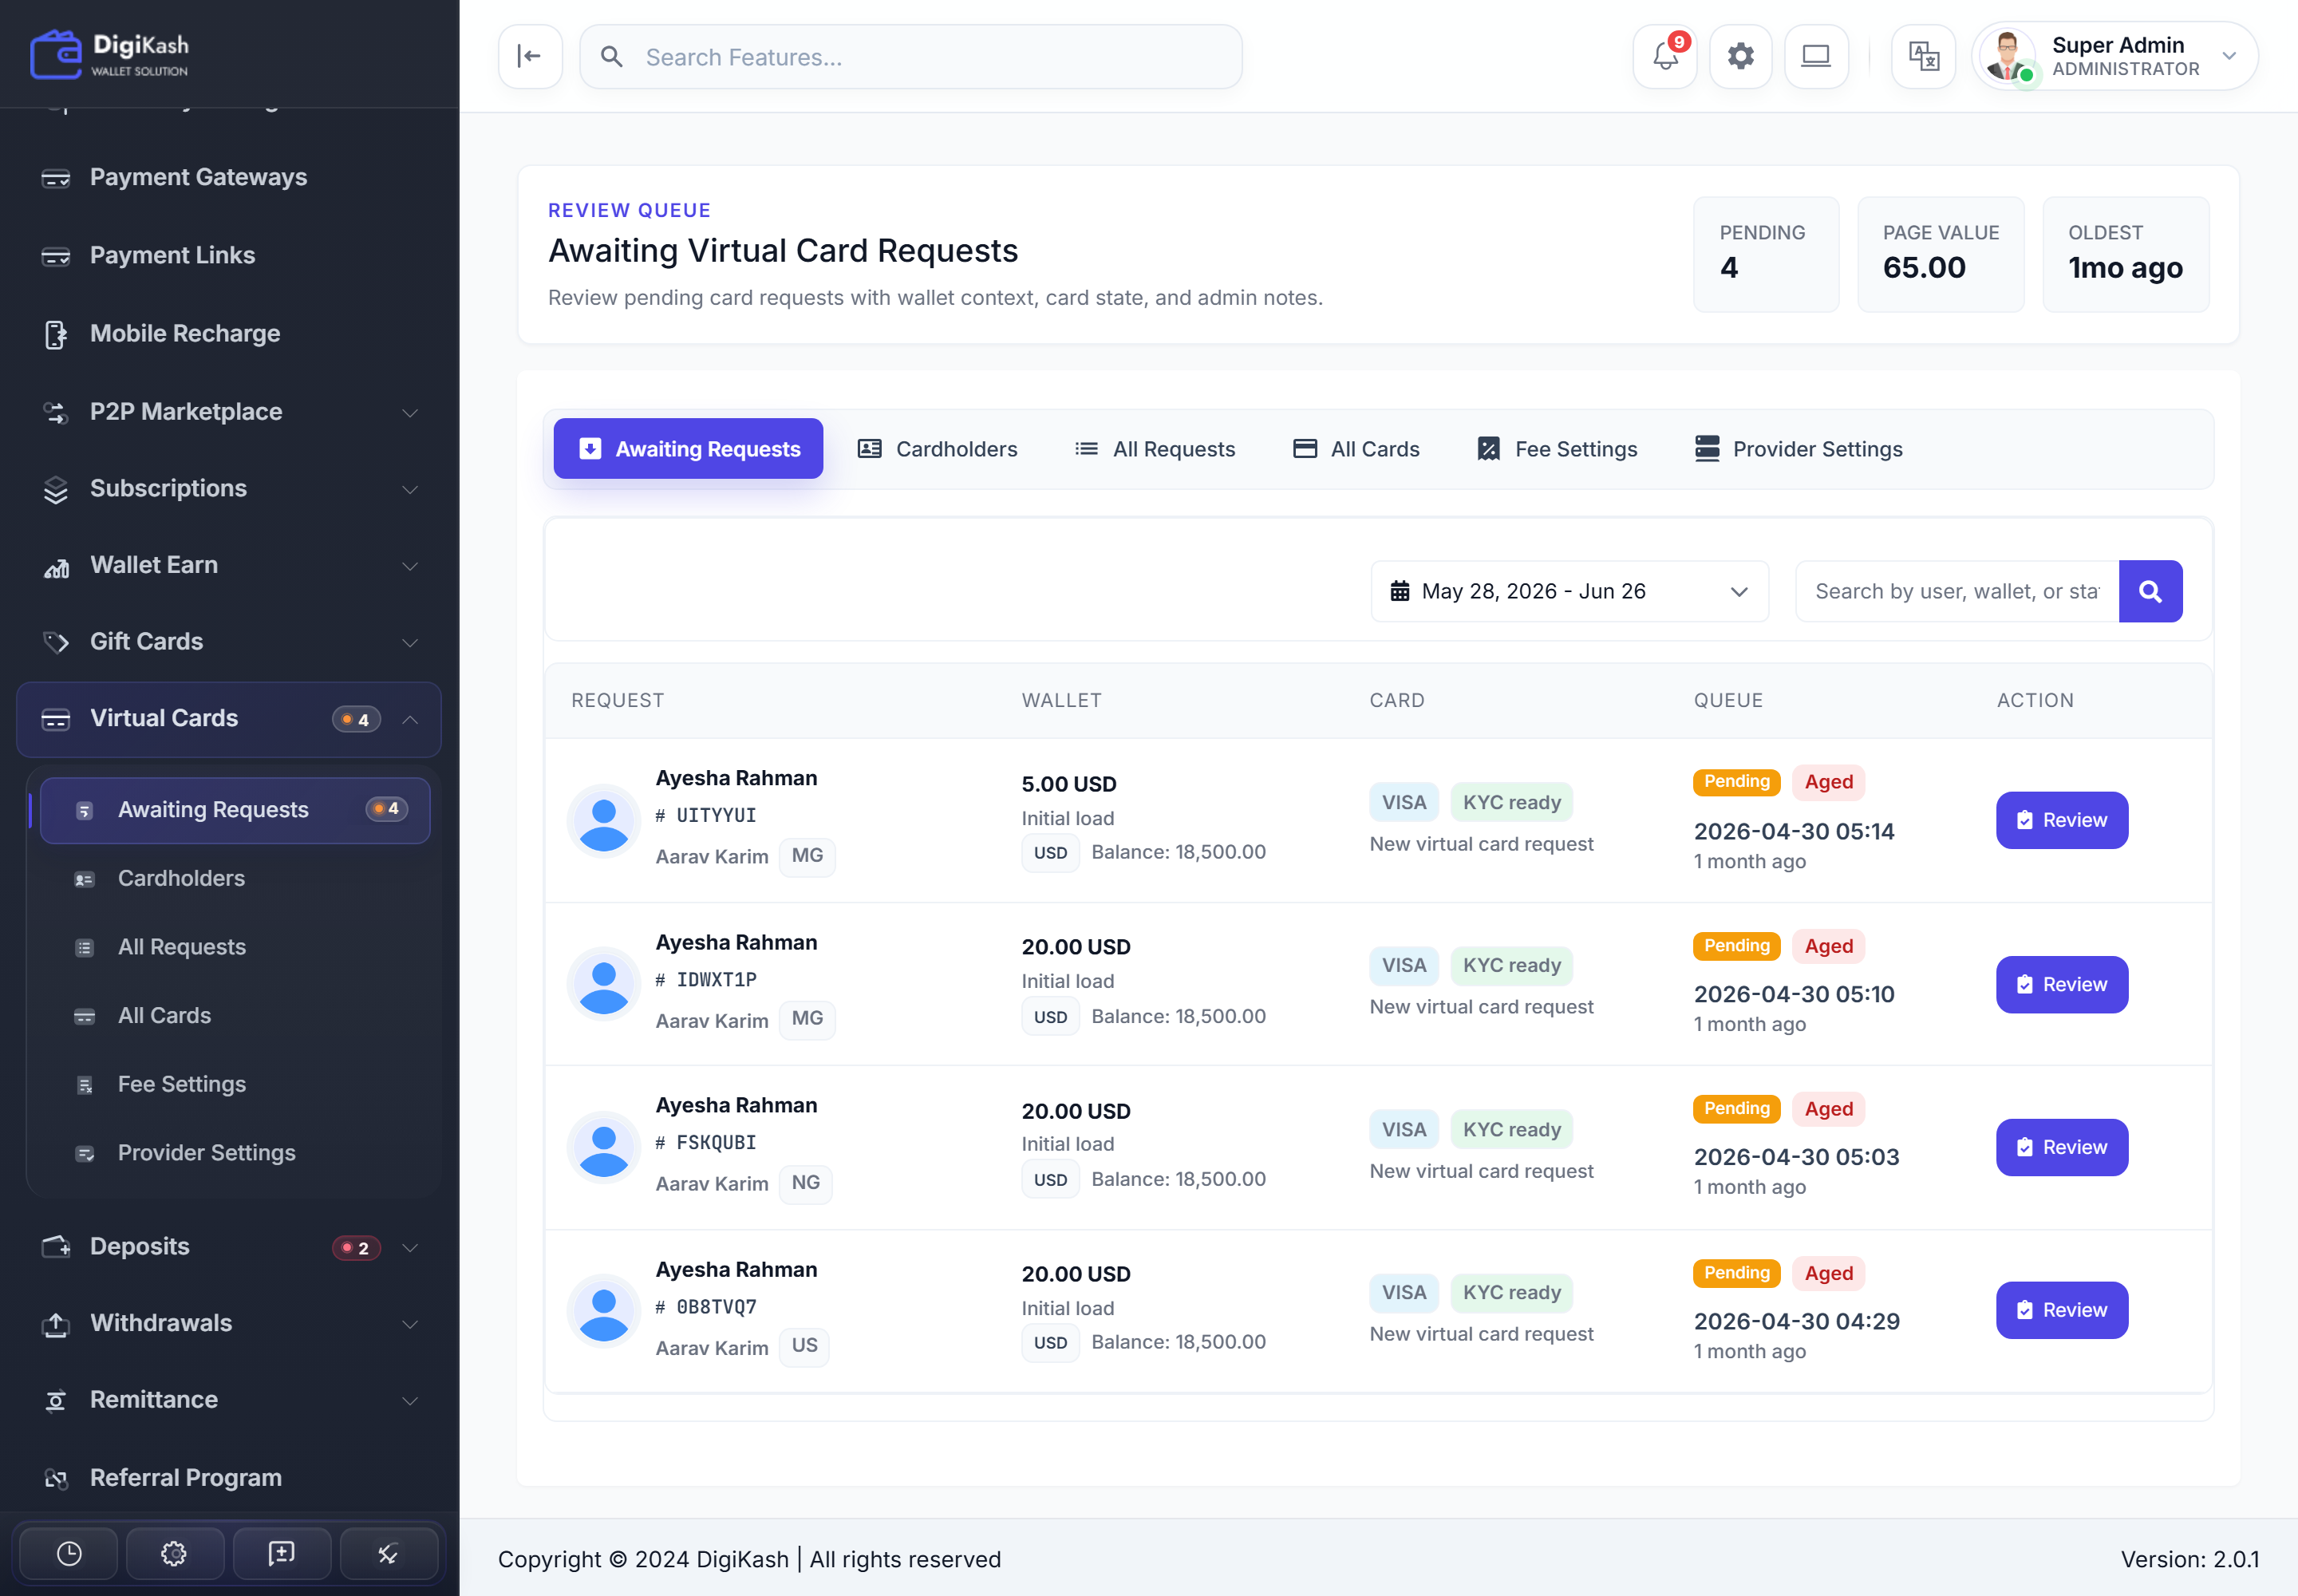
Every issued card lives in All Cards — your full inventory with the assigned user, provider, wallet, status, and issue date, filterable by card, user, or email.
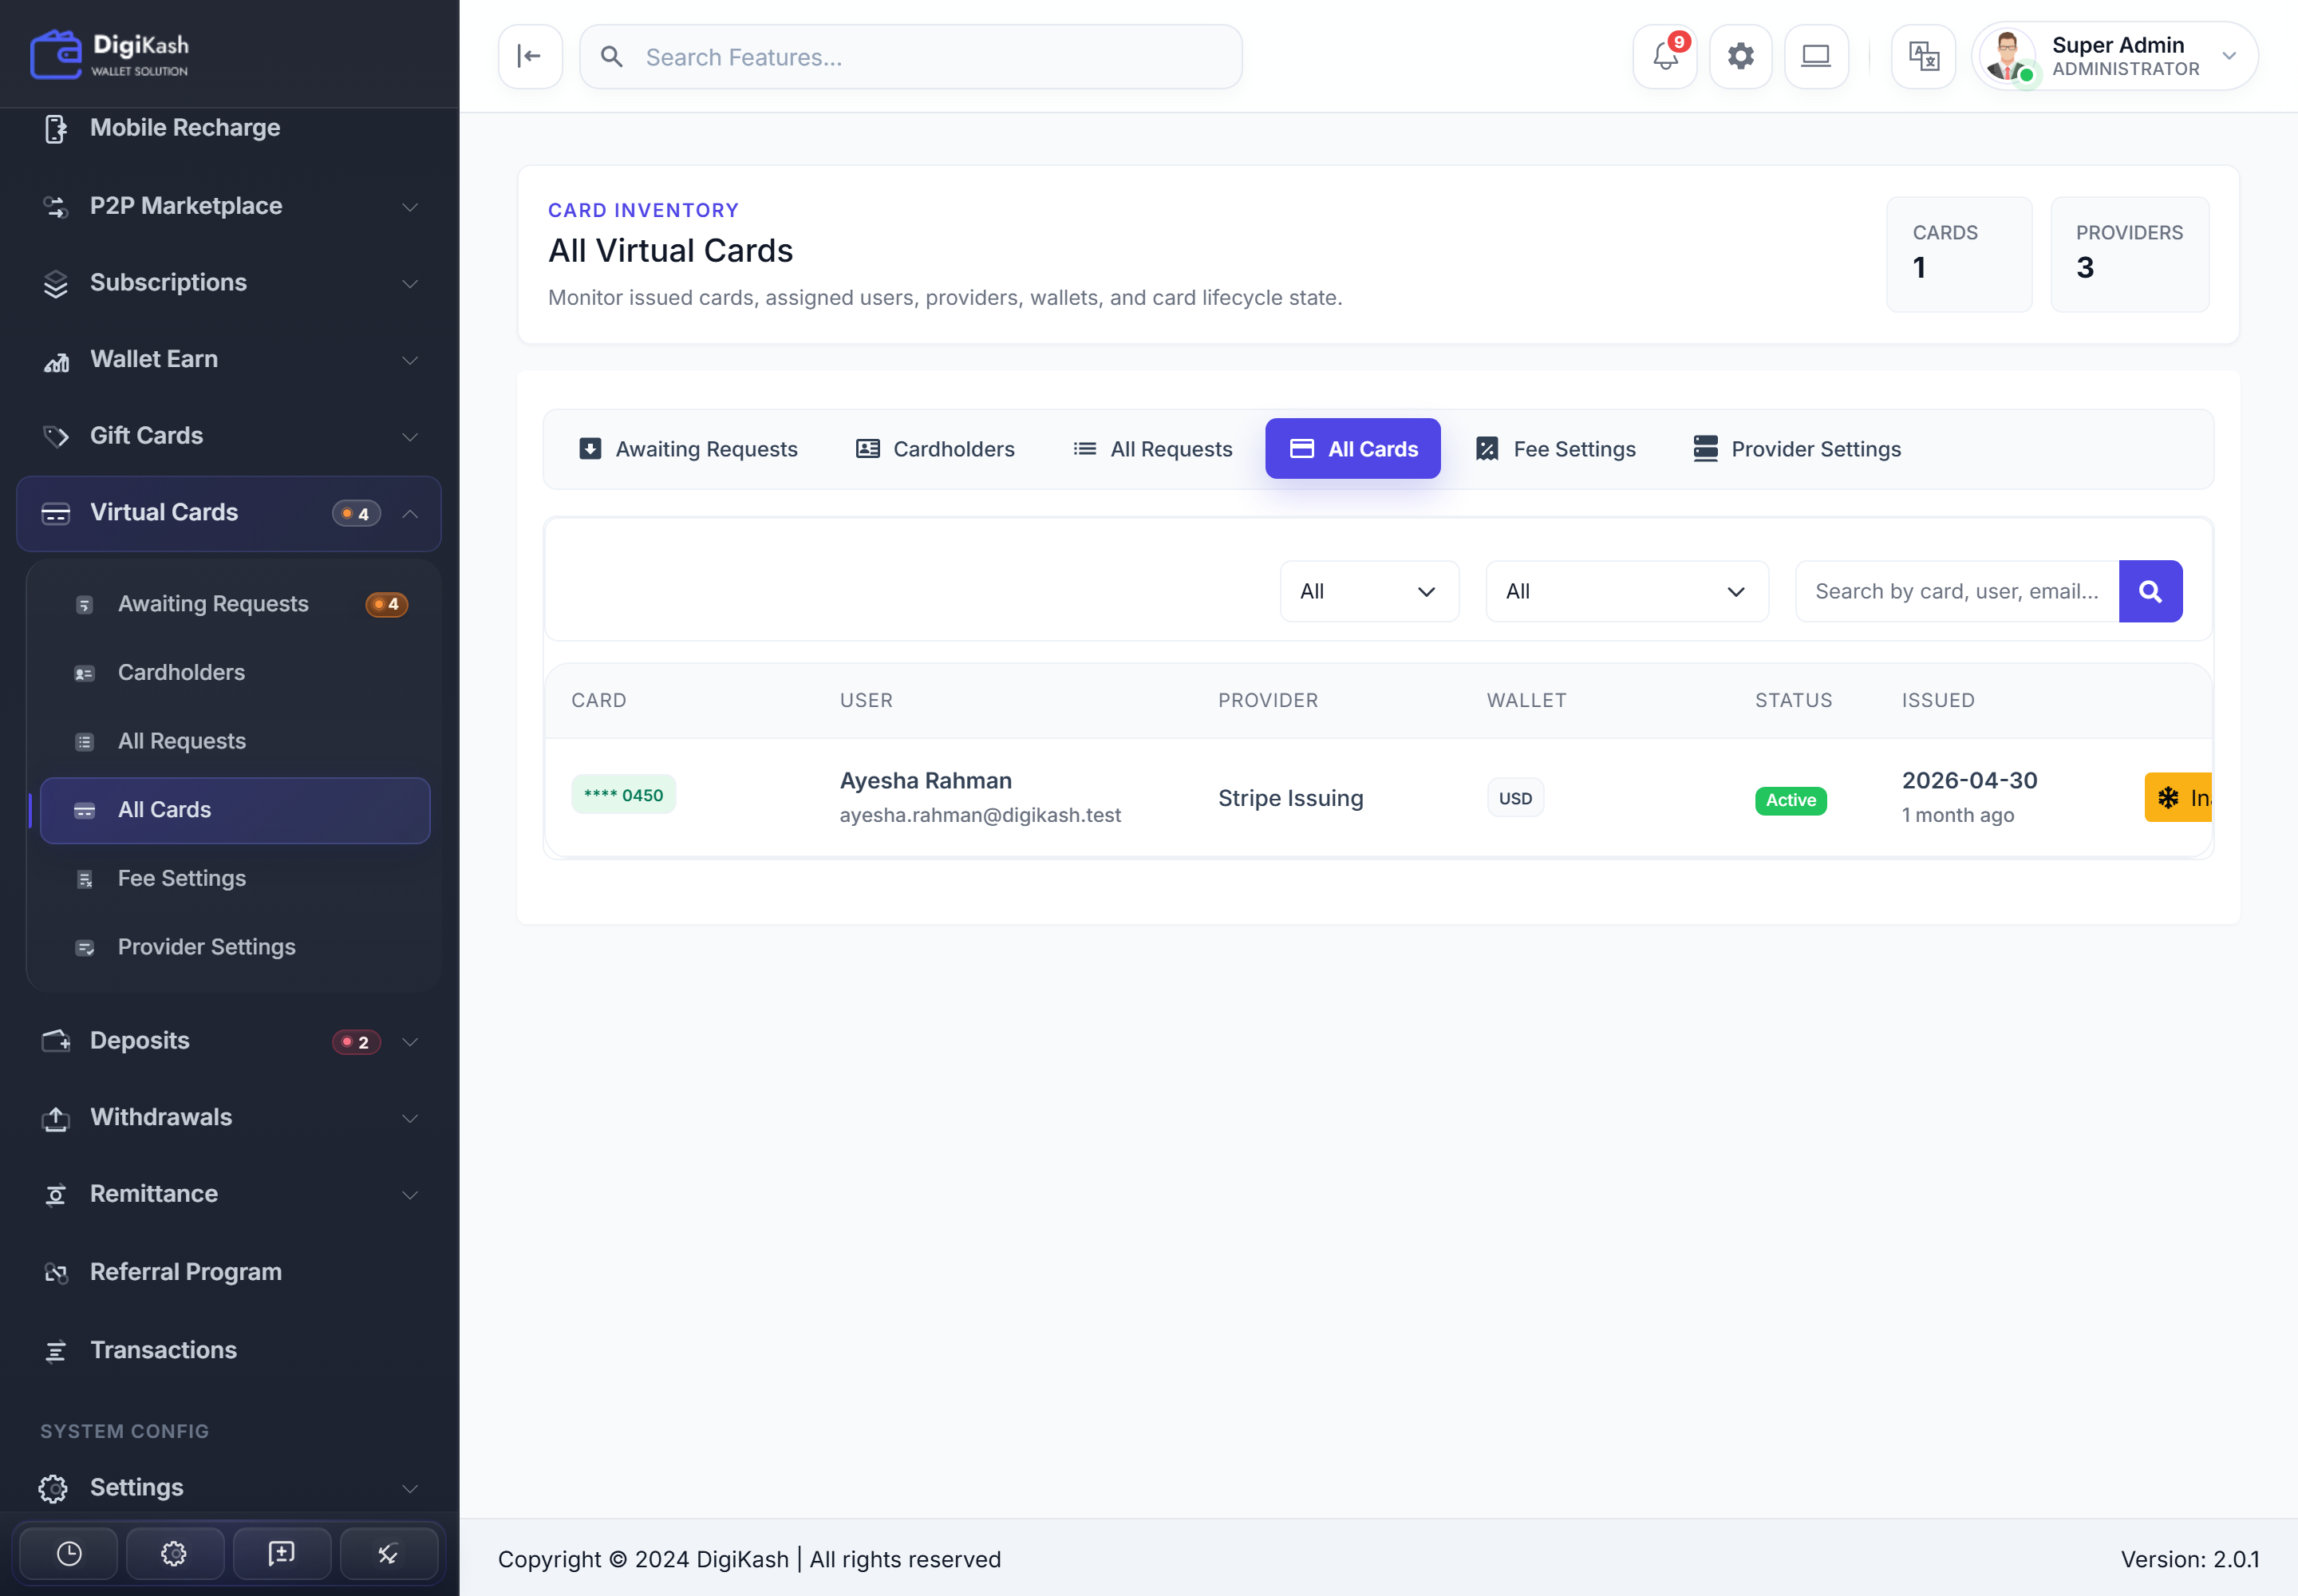
What each tab is for
- Awaiting Requests — the review queue for new issuance applications (approve or reject).
- Cardholders — issued cardholder records, including pending KYC profiles.
- All Requests — the full request history with status filters.
- All Cards — every issued card with provider, status, balance, and last sync.
- Fee Settings — per-provider, per-currency pricing (fixed + percentage, threshold, min/max).
- Provider Settings — credentials, capabilities, and provider-specific overrides.
Test each provider's credentials in sandbox first, require KYC before issuance (requests show a KYC ready flag), set fee rules for every currency you accept, and keep an eye on the Awaiting Requests queue so applications don't sit unreviewed.
Wallet Earn (Staking) New in 2.0
Create earning plans, let users stake their wallet balance into them, and let the platform pay rewards and return principal automatically. You stay in control of approvals and can intervene on any individual stake.
1. Build an Earning Plan
A plan is the template users stake into. Every field below is configurable per plan:
| Field | What it controls |
|---|---|
| Currency | A specific currency, or All Currencies to let users stake any wallet. |
| Minimum / Maximum stake | The amount range a single stake must fall within (maximum is optional). |
| Profit type | Fixed — a flat reward amount per payout; or Percentage — a % of the staked principal per payout. |
| Profit rate | The value used by the profit type (the flat amount, or the percentage). |
| Duration | The lock term — a value plus a unit of hours, days, or months. |
| Payout frequency | Daily, Weekly, Monthly, or End of Term (a single payout at maturity). |
| Return principal | Whether the original stake is credited back to the user at maturity. |
| Auto-approve | On — stakes activate instantly. Off — stakes stay Pending for your review. |
| Presentation | Description, icon, badge text, featured flag, and active/inactive status. |
Reward per payout = Fixed: the flat rate, or Percentage: principal × rate ÷ 100. The number of payouts is derived from the duration and payout frequency, and the user's expected profit = reward per payout × number of payouts. With End of Term, the whole profit is paid once at maturity.
2. Automatic Payouts
- The
wallet-earn:processcommand runs every minute via the scheduler — it credits any due payouts and returns matured principal. Keep the scheduler cron entry active. - Each due payout credits the user's wallet, writes a reward transaction, and advances the next payout date until the term completes.
- Payouts are idempotent — each numbered payout is paid exactly once, even if the command overlaps or retries.
- When the final payout is made (or maturity is reached) the stake is marked Completed, and the principal is returned if the plan allows it.
3. Manage Stakes
The Stakes screen lists every user stake with its principal, paid vs. expected profit, payouts made / total, next payout, and maturity date. Per stake you can:
- Approve a pending stake — activates it and sets the payout schedule.
- Reject a pending stake — returns the full principal to the user's wallet.
- Cancel an active stake — stops future payouts and returns the principal.
- Complete an active stake — settles any due payouts immediately and closes it (returning principal if configured).
Each action writes a wallet transaction — a debit when the stake is created, a credit for every reward payout, and a credit when principal is returned. The Earn Dashboard rolls these up into total staked balance per currency, the upcoming payout pipeline, and rewards paid to date. Users are notified at each step (stake created, approved, rejected, canceled, each reward paid, and completion) via notification templates.
Wallet Earn requires KYC by default — adjust this, or turn the whole module on/off per panel, under Feature Controls. The principal is locked from the user's wallet the moment they stake, so balances always reconcile.
Subscriptions New in 2.0
Tier-based subscription plans with features, pricing cycles, and per-user lifecycle tracking.
- Plans — define tiers, features, and per-cycle prices (monthly, quarterly, yearly).
- Plan Features — bind plans to platform features with quantity/limit overrides.
- User Plans — view active and historical subscriptions, with manual override controls.
- Transactions — every subscription payment with status, plan, and renewal info.
- Users can subscribe, cancel, change tier, and view receipts from their dashboard.
Referral Program & User Rankings
Growth tooling for retention and acquisition.
Referral Program
- Unique referral codes and shareable links per user.
- Configurable reward per signup, KYC completion, first deposit, or specific event.
- Per-currency reward caps and minimum referrer requirements.
- Referral tree view in the user dashboard.
User Rankings
- Define ranks (e.g. Bronze, Silver, Gold, Platinum) with progression criteria.
- Per-rank wallet limits, referral level depth, and reward multipliers.
- Automatic rank promotion based on user activity.
Vouchers
- Single-use or multi-use redeemable vouchers for wallet balance.
- Per-voucher currency, amount, expiry, and redemption limit.
- Redeemable from the user wallet or at merchant checkout.
Notifications & Support
Reach users quickly and run a structured support backlog.
Notifications
- Send Notification — push custom notifications to all users or filtered audiences.
- Notification Logs — searchable record of every notification with channel and status.
- Templates — per-event templates with three configurable channels: Email, SMS, and Push.
- Each channel has an independent on/off toggle per template — enable email but disable SMS for low-impact events.
- An in-app inbox also receives every notification via Laravel's database notification table — independent of the channel switches above.
Email Subscribers
- Newsletter signup form on the public site captures subscribers.
- Export to CSV or send bulk announcements directly.
Support Tickets
- Status tabs: New, In Progress, Closed, History.
- Per-ticket reply thread with attachments.
- Configurable Ticket Categories with auto-routing.
- Internal notes visible only to staff.
Site Builder & CMS
Control public-facing content without touching code.
Pages & Components
- Landing Page — upload a custom HTML/CSS landing page, or use the built-in builder.
- All Pages — manage every static page with rich content.
- Page Components — reusable building blocks (heroes, feature lists, CTAs, FAQs).
- Site Navigation — header menu structure with multi-level dropdowns.
- Footer Sections — manage footer columns and links.
- Style Manager — inject custom CSS for fine-tuning the public theme.
SEO & Social
- SEO Settings — per-page title, meta description, Open Graph, and Twitter cards.
- Social Links — manage the social network footer/header icons.
Blog
- Blog Posts — title, slug, cover image, rich body, SEO fields.
- Blog Categories — taxonomy for filtering posts.
System Configuration
Platform-wide settings, integrations, languages, and background jobs.
Site Settings
- Brand, logo, favicon, login banner, currency display, time zone.
- Mail (SMTP), Security, Maintenance Mode, Cookie Consent, Captcha.
- Visitor landing behavior — redirect to login page or default landing.
- Admin URL prefix override for security through obscurity.
Integration Center
- Enable / disable plugin integrations (WooCommerce, Google Analytics, etc.).
- Each plugin exposes its own credential form.
Languages
- Manage installed languages, add new locales, edit translation strings inline.
- Set the default language and toggle the language switcher visibility.
Background Jobs
- Live view of running, failed, and recent jobs.
- Re-run failed jobs from the UI.
- Pair with a real queue worker process (
queue:work) for reliable delivery.
Feature Controls New in 2.0
Toggle every revenue feature per panel (user / merchant / agent), set KYC and phone gates, and control country allow-lists. Drives the entire UI from a single screen.
| Category | Features |
|---|---|
| Money Movement | Deposit, Withdraw, Send, Request, Exchange, Wallet Earn, Mobile Recharge, Bank Transfer Payouts |
| Business & Merchant | Payment Links, Merchant Payment, Agent Program, Subscription System |
| P2P Marketplace | P2P Marketplace |
| Virtual Cards | Virtual Cards |
| Engagement & Growth | Referral Program, User Ranks, Vouchers |
Features marked Core (like Deposit and Withdraw) can be toggled, but the UI warns first — disabling them typically breaks business flows that depend on them.
Staff & Roles
Use least-privilege access for everything except the super-admin.
- Team Members — create staff accounts with assigned roles.
- Roles & Permissions — define granular permissions per role (powered by Spatie Permission).
- Every admin menu item declares the permission it requires; menu links are hidden when missing.
- Disable a staff account immediately if a member leaves the team.
Production Setup
A production-grade DigiKash install needs a queue worker, a cron entry, HTTPS, and SMTP for mail.
Cron — Laravel Scheduler
Run the scheduler every minute. It dispatches background tasks for rewards, withdraw schedules, recurring jobs, and cleanup.
* * * * * php /path/to/digikash/artisan schedule:run >> /dev/null 2>&1
Open Admin → Background Tasks → Scheduler for a built-in Scheduler & Queue Guide. It auto-detects your PHP binary and project path, hands you a copy-paste cron entry, includes a one-click cron-expression builder, and lists the exact queue-worker commands for your server.
/admin/background-tasks/scheduler · Scheduler & Queue Guide
What runs on the schedule
Once the cron entry above is live, DigiKash runs these jobs for you automatically — there's nothing else to wire up. Times follow the application timezone set in Site Settings.
| Command | Runs | What it does |
|---|---|---|
p2p:orders:expire | Every minute | Expire pending P2P orders past their deadline and refund the escrow. |
p2p:promotions:expire | Every minute | Expire active P2P offer promotions that passed their end time. |
wallet-earn:process | Every minute | Pay out due Wallet Earn rewards and matured principal returns. |
subscription:process --renewals | Hourly | Charge due subscription renewals and apply plan changes. |
license:heartbeat | Twice daily (03:00 & 15:00) | Re-verify your project license with the update server. |
| Temp media cleanup | Daily at 02:00 | Delete yesterday's temporary Summernote upload folder. |
Queue Worker — Supervisor
Keep a queue worker alive. Supervisor is the recommended way to auto-restart it.
[program:digikash-worker]
process_name=%(program_name)s_%(process_num)02d
command=php /path/to/digikash/artisan queue:work --tries=3 --timeout=90
autostart=true
autorestart=true
user=www-data
numprocs=2
redirect_stderr=true
stdout_logfile=/path/to/digikash/storage/logs/worker.log
On shared hosting without Supervisor, run the worker from cron instead — it drains the queue and exits, and the next minute's run picks up where it left off. flock stops two workers overlapping:
* * * * * flock -n /tmp/dk-queue.lock php /path/to/digikash/artisan queue:work --stop-when-empty --max-time=55 --tries=3 >> /dev/null 2>&1
Queue workers hold code in memory, so after deploying or updating DigiKash run php artisan queue:restart so they pick up the new code on their next cycle.
Storage Symlink
php artisan storage:link
HTTPS
- Install a valid SSL certificate (Let's Encrypt is free and well-supported).
- Force HTTPS in your web server config.
- Set
APP_URLto the HTTPS variant in.env.
Mail (SMTP)
- Configure SMTP under Settings → Site Settings → Mail.
- Send a test mail before enabling notification channels.
- Use a reputable transactional mail provider (Postmark, SES, Mailgun, Resend) in production.
Progressive Web App
DigiKash can be installed as a Progressive Web App on mobile and desktop, giving users a native-feeling shortcut to the wallet.
- Manifest and service worker are served by the
PwaController. - Users can install the app to the home screen on mobile and desktop browsers that support PWA.
- Customize the install banner, theme color, and icons from Settings → Site Settings → PWA.
Security & Maintenance
Keep production stable with least-privilege access, 2FA, backups, cache tools, activity logs, and the Project Updater.
Take a backup, confirm queue workers are running, test one small transaction, then monitor logs and callbacks.
- Enable 2FA for admins and staff with sensitive permissions.
- Review Activity Logs when investigating login, device, or suspicious access issues.
- Use the IP Block list to ban abusive addresses.
- Run Optimize App and Clear Cache after updates or environment changes.
- Download a recovery backup before installing updates from the Project Updater.
- Rotate API keys (Stripe, Twilio, virtual-card providers) on a regular schedule.
Safe Recovery Commands
php artisan optimize:clearphp artisan storage:linkphp artisan migrate --forceProject Updater
Install signed releases over the air with checksum verification, recovery backups, and migration automation.
- Lives at Admin → Settings → Project Updater.
- Packages must be signed; verification uses the public key in
config/project_updater.php. - Update server URL defaults to
https://updates.coevs.com— override withPROJECT_UPDATER_SERVER_URL. - Storage paths are configurable:
PROJECT_UPDATER_PACKAGES_PATH,PROJECT_UPDATER_EXTRACT_PATH,PROJECT_UPDATER_BACKUPS_PATH. - Protected paths the updater never touches:
.env,storage/,vendor/,node_modules/,.git/. - Disable in-app installs entirely by setting
PROJECT_UPDATER_INSTALL_ENABLED=false.
Troubleshooting
Use these checks when installation, assets, the database import, or updates do not behave as expected.
Installer redirects every page
The app is not installed yet. Complete /install. The wizard then writes storage/app/installed and routes unlock.
Database test fails
Confirm host, port, username, password, and privileges. On cPanel, assign the DB user to the DB with all required privileges.
SQL import stops
The MySQL / MariaDB installer protects existing data. Use a new empty database before importing DB/digikash.sql.
Images do not load
Run php artisan storage:link. If a broken public/storage folder exists, remove it first via file manager or SSH.
Blank page after upload
Run php artisan optimize:clear and confirm the domain points to public/, not the project root.
Updater cannot install
Enable the PHP zip extension, make storage/app writable, set PROJECT_UPDATER_SERVER_URL, and activate the license.
Notifications not sending
Confirm SMTP credentials, then make sure a queue worker is running — mail goes through the queue by default.
Webhooks not firing
Use HTTPS, confirm the callback URL in the provider dashboard, and check storage/logs/laravel.log for inbound errors.
Support
Need help? Reach out — we read every message.
Share your PHP version, Laravel version, database engine, and the latest entries from storage/logs/laravel.log. It speeds up triage massively.